PROBLEM
The raster pixel depth is changed when running the Split Raster tool
Description
When using the Split Raster tool and selecting the Polygon Features split method to split a raster dataset in a feature class, the pixel depth and NoData value in the output raster are changed. For example, when inputting an 8 bit raster data in the Split Raster tool and using a polygon feature class containing grids to split the raster, the output raster has a pixel depth of 16 bit and the NoData value is changed to 256, 256, 256.
The image below shows the raster dataset properties before running the Split Raster tool.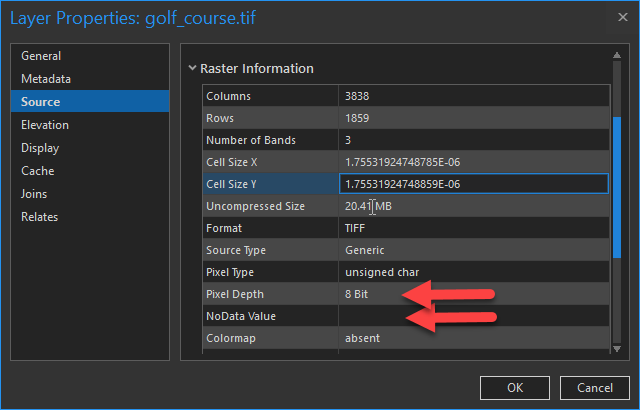
The image below shows the output raster properties after running the Split Raster tool. The Pixel Depth is increased to 16 bit and the NoData Value is changed to 256, 256, 256.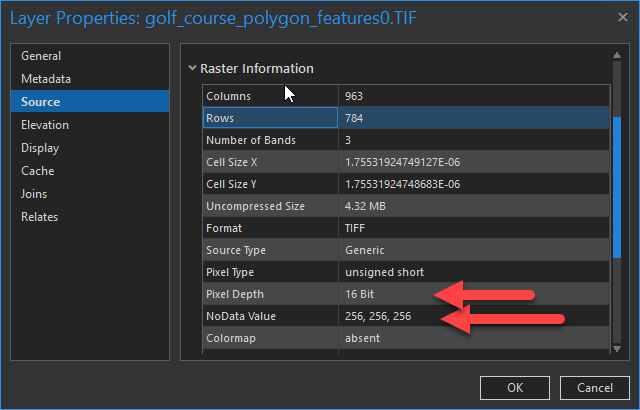
Cause
This is a known issue. It occurs if the outline of the clip polygon feature intersects a single raster cell. For more information, refer to BUG-000116630.
The image below shows a grid feature (outlined in orange) overlapping a raster. The yellow square in the middle is the raster cell intersected by the grid polygon.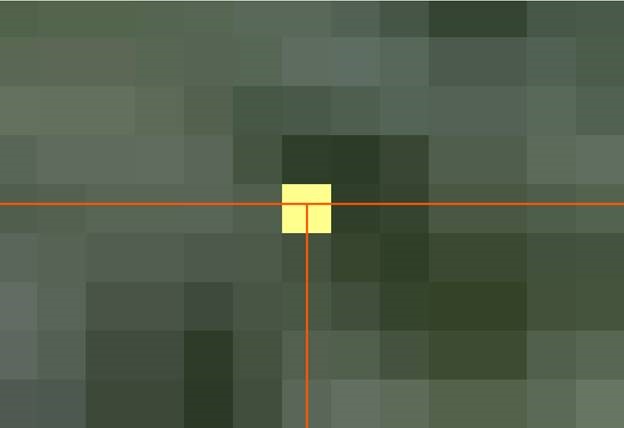
Solution or Workaround
To solve this issue, use one of the following workarounds in ArcMap or ArcGIS Pro:
Limit the NoData value in the Split Raster tool
When running the Split Raster tool, set the NoData Value parameter to a value within the pixel depth capacity range for the raster dataset. For example, to maintain an 8 bit raster, set the value from between 0 to 255. For more information on the range of values of different pixel depths, refer to Bit depth capacity for raster dataset cells.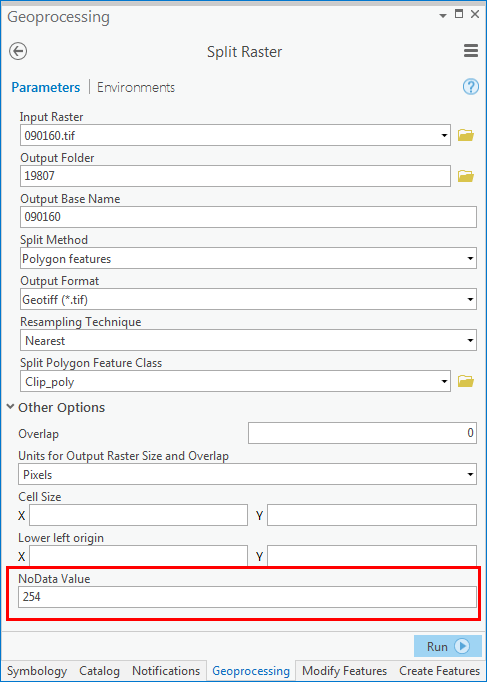
The output raster dataset maintains the original pixel depth, but the NoData value is populated to the value set when running the Split Raster tool. To edit or remove the NoData value, refer to Editing a raster dataset's NoData value.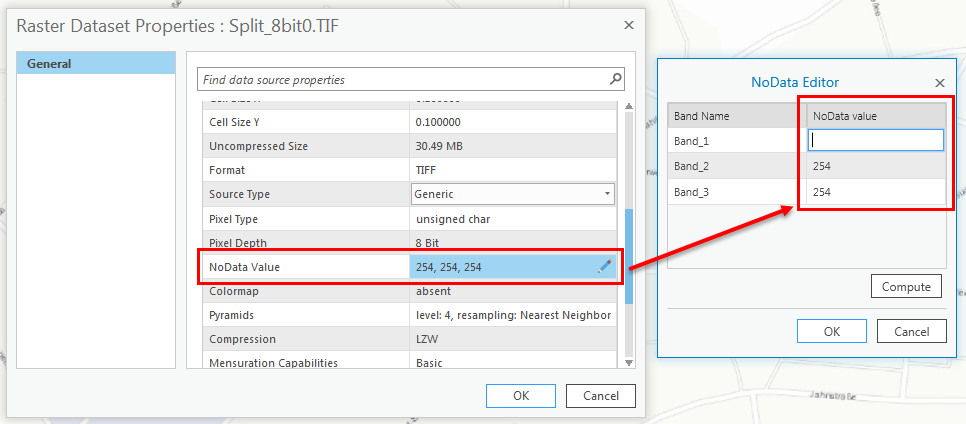
Use the Clip tool to clip the raster to each polygon
- Split the polygon feature class to individual grid pieces or polygons. Use one of the following options to split the grid or polygons:
- Select a grid or polygon to export to a new feature class. Right-click the layer in Table Of Contents (ArcMap) or Contents (ArcGIS Pro), and click Data > Export Features. Do this for each grid or polygon.
- Use the Split by Attributes tool to split multiple features by a specific field. For example, split the features by a field named 'Zones', which provides the zone name of individual grid areas.
- Use the Explode tool to separate multipart features into single-part features while maintaining the attribute values. Refer to Separating a multipart feature (Explode) for steps to do this in ArcMap, and Explode a multipart feature for steps to do this in ArcGIS Pro.
- Use the Clip (Data Management) tool to clip the raster using the output polygons in step 1. Repeat this step to clip the raster to each polygon.
- In ArcToolbox or ArcGIS Pro Toolboxes, navigate to Data Management Tools > Raster > Raster Processing > Clip.
- In the Clip dialog box, select the Input Raster.
- In the Output Extent, select the split polygon feature class.
- Check the check box for the Use Input Features for Clipping Geometry option.
- Set a name and location for the Output Raster Dataset.
- Delete the auto-populated value in the NoData Value parameter, and click OK or Run.
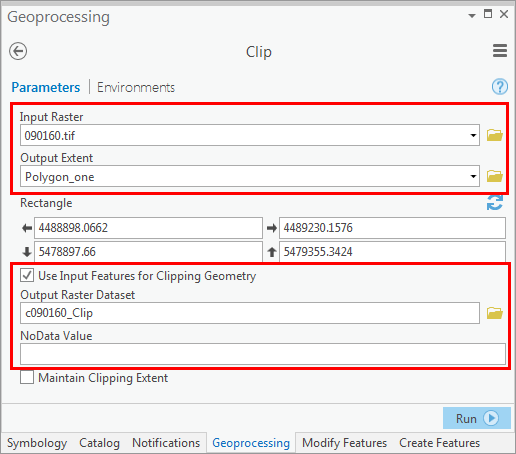
The clipped raster dataset is displayed in the map. The output raster maintains the original raster pixel depth and NoData value.
Article ID: 000019807
- ArcMap
- ArcGIS Pro
Get support with AI
Resolve your issue quickly with the Esri Support AI Chatbot.


Related Information
Discover more on this topic
Search for related information
Find training related to this topic
Explore ideas and give feedback
Get help from ArcGIS experts
Start chatting now