PROBLEM
Excel table colors in the layout view are lost when exported to PDF
Description
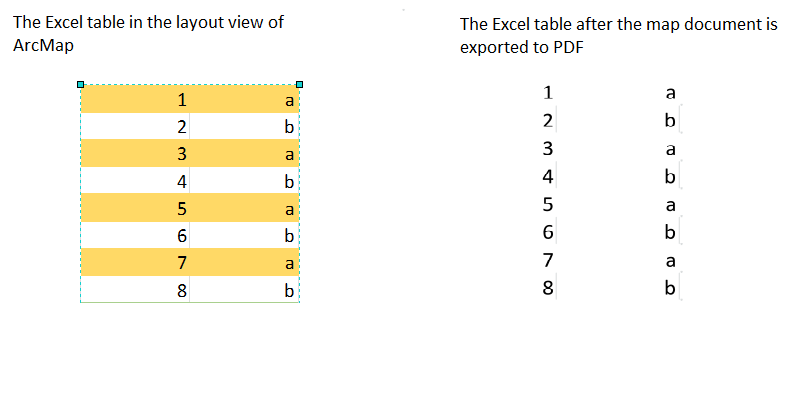
Occasionally after copying and pasting an Excel table to the layout view of ArcMap, the colors of the table are not reflected when the map document is exported to PDF. For example, the image on the left shows an Excel table with color when viewed in the layout view of ArcMap, and the image on the right shows the same Excel table without color when viewed after the map document is exported to PDF.
Cause
This is a known limitation as ArcMap uses the Microsoft Graphics Device Interface (GDI) for drawing to screen, to printer, and to map exports. When exporting to a graphical interchange format, such as PDF or JPEG, ArcMap uses information from Windows' default printer; therefore the default printer affects the accuracy and appearance of the exports.
This issue also occurs when exporting map documents with the Map Page Size of A1 or A0. Refer to ArcMap: About map printing for more information on Map Page Size.
Solution or Workaround
To resolve this issue, use one of the following methods:
Use ArcGIS Pro if available
This issue is resolved in ArcGIS Pro as it does not rely on the Microsoft GDI, but uses a high-performance drawing engine to achieve better performance and drawing quality. Esri recommends using ArcGIS Pro for printing and exporting, since ArcGIS Pro does not experience the issues caused by the limitations of the ArcMap display engine. Refer to ArcGIS Pro: Export to PDF for more information.
Insert the Excel table in the map document
Warning:
This method may not work depending on the version of ArcMap and Excel. Use this solution for ArcMap 10.6 and the Excel table is created in Excel 2016. If not, use one of the other solutions provided.
Insert the Excel table as an object into the map document instead of copying and pasting the Excel table
- Open the map document in ArcMap.
- Navigate to Insert > Object.
- In the Insert Object dialog, check Create from File.
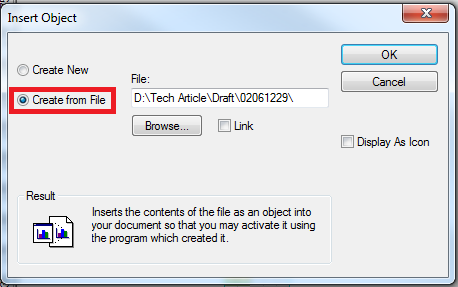
- Click the Browse button and select the Excel file with the table. Click OK in the Insert Object dialog.
Note:
Alternatively, save the Excel table as an image file (.png or .jpg) and select the image in the Insert Object dialog.
- Export the map document to PDF.
Use a different Map Page Size
Before exporting the map document to PDF, change the Map Page Size of the map document.
- Open the map document in ArcMap.
- Navigate to File > Page and Print Setup.
- In the Page and Print Setup dialog, select an option under Standard Sizes other than A1 or A0.
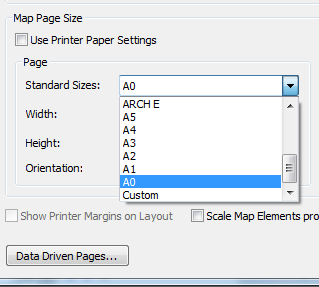
- Export the map document to PDF.
Print the layout as a PDF
Instead of exporting the layout to PDF, print the layout with a PDF printer.
- Open the map document in ArcMap.
- Navigate to Insert > Object.
- In the Insert Object dialog, check Create from File.
- Click the Browse button and select the Excel file with the table. Click OK in the Insert Object dialog.
- Navigate to File > Page and Print Setup. Set the printer to Microsoft Print to PDF. Refer to How To: Set up ArcMap page and printer settings for more information. Click OK.
Note:
Alternatively, select other PDF printers such as PDFCreator, or CutePDF.
- Print the layout. Refer to ArcMap: Printing a layout to do this.
Article ID: 000017701
- ArcMap 10 6
- ArcMap 10 x
- ArcMap 10 7
- ArcMap 10 8
Get support with AI
Resolve your issue quickly with the Esri Support AI Chatbot.


Related Information
Discover more on this topic
Search for related information
Find training related to this topic
Explore ideas and give feedback
Get help from ArcGIS experts
Start chatting now