HOW TO
Use 3D shapes as marker symbols in an ArcGIS Pro scene view
Summary
3D symbols are categorized under the marker symbol layers known as 3D model marker symbol layers. 3D model marker symbol layers are mainly used to emphasize symbols, especially point symbols on a map. They can be used to identify locations, routes or transportation utilized in an area symbolized in 3D form. The model for these markers can be derived from either built-in 3D symbols, or importing custom 3D symbols in ArcGIS Pro.
Procedure
The instructions provided describe two methods to use 3D shapes as marker symbols in an ArcGIS Pro scene view, either using built-in symbols, or importing custom symbols.
Note:
Some layers are displayed as 2D layers in a scene by default. To apply 3D symbology to a layer, ensure the desired point file is moved to the 3D Layers group in the Contents pane. Refer to ArcGIS Pro: Make a 3D scene and  look under Add 3D symbology to 2D layers for more information.
Using built-in 3D symbols
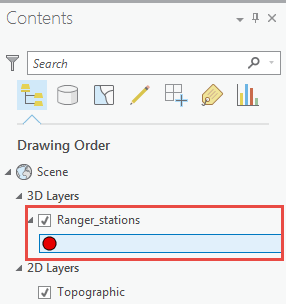
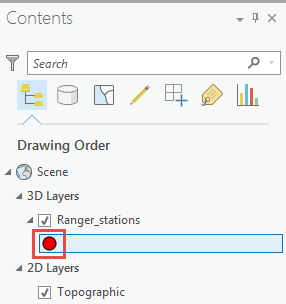
- Click the symbol of the desired point layer in the Contents pane to open the Symbology pane.
Note:
It is also possible to right-click the point layer in Contents > Symbology to open the Symbology pane.
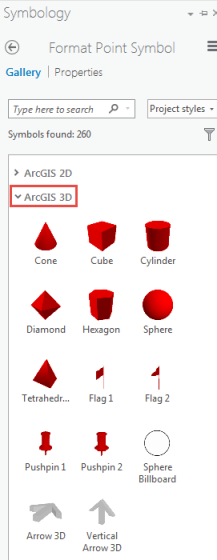
- Click the ArcGIS 3D drop-down arrow to view the common 3D symbols.
Note:
Most of the built-in 3D symbols are turned off by default upon first opening of ArcGIS Pro.
- To add more built-in 3D symbols, follow the steps below:
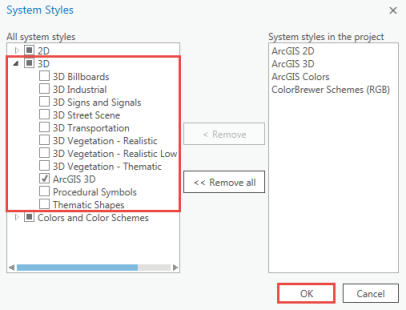
- Click the Insert tab and click Add Style > Add System Styles.

- Click the 3D drop-down arrow and check the desired 3D symbol boxes in the System Styles dialog box. Click OK.
- Select the desired 3D symbol to add in ArcGIS Pro.
Importing custom 3D symbols
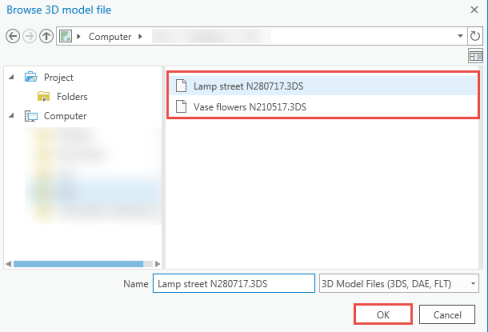
Note:
ArcGIS Pro only supports COLLADA (.dae), 3ds Max (.3ds), OpenFlight (.flt), and Wavefront (.obj) models for custom 3D symbols. Users can download these files from websites or create the files in other software.
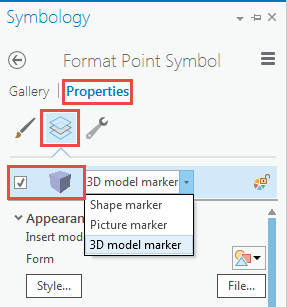
- Click the symbol of the desired point layer to open the Symbology pane.
- Click Properties and the Layers icon
Note:
Ensure the box that lies under the Layers icon is checked to enable viewing of the 3D symbol at the bottom of the Symbology pane.
Other settings can be changed as well. Refer to ArcGIS Pro: Modify symbol layers for more information.
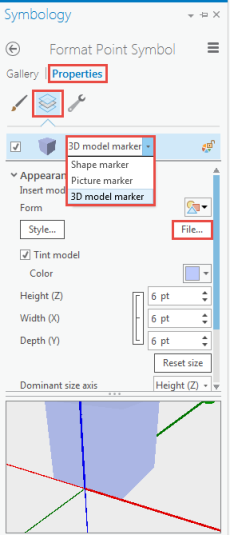
- Click the drop-down arrow below the Layers icon to change the marker type. Select 3D model marker.
- In the Appearance section, click the File button.
- In the Browse 3D model file dialog box, select the desired custom symbol file, and click OK.
Article ID: 000016699
- ArcGIS Pro
Get support with AI
Resolve your issue quickly with the Esri Support AI Chatbot.


Related Information
Discover more on this topic
Search for related information
Find training related to this topic
Explore ideas and give feedback
Get help from ArcGIS experts
Start chatting now