HOW TO
Alter text elements in multiple MXDs simultaneously using a Python script
Summary
When working with map documents (MXDs), text elements may need to be replaced or updated due to data changes or making revisions. The text.Split() function in Python can be used to replace text elements in multiple MXDs simultaneously to save time, instead of having to update the text in each MXD separately.
Procedure
Using a Python script tool in ArcMap, create two text lists to store the old and new text elements in the MXDs, and change any text element that matches the first list to the corresponding text in the second list. To do so, follow the steps provided below.
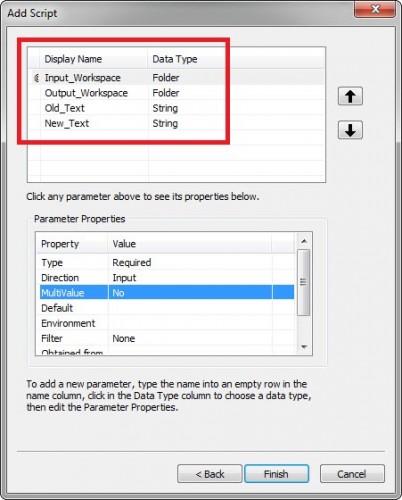
- Create a custom tool using the steps outlined in the following document, Adding a script tool. Save the Python code below in a text editor, and add the file as the tool's script file.
import arcpy
from arcpy import env
import os
arcpy.env.overwriteOutput = True

#set path to the relevant folder
arcpy.env.workspace = Input_Workspace = arcpy.GetParameterAsText(0)
Output_Workspace = arcpy.GetParameterAsText(1)
Old_Text = arcpy.GetParameterAsText(2)
oldList = Old_Text.split(', ') #set the comma as separator for multiple inputs
New_Text = arcpy.GetParameterAsText(3)
newList = New_Text.split(', ')

#list the mxds of the workspace folder
for mxdname in arcpy.ListFiles("*.mxd"):
    arcpy.AddMessage(mxdname)
#set the variable
    mxd = arcpy.mapping.MapDocument(Input_Workspace + "\\" + mxdname)
#replace elements that occur in the map document
    for elm in arcpy.mapping.ListLayoutElements(mxd, "TEXT_ELEMENT"):
        counter = 0
        for text in oldList:
            if text in elm.text:
                elm.text = elm.text.replace(text, newList[counter])
                arcpy.AddMessage('{} changed'.format(elm.text))
                counter = counter + 1
            else:
                counter = counter + 1

    mxd.saveACopy(Output_Workspace + "\\" + mxdname)
- In the Catalog window, double-click the name of the custom tool to open the tool.
- When the tool window opens, add the folder (workspace) containing the MXDs, specify the output folder, and type in the text to be replaced and the updated text in the Old_Text and New_Text fields respectively. Delimit each text string with commas (see below).
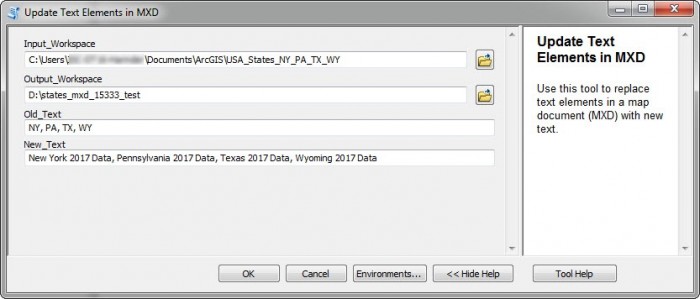
Note:
The script iterates through the MXDs based on their name in alphabetical order. When updating the text elements, start from the first MXD alphabetically so that the changes made are as desired.
Note:
Ensure that the text elements being replaced match exactly as displayed in each MXD when typing the text in the Old_Text field. Otherwise, the script does not recognize the text, and the change is not reflected in the output MXD.
- Click OK to execute the tool. The updated MXDs are created and saved in the specified output folder.
Article ID:000015333
- ArcMap
Get help from ArcGIS experts
Download the Esri Support App
Related Information
Discover more on this topic
Search for related information
Find training related to this topic
Explore ideas and give feedback