PROBLEM
Unable to use a shapefile, feature class, or table as an input in the Add Join tool
Description
The Add Join tool matches and joins the records in the Join Table to the records in the input Layer Name based on a common field. When attempting to browse for a shapefile, feature class, or table as an input in the Layer Name parameter, the data does not appear in the browsed folder location. For example, when attempting to create an Add Join geoprocessing model using ModelBuilder and browsing for a shapefile as the Layer Name input, the shapefile does not appear.
In some instances, selecting a table as the Layer Name input results in a complete join, and no error or warning is returned, but none of the fields from the joined table are present when viewing the joined attribute table.
Cause
This is by design. The Add Join tool only accepts a feature layer, table view, or raster layer with a raster attribute table as an input to the Layer Name parameter and does not accept a shapefile, feature class, or table as the input. For more information on the Add Join tool and the supported data types for the Add Join tool input, refer to ArcGIS Desktop: Add Join.
Solution or Workaround
Use one of the following workarounds to create a feature layer from the shapefile or feature class using the Make Feature Layer tool, or create a table view from the table using the Make Table View tool. The output feature layer or table view can be used as an input to the Layer Name parameter in the Add Join tool.Create a feature layer from the shapefile or feature class
Follow the steps below to create a feature layer from the shapefile or feature class using the Make Feature Layer tool:- In ArcToolbox, navigate to Data Management Tools > Layers and Tables Views > Make Feature Layer.
- Select the shapefile or feature class as the Input Features.
- Set a name for the Output Layer.
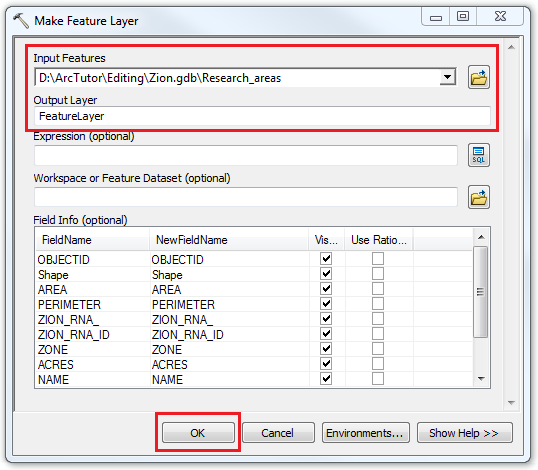
- Click OK. The created feature layer is automatically added to the map and listed in the Table Of Contents. The feature layer can be selected as an input to the Layer Name parameter in the Add Join tool.
Note:
The created feature layer is temporarily stored in memory; it is not saved on disk and only remains available within the current session. The layer is deleted once the session is closed. The feature layer can be saved to disk as a layer file using the Save To Layer File tool or saved as a new feature class using the Copy Features tool.
Create a table view from the table
- In ArcToolbox, navigate to Data Management Tools > Layers and Tables Views > Make Table View.
- Select the table as the Input Table.
- Set a name for the Table Name.
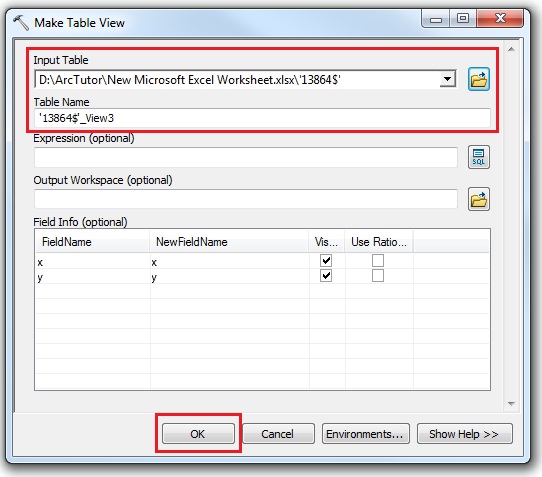
- Click OK. The created table view is automatically added to the Table Of Contents, and can be selected as an input to the Layer Name parameter in the Add Join tool.
Note:
The created table view is temporarily stored in memory; it is not saved on disk and does not persist after the session ends unless the document is saved.
Article ID:000013864
- ArcMap
Get help from ArcGIS experts
Download the Esri Support App
Related Information
Discover more on this topic
Search for related information
Find training related to this topic
Explore ideas and give feedback