PROBLEM
Unable to access ArcGIS Server Manager after upgrading ArcGIS for Server
Description
After upgrading ArcGIS for Server, the ArcGIS Server Manager page returns the error message, "The page cannot be displayed" and is inaccessible.
Cause
The upgrade process overwrites previously configured ArcGIS for Server settings, which causes the ArcGIS Server Manager page to become inaccessible.
Solution or Workaround
The following are possible solutions for this issue:- Reconfigure the newly upgraded ArcGIS for Server machine.
- Remove the upgrade.txt file. Navigate to the following path, C:\Program Files\ArcGIS\Server\framework\etc, and delete the upgrade.txt file. If the file is not found in the provided path, proceed to Step 2.
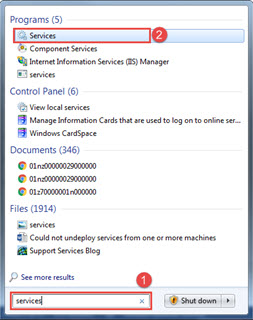
Note: The upgrade.txt file is created when ArcGIS for Server is upgraded and also stores information regarding the upgrade process. - Navigate to Windows Start. In the search bar, type services, and click the Services icon.
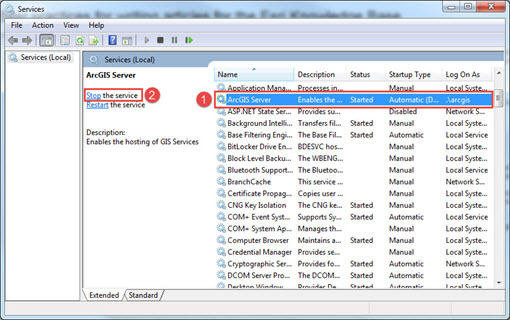
- In the Services window, navigate to the ArcGIS Server service, and click Stop.
- Run the Configure ArcGIS for Server Account utility by navigating to Windows Start > All Programs > ArcGIS > ArcGIS for Server, and click the Configure ArcGIS Server Account icon. Specify the appropriate Server account credentials.
- Restart the ArcGIS Server service.
- Reconfigure ArcGIS Web Adaptor. The following ArcGIS for Server document describes this in detail: Configure ArcGIS Web Adaptor after installation.
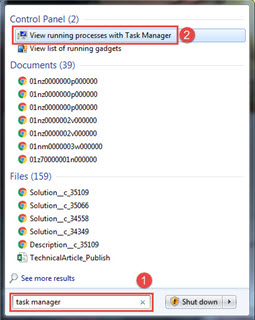
- Verify the ArcGIS instances, javaw.exe and ArcSOC.exe are running in the Task Manager. Navigate to Windows Start. In the search bar, type task manager, and click the View running processes with Task Manager icon.
- Log in to ArcGIS Server Manager to check accessibility.
- Repair the ArcGIS for Server upgrade.
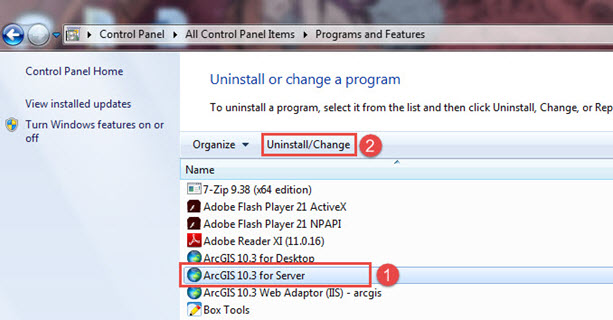
- Navigate to Windows Start > Control Panel > Programs and Features.
- In the Uninstall or change a program window, locate the ArcGIS for Server installation and click Uninstall/Change.
- In the Program Maintenance window, select Repair, and click Next.
- In the Ready to Repair the Program window, click Install.
- Once the repair is completed, click Finish.
- Log in to ArcGIS Server Manager to check accessibility.
Article ID:000013420
Software:
- ArcGIS Server
Get help from ArcGIS experts
Download the Esri Support App
Related Information
Discover more on this topic
Search for related information
Find training related to this topic
Explore ideas and give feedback