PROBLEM
The Manage Tiles dialog box in ArcGIS Online does not reach 100% completion
Description
When publishing a tile package in ArcGIS Online, the percentage of completed tiles generated can be viewed in the Settings tab of the Item Details under the Manage Tiles dialog. Some tile packages may appear to stop at a percentage of less than 100% completion, although when displaying the tiles in the Map Viewer, all of the data is present.
Users can confirm the status of the publishing process for the tiles by going into the Service URL for the item. In the Overview tab of the item under Layers, click the layer name. This opens the REST endpoint of the service within the Services Directory. At the top, click the Tile Package name and enter your ArcGIS Online credentials to access the Administrative view. Add 'admin/' between 'rest'/ and 'services'.
Example: https://tiles.arcgis.com/tiles/<your_org_id>/arcgis/rest/admin/services/<your_service_name>/MapServerScroll to the bottom of the page to find 'Resources: Jobs' and click on 'Jobs'. This shows the Tile Service Jobs Summary for the service. If all jobs (or the most current job) show as DONE, then the tile processing is complete, despite the percentage displayed in the Manage Tiles dialog.
Cause
The percentage of tile completion shown in the Manage Tiles dialog is equal to the number of Tiles Published, divided by the number of Total Tiles. If the number of Tiles Published differs from the number of Total Tiles, then there may have been tiles present in the tile package that were blank and did not include any data. When blank tiles are found in a tile package during the publishing process, these tiles are not included in the Published Tiles. This is why the Percent Complete may be less than 100 percent.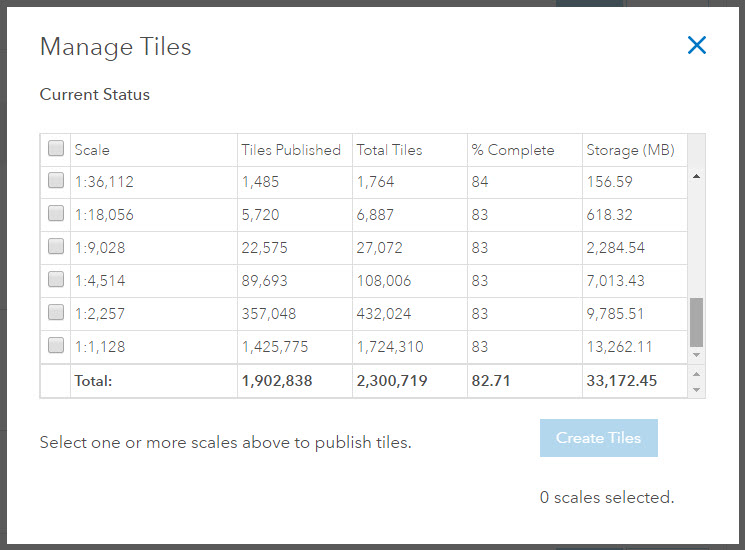
This behavior can be seen by two different types of situations:
Situation One: The full extent of the tile package does not match the initial extent of the tile package
The following extents should be considered prior to creating the tile package:
- The full extent of the tile package is carried over from the full extent of the Data Frame of the map document. Check the Full Extent of the Data Frame by right-clicking the Data Frame > Data Frame Properties > Data Frame tab > Extent Used by Full Extent command. This is set to the extent of data in all layers by default. The extent of data in all layers option should be selected if the goal of the tile package is to include the data in all of the layers present in the map document. Alternatively, define the full extent of the Data Frame to include only the area of interest.
Note:
The feature extent of a layer may not always be set to the most optimal level. Double check the extent of a data layer by right-clicking the layer in the Table of Contents and going to Zoom to Layer. To correct the extent of a feature class, Recalculate Feature Class Extent in ArcCatalog.
- The initial extent of the tile package is carried over from the current extent of the Data Frame of the map document. Set the current extent of the map to match the full extent of the map to ensure that all data is included and to eliminate any excessive white space. If the full extent of the Data Frame differs from the current extent of the Data Frame when the tile package is created, the full extent and initial extent seen in the tile package also differs.
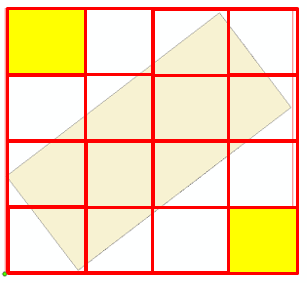
Situation Two: The data is angular in shape
If data has an unusual shape, this may cause tiles around the edges of the data to contain no data. An example of this would be a diamond-shaped feature in a feature class prior to publishing. See the following image for an example. The yellow squares show that, as the tiles get smaller down each level, there are tiles that contain no data. With this situation, the percentage of Tiles Published is expected to decrease as the levels of display move towards the highest level of detail.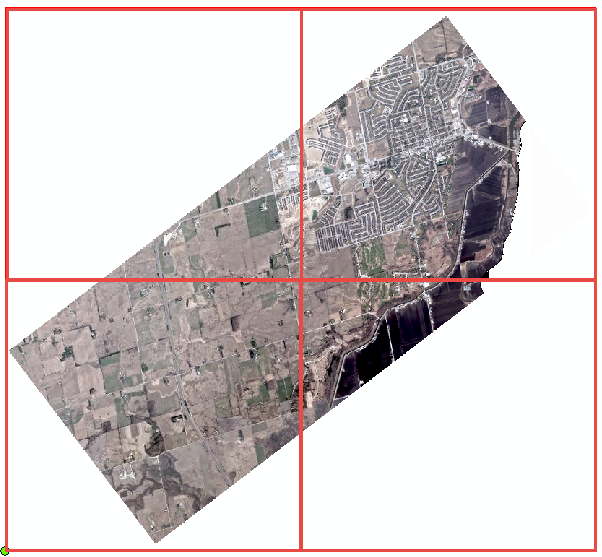
Solution or Workaround
Solution One: To resolve the extent mismatch issue:Option A: When creating the tile package in ArcMap, whether through the Tile Cache tools or through using options available in File > Share As, click on the Full Extent button before starting the process. This ensures that the initial (current) extent and the full extent (also known as the job extent) are the same. Alternatively, set the current extent of the Data Frame to match the full extent of the map prior to running the tool(s).
Option B: If the tile package has already been created, you may be able to resolve the extent mismatch by altering the files in the tile package itself:
- Download the tile package if needed.
- Unzip the tpk folder to extract the files.
- In the directory servicedescriptions\mapserver, right-click mapserver.json and open in a Text Editor such as Notepad.
- Alter fullExtent to equal initialExtent and geoFullExtent to equal geoInitialExtent or vice versa.
- Save and close.
- Add the folders back into a .zip file and then manually change the file extension back to .tpk.
- Add the tile package back to My Content in ArcGIS Online (ensure the original is deleted).
- Attempt to create the tiles.
In this case, the less than 100% value is expected behavior. This should not affect the usability of the tile cache, but is an inconsistency to be aware of.
Article ID: 000013315
- ArcGIS Online
Get support with AI
Resolve your issue quickly with the Esri Support AI Chatbot.


Related Information
Discover more on this topic
Search for related information
Find training related to this topic
Explore ideas and give feedback
Get help from ArcGIS experts
Start chatting now