HOW TO
Georeference CAD data
Summary
Georeferencing CAD data involves assigning a coordinate system and applying a transformation to the CAD data. The instructions provided describe how to georeference CAD data in ArcMap.
Note:
ArcMap is in Mature support and will be retired March 1, 2026. There are no plans for future releases of ArcMap, and it is recommended that you migrate to ArcGIS Pro. See Migrate from ArcMap to ArcGIS Pro for more information.
Procedure
Note:
Before georeferencing the CAD data, assign the desired projection to the map to which the CAD data will be referenced. The georeferencing process writes out the projection file for the newly georefenced CAD file.
Refer to FAQ: How do I define the projection for ArcGIS data? for more information.
- In ArcMap, add the CAD data to the map.
- Open the Georeferencing toolbar. Navigate to Customize > Toolbars > Georeferencing.
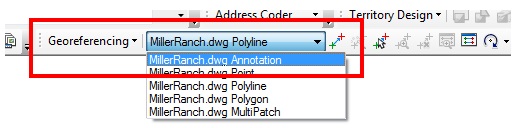
- On the toolbar, select the desired CAD feature layer from the dataset.
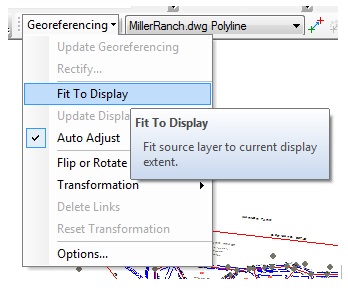
- Zoom to the desired destination area, and navigate to Georeferencing > Fit To Display.
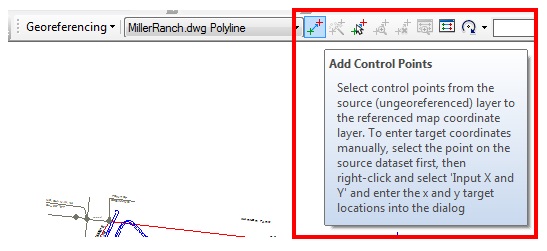
- To create the first link, click the Add Control Points tool, and snap to the endpoint of the desired parcel feature.
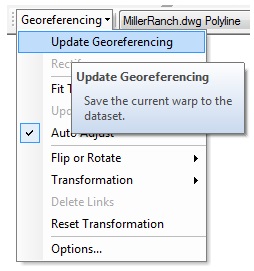
- To save the updates, click Georeferencing > Update Georeferencing.
Note:
The CAD World File window displays.
- In the CAD World File window, save the desired file name and file type as World.
- Click Save.
Article ID: 000012808
Software:
- ArcMap
Get support with AI
Resolve your issue quickly with the Esri Support AI Chatbot.


Related Information
Discover more on this topic
Search for related information
Find training related to this topic
Explore ideas and give feedback
Get help from ArcGIS experts
Start chatting now