PROBLEM
ArcPad 7 toolbar cannot be hidden in ArcMap
Description
The toolbar visibility is not saved in ArcPad 7, which prevents hiding the ArcPad toolbar.
Cause
There is a .dll registration issue that prohibits permanently setting the toolbar's visibility.
Solution or Workaround
Remove the ArcPad 7 tools and manually re-install them to the ArcPad toolbar.- Unregister the following .dlls:
- AP7Checkout.dll
- ArcPad7Tools.dll.
Do not unregister the ArcGISExport.dll.
Navigate to 'Start > Run' and use the Regsvr32 command line tool to unregister the .dlls. ArcPad's default installation places the .dlls into the Desktop Tools folder located at C:\Program Files\ArcPad 7.0\Desktop Tools. Do this for both .dlls.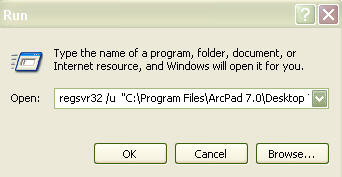
Use the unregister parameters /u for both .dlls, for example:Code:
regsvr32 /u "C:\Program Files\ArcPad 7.0\Desktop Tools\ArcPad7Tools.dll"
regsvr32 /u "C:\Program Files\ArcPad 7.0\Desktop Tools\AP7Checkout.dll" - Open ArcMap.
There are two sets of ArcPad 7 tools that can be added to the existing ArcPad toolbar. The first is for the ArcPad 7 checkout: AP7Checkout.dll. The second consists of support for Graphics Layers, Stylesheets and Layer Definition Files exportation: ArcPad7Tools.dll. - Add the ArcPad 7 tools by navigating to ArcMap's Customize Dialog by way of 'Tools Menu > Customize dialog > Commands'. Click the 'Add from file...' button. Navigate to the file path of the location of the .dlls, the default install is at C:\Program Files\ArcPad 7.0\Desktop Tools.
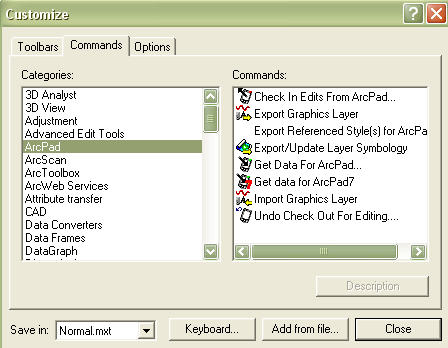
- Open the AP7Checkout.dll and click 'OK'. Notice that the Added Objects dialog appears, reporting which new objects have been registered with ArcMap or ArcCatalog. Verify that 'GetDataForAP7' is listed and click OK. The 'Get Data for ArcPad7' command should now be listed in the Commands List. Drag the commands needed to the ArcPad toolbar.
- Add the remaining ArcPad 7 tools contained in the ArcPad7Tools.dll. Also add the ArcPad 7 tools by navigating to ArcMap's 'Customize' Dialog and then to the Commands tab.
- Click the 'Add from file...' button. Navigate to the file path location of the .dlls; the default install is located at C:\Program Files\ArcPad 7.0\Desktop Tools.
- Open the ArcPad7Tools.dll. Note that the Added Objects dialog appears, reporting which new objects have been registered with ArcMap or ArcCatalog. Listed should be the APLUpdater, EXpGraphicsLayer, ImpGraphicsLayer and ExpStyleSheet. Click 'OK'. The four newly added commands are now listed in the Commands List. Drag the commands required to the ArcPad toolbar.
- Repeat these steps if ArcPad 7 is uninstalled from the system and then reinstalled.
Article ID:000008427
Software:
- ArcPad Prev
- ArcMap 9 x
Get help from ArcGIS experts
Download the Esri Support App
Discover more on this topic
Search for related information
Find training related to this topic
Explore ideas and give feedback