HOW TO
Apply a color range to a portion of symbols in ArcMap
Summary
There are two ways to apply a range of colors to a portion of a layer's symbology, depending on whether the symbology is based on unique values or graduated colors.
Procedure
Unique values
Select the desired symbols and use the Color Scheme dropdown list to apply new colors to them.

- In ArcMap, right-click the layer in the Table Of Contents > Properties.
- Click the Symbology tab.
- Under Show, click Categories > Unique values.
- Use the Add All Values button or the Add Values button.
- Hold the Ctrl key down and select several symbols.
- To apply new colors, select a new color scheme from the Color Scheme dropdown list.
Graduated colors
Change the color of individual symbols and use the Ramp Colors menu to apply a smooth range of colors between them.
- In ArcMap, right-click the layer in the Table Of Contents > Properties.
- Click the Symbology tab.
- Under Show, click Quantities > Graduated Colors.
- Double-click the symbol where the new range of colors should start.
- Pick a new color for this symbol.
- Double-click the symbol where the range of colors should end.
- Pick a new color for this symbol.
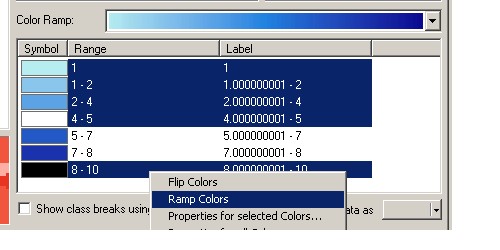
- Ensure all symbols whose colors are changed are selected by using the Ctrl or Shift key while selecting the symbols. The selected symbols form the start and end parameters for the new color ramp.
- Right-click the selected symbols > Ramp Colors.
There is no limit to selecting a start and end symbol; one or more middle symbols may be selected to participate in the color ramp as well.
Article ID: 000004541
- ArcMap 8 x
- ArcMap 9 x
Get support with AI
Resolve your issue quickly with the Esri Support AI Chatbot.


Related Information
Discover more on this topic
Search for related information
Find training related to this topic
Explore ideas and give feedback
Get help from ArcGIS experts
Start chatting now