HOW TO
Separate the intersected buffer polygon area in ArcGIS Online Map Viewer Classic
Summary
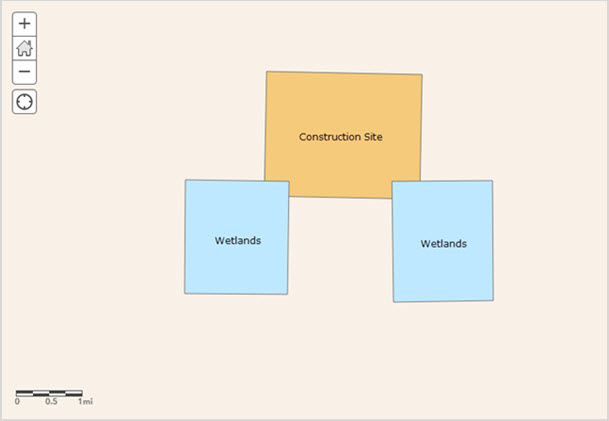
In some instances, it is necessary to separate the buffer area of two intersecting polygons to provide a clear picture of the overlapping zone. For example, the image below shows a construction site being built near two wetlands. As the construction activities done near the wetlands may pose a risk on the workers and the construction, a buffer is placed around the wetlands, further intersecting the construction zone. This area is then separated to provide a clear view of the danger zone and prevent any construction activities.
This article provides a workflow to separate the intersected buffer polygon area between the example Construction Site and Wetlands layers in ArcGIS Online Map Viewer Classic.
Procedure
- Log in to ArcGIS Online and click Content > My Content.
- Browse to the web map, click More Options and select Open in Map Viewer Classic.
- Create a buffer around the layer using the Create Buffer tool.
- In Map Viewer Classic, on the Details tab, click Show Contents of Map and click the Perform Analysis
 icon below the reference layer.
 - In the Perform Analysis pane, click Feature Analysis, expand Use Proximity and click Create Buffers.
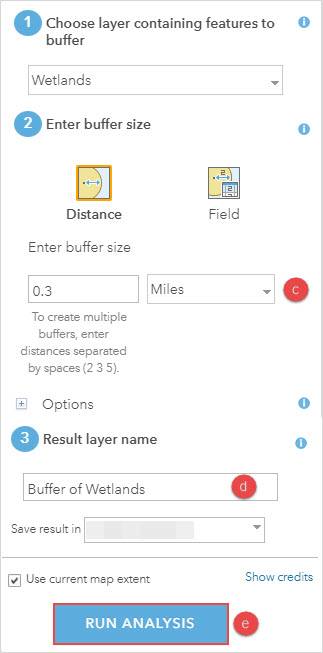
- In the Create Buffers pane, under Enter buffer size, specify the value of the distance and select the unit from the drop-down list. In this example, the buffer size is 0.3 and Miles is selected.
- For Result layer name, specify a name of the buffer layer.
- Click RUN ANALYSIS.
- In Map Viewer Classic, on the Details tab, click Show Contents of Map and click the Perform Analysis
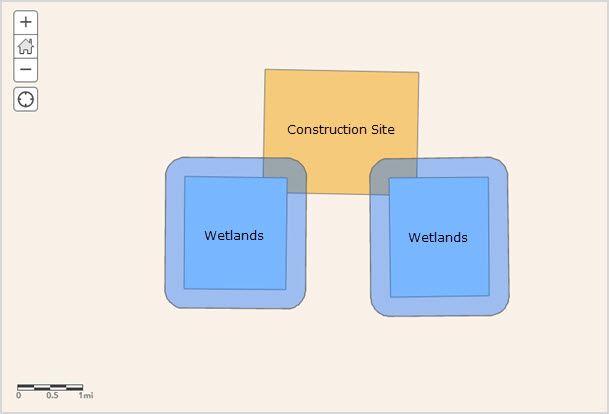
The image below shows the buffer layer around the Wetlands polygons.
- On the Details tab, click Show Contents of Map and click the Perform Analysis
 icon below the buffer layer.
 - In the Perform Analysis pane, click Feature Analysis, expand Find Locations and click the Derive New Locations tool to separate the intersected buffer layer.
- Configure the parameters to separate the buffer layer from the original layer.
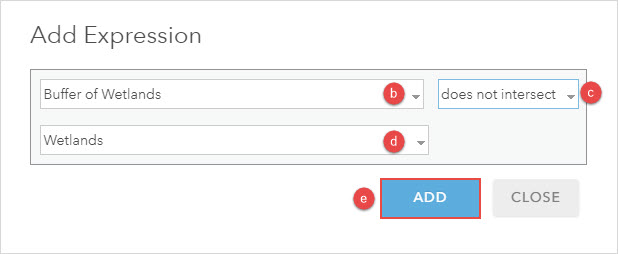
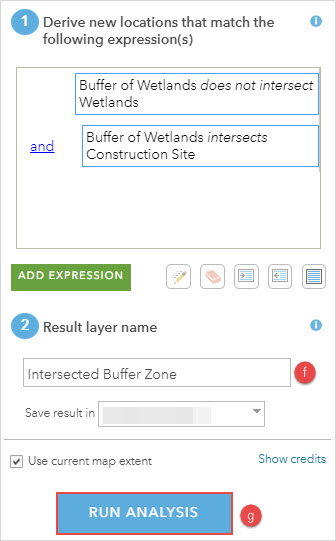
- In the Derive New Locations pane, for Derive new locations that match the following expression(s), click ADD EXPRESSION.
- In the Add Expression window, for the first drop-down menu, select the buffer layer. In this example, 'Buffer of Wetlands' is selected.
- For the where (attribute query) drop-down menu, select does not intersect.
- For the third drop-down menu, select the original layer to be separated from the buffer layer. In this example, 'Wetlands' is selected.
- Click ADD.
- Configure the parameters to separate the intersected area of the buffer layer and the Construction Site layer.
- In the Derive New Locations pane, for Derive new locations that match the following expression(s), click ADD EXPRESSION.
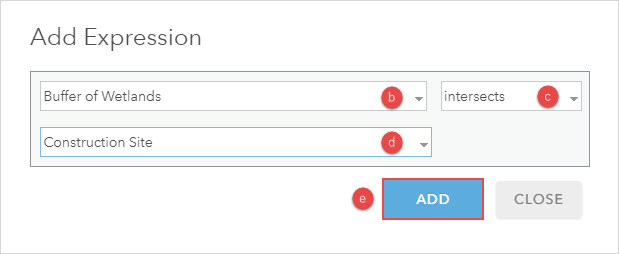
- In the Add Expression window, for the first drop-down menu, select the buffer layer.
- For the where (attribute query) drop-down menu, select intersects.
- For the third drop-down menu, select the layer intersecting the buffer layer. In this example, 'Construction Site' is selected.
- Click ADD.
- For Result layer name, specify a name for the layer.
- Click RUN ANALYSIS.
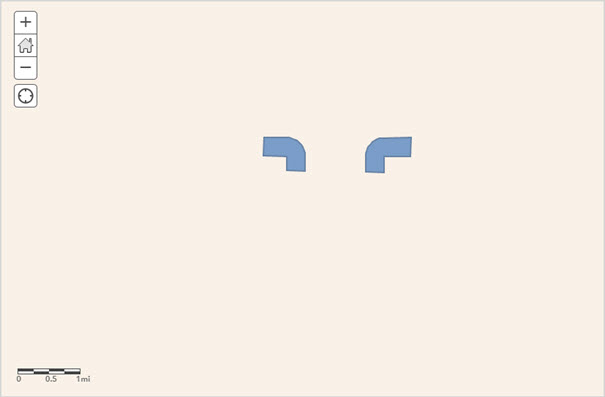
The image below shows the buffer intersect zone between the Construction Site and Wetlands layers.
Article ID: 000029655
- ArcGIS Online
Get support with AI
Resolve your issue quickly with the Esri Support AI Chatbot.


Related Information
Discover more on this topic
Search for related information
Find training related to this topic
Explore ideas and give feedback
Get help from ArcGIS experts
Start chatting now