HOW TO
Upgrade to ArcGIS Enterprise 11.x
Summary
This article walks through the process of upgrading to ArcGIS Enterprise 11.x, with detailed steps on what needs to be checked before the upgrade, done during the upgrade, and verified after the upgrade.
Note:
The upgrade process can be time-consuming, and if not done correctly, many things can go wrong. The steps outlined here can save a significant amount of time and make the process more efficient.
Procedure
When planning an upgrade, keep in mind that it is not recommended to upgrade directly from versions that are more than two releases apart. For example, you can't upgrade directly from ArcGIS Enterprise 10.6.1 or earlier to version 11.0. You must first upgrade to an interim version (10.7.x to 10.9.x) and then upgrade to 11.0. Before upgrading, check the upgrade documentation for the interim version to confirm direct upgrades are supported for the starting version of ArcGIS Enterprise.
Prepare for the upgrade
Before starting the upgrade process:
- Check if there are any considerations before upgrading to the desired version, see: Upgrade considerations from ArcGIS Enterprise 10.9.1 and earlier
- Check if there are any retirement notices: Retirement notices, for example:
- End of support for ArcMap-based workflows At this release, ArcMap-based workflows are no longer supported in ArcGIS Enterprise. The 11.0 software and subsequent releases include the ArcGIS Pro- based runtime, but do not include the ArcMap-based runtime. See: Learn more about your options to migrate services to the ArcGIS Pro runtime.
- If you published applications based on ArcGIS Configurable Apps templates, check to verify if the app template has been decommissioned. Retired configurable app templates will not function once you upgrade your portal to 11.x. You will need to re-create these apps using ArcGIS Instant Apps, ArcGIS StoryMaps, ArcGIS Experience Builder, ArcGIS Web AppBuilder, or ArcGIS Dashboards. Note that if your portal is several releases old, check the retired templates for each release in their respective What's new in Portal topics. For example, if you're upgrading from Portal for ArcGIS 10.7, check the list of retired templates for all releases between 10.7 and the current release.
- Check the system requirements for the machine(s) that hosts the ArcGIS Enterprise products and ensure it meets the minimum requirements. From this, a list of the recommendations can be made like increasing the CPU, disk space, etc., before starting the upgrade process. See: ArcGIS Enterprise 11.x system requirements (latest)
- Keep in mind that the amount of free space available on local disk should be at least 2.5 times the amount of space in the directories. If not, allocate at least 2.5 times more space on local disk. The upgrade must have this free space to successfully back up and upgrade your portal's content, site information, and security settings.
- ArcGIS Web Adaptor (IIS) requires a minimum of 8 GB of memory, with more potentially required depending on the number of ArcGIS Web Adaptor instances installed and the number and size of the requests received.
- Check the type and version of the databases used and registered (such as SQL Server, Oracle, etc.) for compatibility. If not compatible, upgrade it before upgrading the ArcGIS Enterprise. See: Supported databases
- Check permissions across the Enterprise deployment. The Windows service account running the services on all machines should be the same domain-level Active Directory administrative account. The account should have a static password. Explicitly add permissions to the following folders for full control. This must include read and write privileges. The drive listed here should be changed based on the drive used, commonly it would be the C drive but that is not always the case.
- Check permissions on the ArcGIS Server machine:
- Check C:\arcgisserver
- Check C:\Program Files\ArcGIS
- Check C:\Python 27
- Check permissions on Portal for ArcGIS Machine:
- Check C:\arcgisportal
- Check C:\Program Files\ArcGIS
- Check permissions on ArcGIS Data Store Machine:
- Check C:\arcgisdatastore
- Check C:\Program Files\ArcGIS
- Check permissions on the ArcGIS Server machine:
- Download the desired version of Portal for ArcGIS, ArcGIS Server, ArcGIS Data Store, and ArcGIS Web Adaptor, as well as the associated licensing, from the My Esri website.
- Navigate to the portaladmin interface: https://domain.com/webadaptor name/portaladmin
- If your portal is currently in read-only mode, turn the mode off before running the upgrade.
- In the Portal Administrator Directory, from Home > Mode > Update, set Read Only to false.
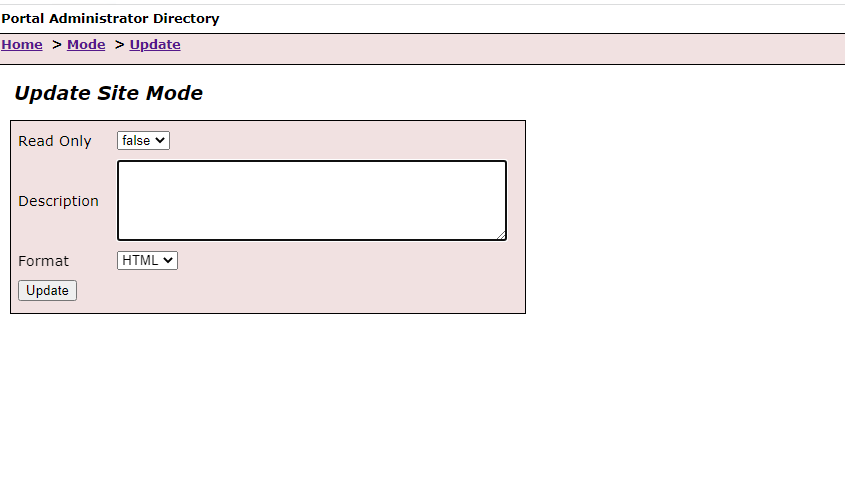
Note:
Unlike the portal, if your ArcGIS Server site is in read-only mode, the site mode will be set to editable when you upgrade. After all machines in your site have been successfully upgraded, the site will remain in editable mode. You can switch back to read-only mode once your upgrade is complete.
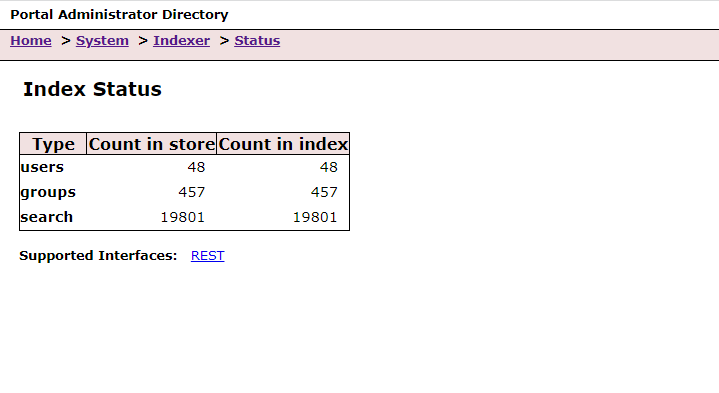
Check Indexer status
- In the Portal Administrator Directory, from Home > System > Indexer > Status:
- Check the index status and make sure the index values are aligned. If they are out of sync, re-index.
- Take a snapshot of all the machines involved as a precautionary measure.
- Validate federation and datastores. See: Validate Servers, and How To: Validate ArcGIS Data Store
- Take note of the web adaptors' names since you must use the exact same names when you reinstall
- Take note of the web context assigned (if any) for the portal and server.
- Back up the deployment using:
- The webgisdr utility for Portal. See: Use the webgisdr utility -Export ArcGIS Enterprise
- The backup utility for ArcGIS Server: Backup utility
- Run the backupdatastore utility to back up each data store-backupdatastore
- Back up the arcgisportal content directory folder and any extensions you've added for Dashboards and Web AppBuilder. Additionally,
- Back up the current deployment advanced portal option by copying the JSON script in the ArcGIS Portal Directory. Refer to Step 1 through 3 in Portal for ArcGIS: Set advanced portal options for instructions to access the JSON script. The copied JSON script can be pasted to the new deployment by using the update function in the ArcGIS Portal Directory.
- If possible stop the antivirus during the upgrade process.
Some other points to consider (if applicable):
- Before upgrading the ArcGIS Enterprise, you must uninstall ArcGIS Insights if you are upgrading Enterprise from version 10.7 or earlier. After the upgrade is complete, it is necessary to install a compatible version of ArcGIS Insights. See: Install Insights in ArcGIS Enterprise
- If you configured ArcGIS Navigator mobile map packages with your portal, you must reconfigure them after upgrading the portal to 11.0.
- If you use ArcGIS Living Atlas of the World content in maps or apps, confirm that the items you use are not in a mature support or deprecated status before upgrading. See the ArcGIS Living Atlas content life cycles and updates.
Start the upgrade process
Note:
Please keep in mind that your deployment (Portal, any ArcGIS Server site you federated with your portal, ArcGIS Data Store, and ArcGIS Pro (if licensed through the portal) will be offline (down) during the upgrade.
Do not forget to:
- Check permissions over all of the directories.
- Take a snapshot of all the machines involved as a precautionary measure.
- Take note of the web adaptors' names (as installing the web adaptors should be with the same names).
- Take note of the web context assigned (if any) for the portal and server (as sometimes after the upgrade they can be lost, so it is good to have them backed up to reconfigure them).
- Use a supported browser when performing the upgrade: Supported web browsers (latest)
If it is a multi-machine deployment, list the names of the machines just to be aware of them during the upgrade: Upgrade your ArcGIS Enterprise portal
- Upgrade the Portal for ArcGIS Upgrade the Portal for ArcGIS
- Please be aware that if you upgrade from a deployment of Portal for ArcGIS 10.8.1 or 10.9 that has Map Viewer Beta installed, Map Viewer Beta will be deleted automatically.
Together with Map Viewer Classic, 11.x also has the new Map Viewer (formerly known as Map Viewer Beta). - The amount of material your portal has, the number of registered accounts, the number of components and customizations you deploy, and the performance of the machine that hosts the portal all affect how long it takes to finish the upgrade. Sometimes it takes up to three hours to complete.
- Clear the browser cache, including cookies. Based on the documentation, the information left over in the cache from the previous version of the website may cause the upgraded website to display incorrectly, and you may not be able to sign in. It is recommended to clear the cache (including cookies) on all browsers that will view the upgraded portal website.
- Run the Portal setup file (Setup.exe) as an administrator, and do not interrupt the installation process.
- If it is a highly-available portal, upgrade both primary and standby machines before doing the next step.
- Once the installation is done, an import license file page is launched in the browser. Have the license file (.json) handy, as it is required.
- Click Continue Portal Upgrade. This triggers the upgrade and creates a backup of your portal's content, site information, and security settings.
- Uninstall the existing portal's web adaptor.
- Install the new portal's web adaptor with the same name as before (the version upgrading to).
- Configure the portal's web adaptor. For full instructions, see the configuring topic for IIS or Java (Windows). Keep in mind that if you have any DNS and it is not listed in the system properties, you should access the web adaptor configuration page using it.
- Once completed, verify that you can log into the portal over the web adaptor URL, for example, https://webadaptorhost.domain.com/webadaptorname/home
- If you receive a notice that post-upgrade steps are required, you must click OK on the message dialog box to complete the required post-upgrade steps. These include upgrading ArcGIS Living Atlas of the World content, re-indexing content, and updating the association between portal machines in a highly available portal.
- Please be aware that if you upgrade from a deployment of Portal for ArcGIS 10.8.1 or 10.9 that has Map Viewer Beta installed, Map Viewer Beta will be deleted automatically.
- Upgrade the ArcGIS Server serving as the portal's hosting server. Upgrade the ArcGIS Server
- Clear the browser cache (including cookies).
- Do not un-federate any server federated with a portal when you upgrade your deployment. This adversely impacts portal deployment, as users will be unable to access, share, or use ArcGIS Server services in the portal.
- Run the server installation file (.exe) as an administrator. A license file is required after this step.
- After the installation is complete, the software authorization wizard appears, prompting to reauthorize ArcGIS Server with a new license file.
- Once authorized, in the browser, launch a 'Continue the upgrade' page.
- Uninstall the existing Server's web adaptor. If it is a multiple-machine server site, this must be done after finishing upgrading all machines joined in the site.
- Install the new Server's web adaptor with the same name as before.
- Configure the Server's web adaptor. For full instructions, see the installation topic for IIS or Java (Windows).
- Validate that the ArcGIS Server Manager interface is accessible over the web adaptor and that you can log in using portal credentials. When logging into Server Manager over the web adaptor, you should see the portal OAuth redirect indicating the federation has been maintained throughout the upgrade.
- Upgrade the ArcGIS Data Store, see: Upgrade ArcGIS Data Store
- Clear the browser cache (including cookies).
- Run the Data Store installation file (.exe) as an administrator.
- Continue the upgrade in the browser.
- Once complete, verify that the Data Store validates successfully in the Server Manager.
- Upgrade any additional ArcGIS Server sites, if there are any other federated servers, such as an image server. Repeat the upgrade process for each additional site.
- ArcGIS GIS Server or ArcGIS Image Server sites
- ArcGIS GeoEvent Server
- ArcGIS GeoAnalytics Server
- ArcGIS Notebook Server
- ArcGIS Mission Server
- ArcGIS Workflow Manager
- ArcGIS Knowledge Server
- Clear the browser cache (including cookies).
- Run the Server installation file (.exe) as an administrator. A license file will be required after this step.
- Continue the upgrade in the browser.
- Uninstall the existing server's web adaptor (for the previous version) If it is a multiple-machine server site this is done after finishing upgrading all machines joined in the site.
- Install the new server's web adaptor with the same name as before.
- Configure the server's web adaptor.
- Validate that the ArcGIS Server manager is accessible over the web adaptor and that you can log in using portal credentials. When logging into Server Manager over the web adaptor, you should see the portal OAuth redirect indicating the federation has been maintained throughout the upgrade.
- Once all the applications have been successfully upgraded
- Navigate to Portal home.
- Validate the ArcGIS Server in Portal for ArcGIS to make sure everything is successfully validated.
- Navigate to the portal admin interface:
- Check the index status, If it's out of sync, re-index
- Navigate to the ArcGIS Server Manager:
- Validate all data stores
- Restore any previously created portal customizations. When restoring your portal customizations, do not replace the files you modified in the previous version. This has an adverse effect on your deployment. You must manually re-add your custom behavior from the previous version in each file.
- It is recommended that you use the serverScan.py and portalScan.py scripts to review security best practices with your ArcGIS Server and ArcGIS Enterprise portal following the upgrade.
- After upgrading, carefully review the following information: Considerations after upgrading Portal for ArcGIS
- If you used ArcGIS Enterprise Builder to set up a base ArcGIS Enterprise deployment on a single machine:
- Review and complete the steps in the prerequisites.
- As an administrator, run the ArcGIS Enterprise Builder installation file (.exe) of the desired version to install components.
- Use the configuration wizard or upgradebasedeployment command line utility to perform the upgrade.
- Complete post-upgrade steps.
- Apply all available patches to be fully up-to-date with ArcGIS Enterprise software fixes.
- Use the ArcGIS Enterprise Check for Updates tool to search and apply all patches: Check for and install software patches and updates
- Additionally, to schedule future patches, the ArcGIS Enterprise Check for Updates Tool has a console option – meaning it can be launched from a command line, or added to a batch script and run from a CRON job or Windows Task Scheduler.
Article ID: 000029452
- ArcGIS Data Store
- Portal for ArcGIS
- ArcGIS Server
- ArcGIS Enterprise Builder
- ArcGIS Web Adaptor
Get support with AI
Resolve your issue quickly with the Esri Support AI Chatbot.


Related Information
Discover more on this topic
Search for related information
Find training related to this topic
Explore ideas and give feedback
Get help from ArcGIS experts
Start chatting now