HOW TO
Copy symbology from a hosted feature layer and apply it to another feature layer in ArcGIS Online
Summary
In some cases, when importing hosted feature layers published from ArcGIS Pro from another project in ArcGIS Online, the symbology is not preserved. This article highlights the workflow to transfer symbology from a hosted feature layer published from ArcGIS Pro to another layer in the admin REST endpoint in ArcGIS Online by copying its JSON script.
Procedure
Note:
This workflow works with hosted feature layer published from ArcGIS Pro. Symbology definition edited from ArcGIS REST Services Directory for layers added within ArcGIS Online is not honored and is reverted back to the default JSON definition.
- Copy the JSON script of the symbology.
- In ArcGIS Online, navigate to Content > My Content.
- On the My Content tab, select the item to open its item details page.
- On the item details page, select and click the feature layer containing the symbology.
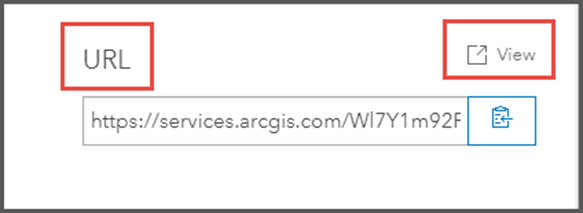
- Scroll down to the URL section and click View. to open the ArcGIS REST Services Directory window.
- On the ArcGIS REST Services Directory window, under Layers, select and click the layer with the desired symbology. This article uses testing(0) as an example.
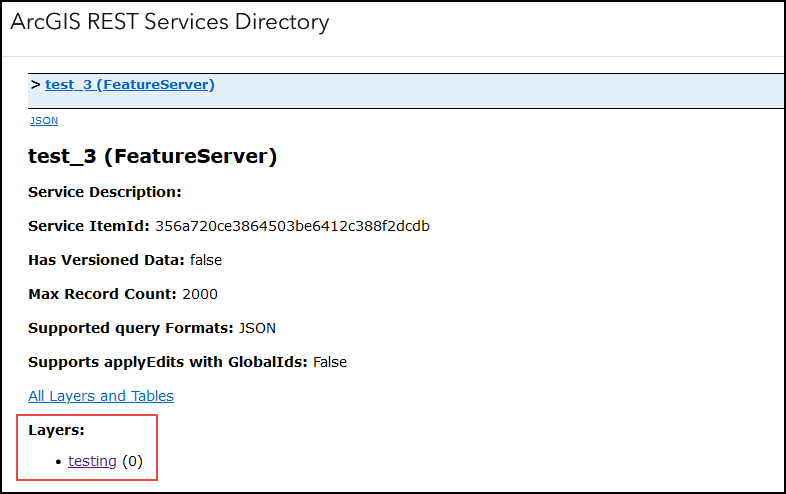
- Navigate to the Drawing Info section, copy the JSON script, and close the ArcGIS REST Services Directory window.

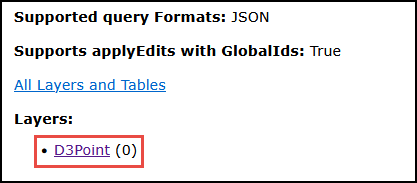
- Transfer the copied JSON script to another layer. This example uses D3Point.
- Repeat Steps 1b through 1d.
Note:
To edit the JSON script, access the ArcGIS REST Administrator Directory.
- On the ArcGIS REST Services Directory window, click Admin.

- Select the desired layer.
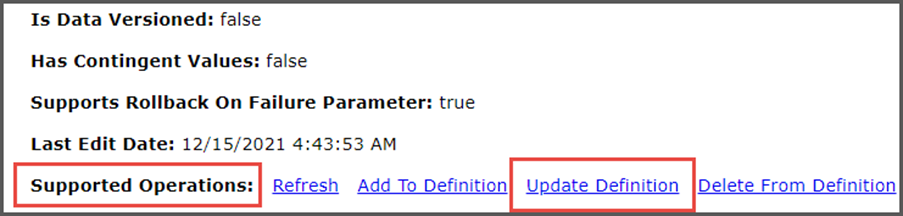
- Scroll down the page. Under Supported Operations, click Update Definition.
- In the Update Layer Definition box, locate the drawingInfo parameter, then paste the JSON script from the first layer. The definition starts from "{renderer" and ends with a "}" (similar to the format shown in the example and below).
{
    "drawingInfo":{"renderer":{"type":"simple","symbol":
{"type":"esriSMS","style":"esriSMScircle","color":
[128,0,123,255],"size":4,"angle":0,"xoffset":0,"yoffset":0,"outline":"{"color":
[0,0,0,255],"width":1}}},"scaleSymbols":false,"transparency":0,"labelingInfo":null}
}
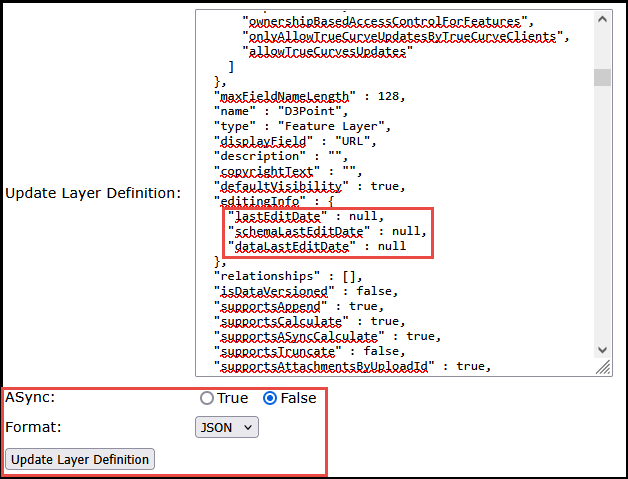
- In the Update Layer Definition box, locate the lastEditDate, shcemaLastEditDate, and dataLastEditDate parameter, and update the values to null.
- Select False for ASync and select JSON for Format. Click Update Layer Definition.
Note:
If the schema of your layers do not match, for example if the second layer is missing a field or a domain that is used in the symbology (i.e. referenced in the drawing info), updating layer definition may still return success but the symbology of the layer won't change.
Article ID: 000027205
Software:
- ArcGIS Online
Get support with AI
Resolve your issue quickly with the Esri Support AI Chatbot.


Related Information
Discover more on this topic
Search for related information
Find training related to this topic
Explore ideas and give feedback
Get help from ArcGIS experts
Start chatting now