PROBLEM
Labels of feature classes in ArcGIS Pro are not retained when publishing to ArcGIS Online
Description
In ArcGIS Pro, when publishing map to ArcGIS Online, the labels display differently in ArcGIS Online Map Viewer.
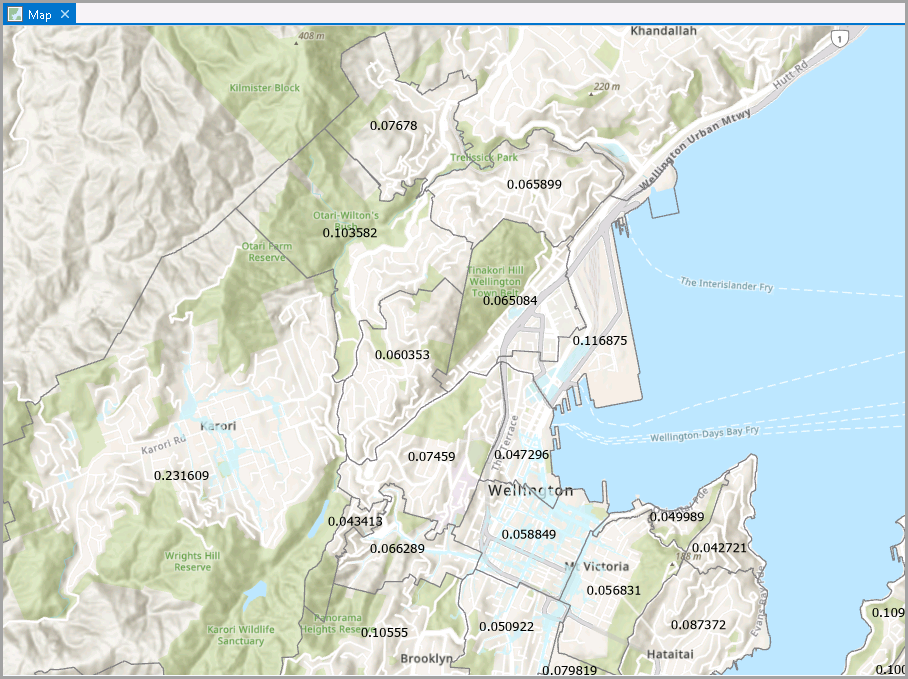
The following image displays the example of the labels for the feature class in ArcGIS Pro.
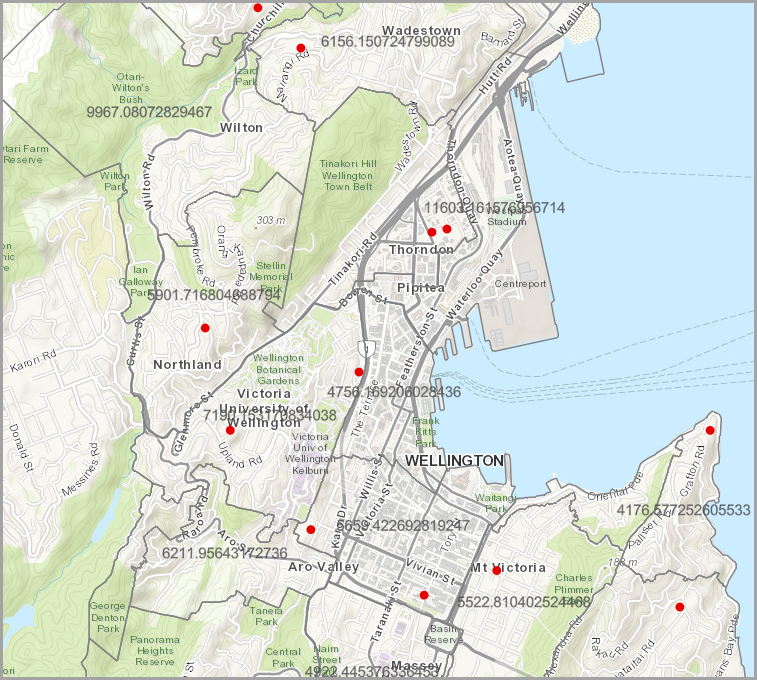
The following image displays the example of the labels for the published feature layer in ArcGIS Online Map Viewer.
Cause
- The label used in ArcGIS Pro is the default Shape_Length or Shape_Area field. The format of the field names for Shape_Area and Shape_Length changes after publishing the layer from ArcGIS Pro to ArcGIS Online. ArcGIS Online uses Shape__Length and Shape__Area with two underscores instead of one.
- The label class name generated from the layer attributes contain special characters or spaces.
Solution or Workaround
Choose one of the options below depending on the cause to resolve the issue.
Populate the Shape_Length or Shape_Area field values in a new field
- In ArcGIS Pro, right-click the desired layer, and click Attribute Table.
- Click Add to create a new field. Refer to ArcGIS Pro: Create and manage fields for more information. Click Save.
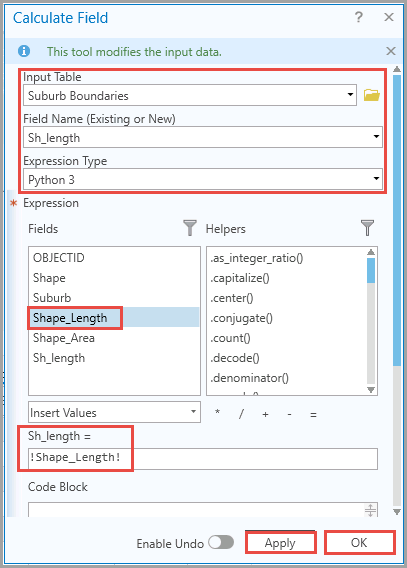
- In the attribute table, right-click the newly created field heading, and click Calculate Field.
- In the Calculate Field window, select the feature layer for Input Table, the field name of the newly created field for Field Name (Existing or New), and Python 3 for Expression Type.
- Under Fields, double-click the original field name to copy the attributes into the new field.
- Click Apply, then click OK.
- Label the features using the newly created field. Refer to ArcGIS Pro: Labeling basics for more information.
- Republish the layer to ArcGIS Online or overwrite the published feature layer to display the feature labels in ArcGIS Online Map Viewer.
Remove the special characters or spaces from the layer attributes
- In ArcGIS Pro, right-click the layer, and click Attribute Table.
- In the attribute table, remove the special characters or spaces from the attribute fields. Refer to FAQ: What characters should not be used in ArcGIS for field names and table names? for more information.
- Create a new unique values symbology and label class. Ensure there are no special characters or spaces in the label class name.
- Republish the layer to ArcGIS Online or overwrite the published feature layer to display the feature labels in ArcGIS Online Map Viewer.
Note:
The label class name issue only occurs in ArcGIS Online Map Viewer Classic. Alternatively, open the layer in the new Map Viewer to display the labels properly.
Article ID: 000025402
- ArcGIS Online
- ArcGIS Pro 2 8 x
- ArcGIS Pro 2 7 x
- ArcGIS Pro 2 x
Get support with AI
Resolve your issue quickly with the Esri Support AI Chatbot.


Related Information
Discover more on this topic
Search for related information
Find training related to this topic
Explore ideas and give feedback
Get help from ArcGIS experts
Start chatting now