HOW TO
Export an attribute table from ArcGIS Pro to Microsoft Excel
Summary
Exporting an attribute table from ArcGIS Pro to Microsoft Excel is a common workflow, as some records are not editable in ArcGIS Pro, or the attribute table must be modified externally without altering original records. This article describes a few methods to export an attribute table from ArcGIS Pro to Microsoft Excel for external editing.
Procedure
Export the attribute table using the Table To Excel tool
- Open an ArcGIS Pro project. On the top ribbon, click the Analysis tab > Tools.
- In the Geoprocessing pane, search for Table To Excel (Conversion Tools), and click it. The Table To Excel window opens. In the Table To Excel window, click Parameters.
- Click the drop-down menu of Input Table or Browse
 , and select the feature layer with the desired attribute table.
 - In the Output Excel File (.xls or .xlsx) section, click Browse
 .
.
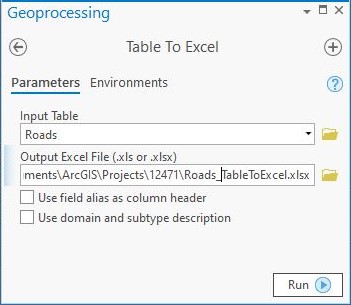
- In the Output Excel File (.xls or .xlsx) window, specify a folder location for the Microsoft Excel file. In the Name section, specify a name for the Microsoft Excel file.
- Click the All supported drop-down menu, select a format (.xls or .xlsx) for the Microsoft Excel file, and click Save.

- In the Table To Excel tool, click Run.
- Navigate to the specified folder location in Windows. The attribute table is exported and can be opened in the Microsoft Excel Worksheet type.
Export the attribute table to a CSV file
- In the Contents pane, right-click the desired feature layer, and select Data > Export Table.
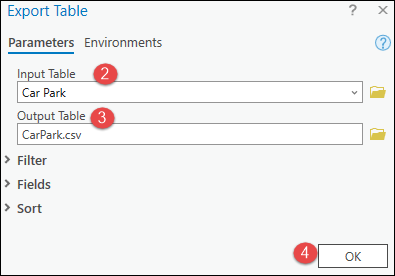
- In the Export Table dialog box, click the drop-down menu of Input Table, and select the desired feature layer.
- Provide a name for Output Table with the .csv file extension for the exported table, and click Browse
 to specify the location for the .csv file.
 - Click OK.
- Navigate to the specified folder location in Windows. The attribute table is exported and can be opened in the Microsoft Excel Comma Separated Value File type.
Copy all the records in the attribute table and paste them in a Microsoft Excel file
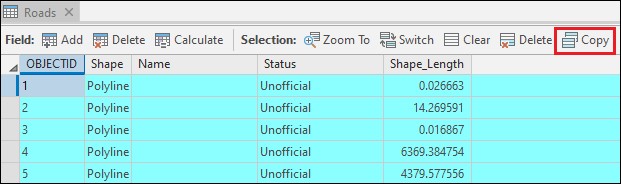
- In the Contents pane, right-click the desired feature layer and click Selection > Select All to select all the records in the attribute table.
- In the Contents pane, right-click the desired feature layer, and select Attribute Table to open it.
- In the Field section of the attribute table, click Copy to copy all the records.
- Open a new Excel file.
- In the Excel file, right-click the A1 cell. Under Paste Option, select a desired paste option, and paste the records.
- Save the file.
Article ID: 000021825
Software:
- ArcGIS Pro 3 1
- ArcGIS Pro 3 0
- ArcGIS Pro 2 x
Get support with AI
Resolve your issue quickly with the Esri Support AI Chatbot.


Related Information
Discover more on this topic
Search for related information
Find training related to this topic
Explore ideas and give feedback
Get help from ArcGIS experts
Start chatting now