HOW TO
Use best practices for multi-user capabilities in ArcGIS for Excel
Summary
ArcGIS for Excel supports multi-user editing, with some functionalities limited to editing existing rows and inserting new ones. Editing existing rows and adding new rows is possible. Inserting columns and deleting rows are not supported.
Users have the ability to share worksheet links across different Microsoft tenants by adjusting the permissions on the shared Excel link.
Note:
Adding layers requires a refresh, as symbology changes are specific to the map.
To view added columns, refresh the layers; a browser refresh alone will be ineffective.
When editing a cell, those changes are immediately visible to others on the spreadsheet. However, updates on other users' maps will experience up to a 10-second delay.
Editing in hosted tables is also supported.
Furthermore, when a new layer is added to the map, it does not appear in others' table of contents immediately. Reload either the browser or the task pane to view the newly added layer.
Procedure
Best practices for multi-user capabilities in ArcGIS for Excel require that the Excel document be shared.
- Open a new Microsoft Excel worksheet.
- Sign into ArcGIS for Excel. Refer to ArcGIS for Microsoft 365: Sign in to an ArcGIS account for more information.
- If not already installed, install ArcGIS for Excel.
- Add a data layer. Refer to ArcGIS for Microsoft 365: Add a feature layer or group layer to a map and an Excel worksheet for more information.
- Share your worksheet with collaborators to minimize refreshing.
- Click the Share button above the ribbon, then click Share…
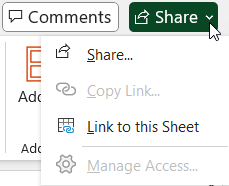
- Click the sharing options icon
 and select the desired sharing level.
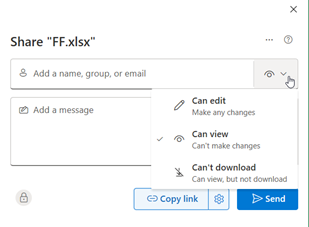
- In the Add a name, group, or email field, add collaborators.
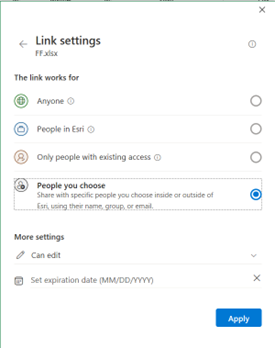
- Click the Link Settings
 icon to open the Link settings window. Toggle who the link will work for. Click Apply to return to the sharing window.
- Click Send.
Note:
If a workbook is not shared publicly, only members of the organization will be able to see the workbook and map.
Article ID: 000035102
- ArcGIS for Excel
Get support with AI
Resolve your issue quickly with the Esri Support AI Chatbot.


Related Information
Discover more on this topic
Search for related information
Find training related to this topic
Explore ideas and give feedback
Get help from ArcGIS experts
Start chatting now