PROBLEM
Unable to add attachments to feature classes in ArcGIS Pro
Description
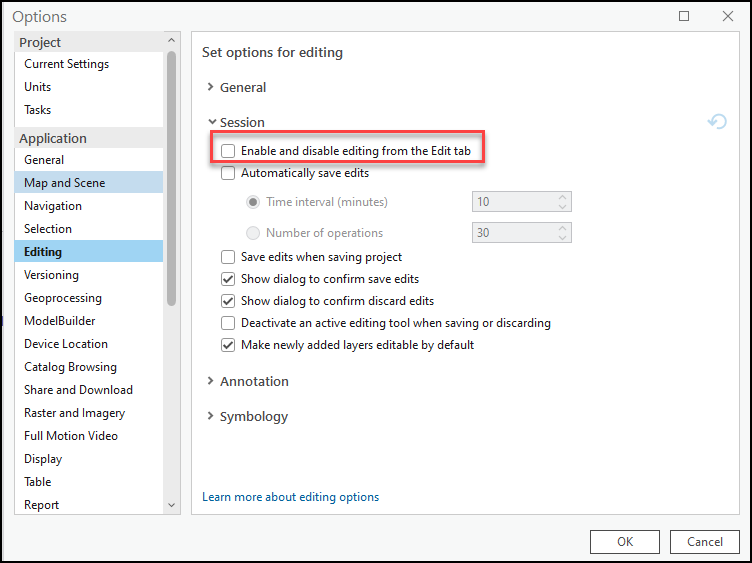
In some instances, when attempting to use the Add button from the Attributes pane to add attachments to feature classes in ArcGIS Pro, the button is disabled, as shown below.

Cause
- The ArcGIS Pro Basic license is used. A Standard or Advanced license is required to add or remove file attachments.
- The ‘Enable and disable editing from the Edit tab’ check box is checked.
- Attachments are not enabled. Attachments must be enabled before adding them to the feature classes. Refer to ArcGIS Pro: Enable Attachments (Data Management) for more information.
- The ArcGIS Pro project is corrupted.
- The ArcGIS Pro installation is not complete.
Solution or Workaround
Assign a ArcGIS Pro Standard or Advanced license to the member
Administrators or organization members with privileges to manage licenses must assign the ArcGIS Pro Standard or Advanced license to the member. Refer to ArcGIS Pro: Assign or unassign an ArcGIS Pro add-on license or extension for more information.
For ArcGIS Pro Single Use or Concurrent Use licenses, contact Esri Customer Service to upgrade the license.
Uncheck the 'Enable and disable editing from the Edit tab' check box
Refer to ArcGIS Pro: Show or hide the Edit button for instructions. However, in Step 3, uncheck Enable and disable editing from the Edit tab.
Note:
Alternatively, on the top ribbon of the ArcGIS Pro project, click Project > Options > Editing. Navigate to the Session section and uncheck Enable and disable editing from the Edit tab.
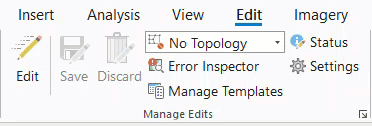
Note:
Optionally, click Edit from the Manage Edits group on the Edit tab to start an edit session before adding the attachments.
Enable the attachments
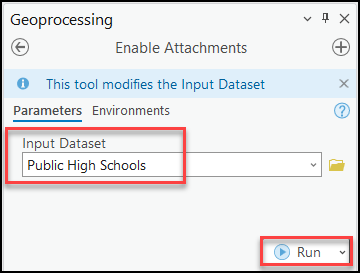
- In ArcGIS Pro, navigate to the Analysis tab.
- On the Analysis tab, in the Geoprocessing group, click Tools.
- In the Geoprocessing pane, search for and click Enable Attachments (Data Management Tools).
- In the Enable Attachments pane, on the Parameters tab, select the feature layer from the Input Dataset drop-down list or by clicking the Browse button. Click Run.
Readd the feature layers or restart ArcGIS Pro
Remove the original feature layers and readd the layers to the ArcGIS Pro project. Alternatively, close the current session of ArcGIS Pro and restart the local machine.
Perform a clean uninstall and reinstall of ArcGIS Pro
Warning:
The instructions below include making changes to essential parts of the operating system. Esri recommends performing a backup of the operating system and files, including the registry, before proceeding.

Esri cannot guarantee results from incorrect modifications while following these instructions. Exercise caution. Consult a qualified computer systems professional if necessary.
Perform a clean uninstall by referring to the instructions found in the Esri Australia Technical Blog: Performing a clean uninstall of ArcGIS Pro document. After performing a clean uninstall, download and install the latest version of ArcGIS Pro.
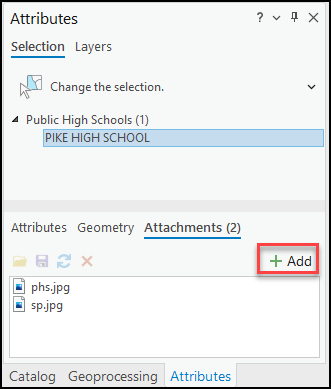
The image below shows the Add button is enabled and attachments are added to the feature classes through the Add button.
Article ID: 000030211
- ArcGIS Pro 3 1
- ArcGIS Pro 3 0
- ArcGIS Pro 2 x
Get support with AI
Resolve your issue quickly with the Esri Support AI Chatbot.


Related Information
Discover more on this topic
Search for related information
Find training related to this topic
Explore ideas and give feedback
Get help from ArcGIS experts
Start chatting now