PROBLEM
The Classify symbology is not available for raster datasets in ArcGIS Pro
Description
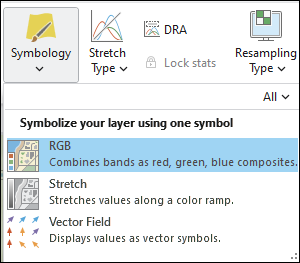
In ArcGIS Pro, the Classify symbology is not listed in the Symbology drop-down menu for certain raster datasets. It is particularly useful for visualizing datasets such as elevation, temperature, or precipitation where values range continuously across a spectrum.
The image shows Classify is not listed in the Symbology drop-down menu.
Cause
The raster dataset is not a single-band raster or does not contain continuous values, causing the Classify symbology to be unavailable. The Classify symbology is not available for multiband rasters, such as RGB satellite imagery or categorical data. Some raster formats store categorical data, such as land cover types or building classifications, rather than continuous numeric values. The Classify symbology is primarily designed for single-band or continuous raster datasets.
Solution or Workaround
Use one of the following workarounds.
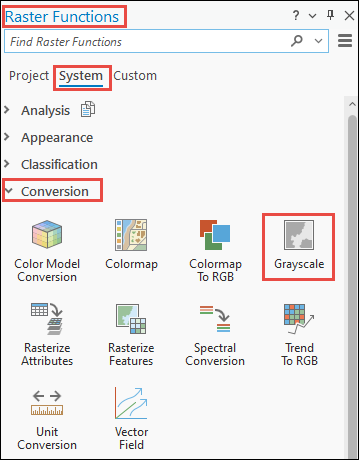
Convert the multiband image to a single-band grayscale image
- In ArcGIS Pro, navigate to the Imagery tab.
- In the Analysis group, click the Raster Functions drop-down menu and select Raster Functions.

- In the Raster Functions pane, on the System tab, expand Conversion and select Grayscale.
- Configure the parameters in the Grayscale Properties pane. Refer to ArcGIS Pro: Grayscale function for more information.
- On the Parameters tab, for Raster, select the raster layer from the drop-down menu.
- Leave the other parameters as default.
- Click Create new layer.
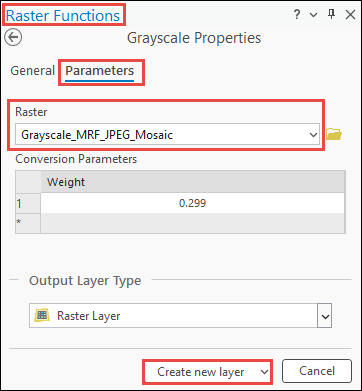
Note:
The Grayscale raster function creates a new grayscale raster layer.
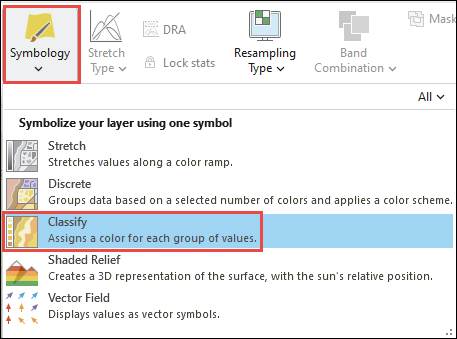
- Change the symbology of the newly created raster layer to Classify. Refer to ArcGIS Pro: Modify the appearance of an image layer for instructions.
Note:
Alternatively, right-click the newly created layer in the Contents pane and select Symbology. In the Symbology pane, for Primary symbology, select Classify.
Use the Reclassify tool to change the values in the raster layer
Note:
The Reclassify tool requires a Spatial Analyst or 3D Analyst license.
- In ArcGIS Pro, navigate to the Analysis tab, click Tools.
- In the Geoprocessing pane, search for and select Reclassify (Spatial Analyst Tools).
- Configure the parameters in the Reclassify pane. Refer to ArcGIS Pro: Reclassify (Spatial Analyst) for more information.
- For Input raster, select the raster layer from the drop-down menu.
- For Reclass field, select the field to be classified from the drop-down menu.
- For Reclassification, click Classify.
- For Output raster, specify a name and location for the output raster layer.
- Click Run.
The image shows the Classify symbology listed in the Symbology drop-down menu for the raster dataset.
Article ID: 000034771
- ArcGIS Pro 3 3
- ArcGIS Pro 3 2
- ArcGIS Pro 3 4
Get support with AI
Resolve your issue quickly with the Esri Support AI Chatbot.


Related Information
Discover more on this topic
Search for related information
Find training related to this topic
Explore ideas and give feedback
Get help from ArcGIS experts
Start chatting now