PROBLEM
The attachment table is not included in the feature layer published to the ArcGIS Enterprise portal
Description
When a feature layer with attachments enabled is published from ArcGIS Pro to the ArcGIS Enterprise portal, the associated attachment table is not accessible in Map Viewer. As a result, any custom attributes stored in the attachment table cannot be viewed, edited, or managed within Map Viewer.
Cause
This is expected behavior. When published as a feature layer, the attachment table is not included as a standalone table in the ArcGIS REST Services Directory or in Map Viewer. Standalone tables, including attachment tables, can be accessed if they are added to the map prior to publishing as a map image layer to the ArcGIS Enterprise portal. However, editing the attachment table through the map image layer is not supported. Refer to ArcGIS Pro: Use map image layers for more information.
Solution or Workaround
As a workaround, create a separate related table to store attachment attributes and link the table to the feature layer using a common key, such as GlobalID or another shared field. Starting with ArcGIS Enterprise 11.2, Map Viewer supports viewing and editing related tables.
- In ArcGIS Pro, create a new table to store the attachment attributes.
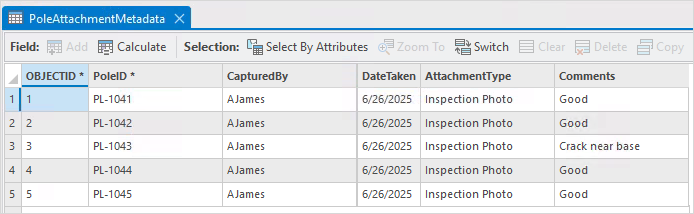
- Create a new table. Refer to ArcGIS Pro: Define tables for instructions. In this example, the table PoleAttachmentMetadata is created.
- Add new fields to the table and populate the fields with the corresponding data.
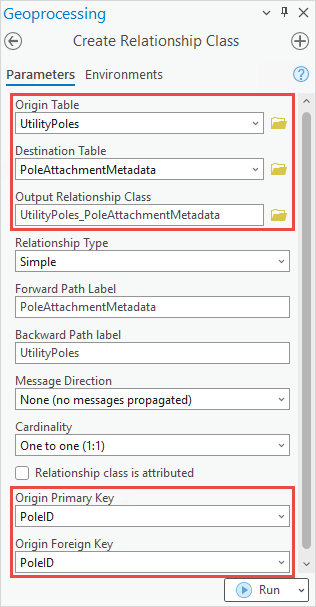
- Use the Create Relationship Class tool to link the feature layer and the related table. For instructions to find and use the geoprocessing tool, refer to ArcGIS Pro: Find a geoprocessing tool.
- In the Create Relationship Class pane, for Origin Table, select the feature layer. In this example, UtilityPoles is the feature layer.
- For Destination table, select the table.
- For Output Relationship Class, specify the output name.
- For Origin Primary Key, select a field from the feature layer matching a key field in the related table.
- For Origin Foreign Key, select a field from the related table matching a key field in the feature layer.
- Leave the other parameters as default and click Run.
- Publish the feature layer as a web feature layer to the ArcGIS Enterprise portal. Refer to ArcGIS Pro: Share a web feature layer using the default configuration for instructions.
- Add the feature layer in Map Viewer and configure the pop-up to display the related records. Refer to Portal for ArcGIS: Show related records for instructions.
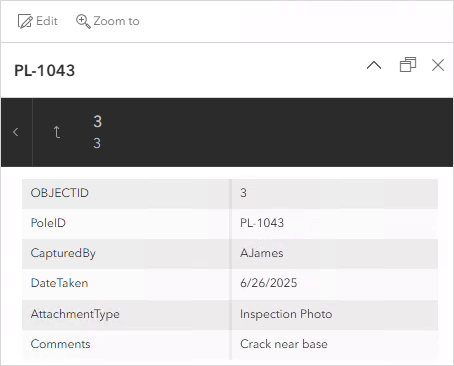
The related table containing the attachment attributes is displayed in the feature layer’s pop-up in Map Viewer, as shown in the image below.
Article ID: 000036944
- ArcGIS Pro
- Portal for ArcGIS
Get support with AI
Resolve your issue quickly with the Esri Support AI Chatbot.


Related Information
Discover more on this topic
Search for related information
Find training related to this topic
Explore ideas and give feedback
Get help from ArcGIS experts
Start chatting now