PROBLEM
Running the publish.py file to deploy Esri Demographics services fails and returns an exception
Description
Esri Demographics map services fuel color coding capabilities in ArcGIS Business Analyst Web App and ArcGIS Business Analyst Desktop. It is essential for these services to be published during the installation process, after installing the Business Analyst data.
The publish.py file for deploying Esri Demographics services is located in the following file path:
<Data Install Path>\ServiceDefinitions\publish.py
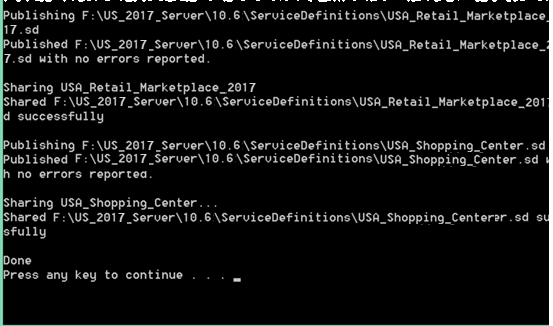
The sample image below demonstrates a successful run of the publish.py file.
However, in some cases, the script fails and returns the following exception:
Error:
TypeError: object of type 'NoneType' has no len()
This process is no longer applicable with the introduction of ArcGIS Business Analyst Enterprise 10.7 and later.
Cause
ArcGIS GIS Server and Portal for ArcGIS are installed on different machines. Deploying Esri Demographics services requires access to both Esri specific modules from the Portal for ArcGIS machine, and the Python modules from the Python27 folder installed with ArcGIS GIS Server.
Solution or Workaround
The publish.py script runs successfully when both ArcGIS GIS Server and Portal for ArcGIS are installed on the same machine. However, if both software components are installed on different machines, follow the instructions below to publish the Esri Demographics services manually.
- Publish the services manually.
- Create a folder connection to the Business Analyst Data location in the Catalog tree. The default location of the data file is as follows:
C:\ArcGIS\Business Analyst\<Data>
- Right-click the .sd files in the Catalog pane and publish them as a service. Refer to ArcGIS Server: Publish a service definition file from ArcMap for more information.
- Share the newly created portal item (demographic services) with the Esri Demographic Layers group.
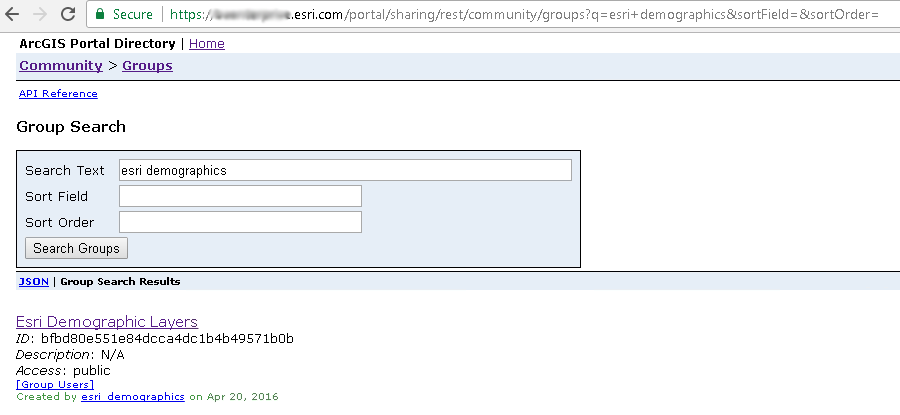
- Log in to ArcGIS Portal Directory. Navigate to sharing > rest > community > groups.
- Search for esri demographics.
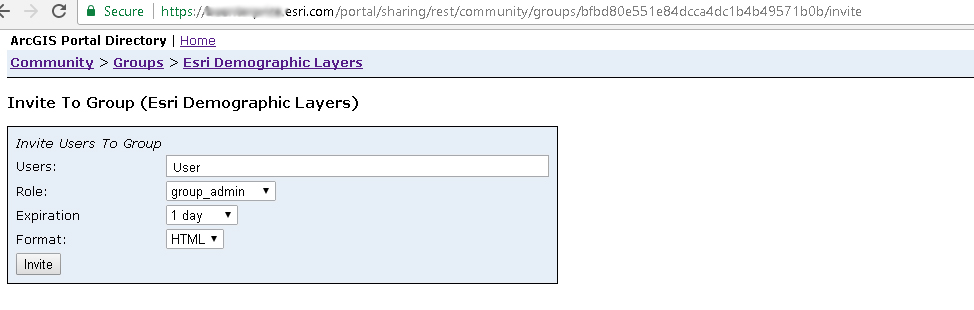
- Click the Esri Demographic Layers group. Type /invite at the end of the link in the address bar.
- Fill in the required details.
- Log in to Portal for ArcGIS Home page using the user details specified in Step d. Accept the invitation to the Esri Demographic Layers group.
- Access the portal items (demographic services) previously published and share them with the Esri Demographic Layers group and the Portal organization.
Article ID: 000017632
- ArcMap
- Portal for ArcGIS
- ArcGIS Server
Get support with AI
Resolve your issue quickly with the Esri Support AI Chatbot.


Related Information
Discover more on this topic
Search for related information
Find training related to this topic
Explore ideas and give feedback
Get help from ArcGIS experts
Start chatting now