PROBLEM
Georeferenced image incorrectly displayed in ArcGIS Pro
Description
After georeferencing an image in ArcGIS Pro, the image does not display as expected. In many cases, the image fails to display in the project during or after the control points have been added, even though the control points move correctly. In addition, the image appears distorted or flipped upside down.
Cause
- The Auto Apply option is enabled, causing uneven distribution of the control points across the image.
- The image is excessively stretched, causing distortion and misalignment with reference data.
- The coordinate system of the georeferenced image does not match the map's coordinate system.
- The georeferencing session is inconsistent due to misplaced control points and software glitches.
Solution or Workaround
Disable the Auto Apply option
Disable the Auto Apply option to prevent the image from updating after adding each control point. Refer to ArcGIS Pro: Georeferencing options for more information.
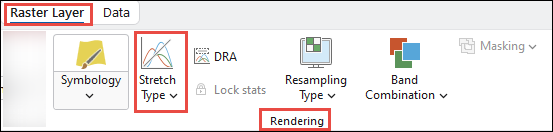
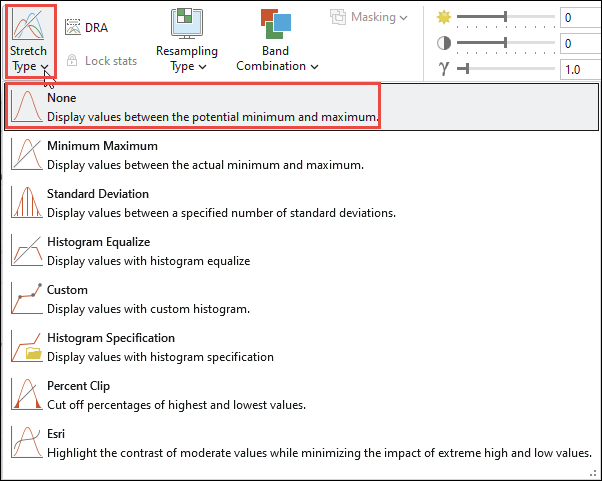
Set the stretch type method to None
Set Stretch Type to None to allow the data to be viewed in its original form without any visual adjustments, regardless of the availability of statistics. Refer to ArcGIS Pro: Stretch function for more information.
- Open the ArcGIS Pro project.
- Select the raster layer in the Contents pane.
- On the Raster Layer ribbon tab, in the Rendering group, select None from the Stretch Type drop-down menu.
Match the coordinate system of the georeferenced image with the map's coordinate system
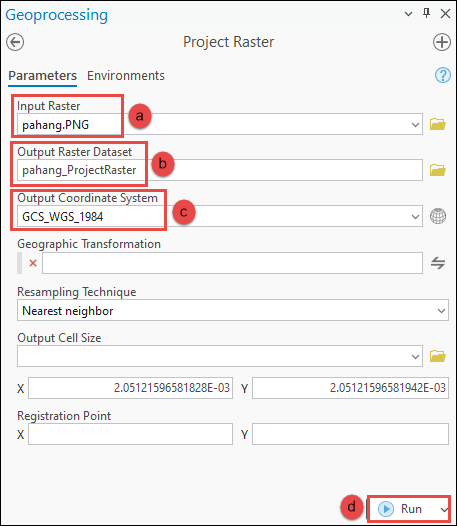
To change the coordinate system of the georeferenced image, use the Project Raster tool in ArcGIS Pro. Refer to ArcGIS Pro: Project Raster (Data Management) for more information.
- Open the ArcGIS Pro project.
- Navigate to the Analysis tab and click Tools.
- In the Geoprocessing pane, search for and select Project Raster (Data Management Tools).
- Configure the parameters in the Project Raster pane.
- For Input Raster, select the raster dataset from the drop-down menu. In this example, the raster dataset pahang.PNG is selected.
- For Output Raster Dataset, specify a name and location for the output dataset or feature class. In this example, the output is named pahang_ProjectRaster.
- For Output Coordinate System, select the coordinate system from the drop-down menu or click Select coordinate system
 to specify the coordinate system. In this example, GCS_WGS_1984 is selected.
 - Leave the other parameters as default. Click Run.
Note:
Optionally, if the georeferenced image has an unknown coordinate system, use the Define Projection tool in ArcGIS Pro to update the coordinate system information such as the map projection and datum, stored with the dataset.
Restart the georeferencing session in ArcGIS Pro
Close the georeferencing session. Refer to ArcGIS Pro: Close for instructions. Restart a new georeferencing session. Refer to ArcGIS Pro: Georeferencing tools for instructions.
Remove and re-add the georeferenced image in ArcGIS Pro
Remove the existing georeferenced image. Refer to ArcGIS Pro: Remove items for instructions. Then, re-add the image to the ArcGIS Pro project. For instructions, refer to ArcGIS Pro: Add data from a geodatabase or ArcGIS Pro: Add data from a folder.
Article ID: 000034426
- ArcGIS Pro 3 3
- ArcGIS Pro 3 2
- ArcGIS Pro 3 4
Get support with AI
Resolve your issue quickly with the Esri Support AI Chatbot.


Related Information
Discover more on this topic
Search for related information
Find training related to this topic
Explore ideas and give feedback
Get help from ArcGIS experts
Start chatting now