PROBLEM
Add Join excludes records when definition query is applied in ArcGIS Pro
Description
In ArcGIS Pro, when performing a join to a table with a definition query, the join does not return all records even though the 'Keep all input records' setting in the Add Join tool is checked. As a result, records from the input table with no matching record in the join table are excluded, leading to incomplete and inaccurate analysis.
Cause
This is expected behavior when a definition query is applied to the join table. In the Add Join tool, the definition query overrides the 'Keep all input records' setting for the target table. Refer to ArcGIS Pro: Usage for more information. The query filters the join table, and only filtered records are used to perform the join. Therefore, the output includes only matching records from the filtered join table and unmatched records are excluded.
Solution or Workaround
Note:
Use the Remove Join tool to remove the existing join before creating a new join using the Add Join tool. Removing an existing join prevents inaccuracies when a new join is applied, as multiple joins on the same dataset can lead to incorrect attribute associations or analysis errors.
Remove the definition query from the join table
- Open the ArcGIS Pro project.
- Remove the definition query to clear the filter from the join table. Refer to ArcGIS Pro: Modify existing queries for instructions.
- Create a new join using the Add Join tool. In the Add Join dialog box, configure the parameters and check the Keep all input records check box.
Export the join table as a new table
- Open the ArcGIS Pro project.
- Export the join table to create a new table containing records that match the definition query. Refer to ArcGIS Pro: Export a table from a map for instructions. In the Export Table dialog box, for Input Table, ensure Use the filtered records is toggled on.

- Join the exported table to the input table. In the Add Join dialog box, configure the parameters and check the Keep all input records check box.
Create a table view with the filtered records
Use the Make Query Table tool to generate a table view by applying the definition query or SQL expression to filter the data.
- Open the ArcGIS Pro project.
- On the Analysis tab, in the Geoprocessing group, click Tools.
- In the Geoprocessing pane, search for and click Make Query Table.
- Configure the Make Query Table tool parameters.
- For Input Tables, click Browse
 and select the join table.
 - For Fields, click the drop-down menu and select a field. Repeat the process to add additional fields from the join table.
- For Expression, construct a query expression to filter the data. Refer to ArcGIS Pro: Build a query for instructions.
- For Table Name, specify a name for the query table.
- Click Run.
- For Input Tables, click Browse

- Join the new query table added to the Contents pane to the input table. In the Add Join dialog box, configure the parameters and check the Keep all input records check box.
Modify the definition query to include null values
- Open the ArcGIS Pro project.
- Add a new clause to the definition query. Refer to ArcGIS Pro: Modify existing queries for instructions.
- Configure the clause to include null values.
- In the query builder, specify the Or clause as follows:
Or <field> is null
- Click Apply and click OK.
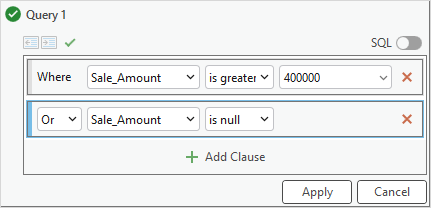
- Perform a new join using the Add Join tool. In the Add Join dialog box, configure the parameters and check the Keep all input records check box.
Article ID: 000034183
- ArcGIS Pro 3 3
- ArcGIS Pro 3 2
- ArcGIS Pro 3 4
Get support with AI
Resolve your issue quickly with the Esri Support AI Chatbot.


Related Information
Discover more on this topic
Search for related information
Find training related to this topic
Explore ideas and give feedback
Get help from ArcGIS experts
Start chatting now