HOW TO
Symbolize point features by color and shape using two fields in ArcGIS Online Map Viewer
Summary
In ArcGIS Online Map Viewer, symbols can be configured for point features based on two fields, with one field defining its color and the other defining its shape. This allows for the simultaneous classification of each point feature with two attributes, providing more detailed symbolization.
In this example, when mapping campsite infrastructure, the first field symbolizes the campsite type (Glamping sites, RV campsite, and Tent Campsites) using colors, while the second field symbolizes the maintenance status (Operational, Maintenance required, and Out of service or damaged) using shapes.
This article outlines the workflow to symbolize point features by color and shape based on two fields in ArcGIS Online Map Viewer.
Procedure
- In ArcGIS Online, open Map Viewer.
- Find and add the point feature layer to the web map. Refer to Steps 1 through 4 in ArcGIS Online: Browse layers for instructions.
- In the Layers pane, click Options
 next to the added layer and click Duplicate.
 - Rename both layers.
- Click Options
 next to the layer and click Rename.
 - Type a new name for the layer and click OK.
- Click Options
- Apply a style to the original layer. Refer to Steps 3 through 5 in ArcGIS Online: Apply a style for instructions. For Step 5, click Field, find and select the desired attribute, and click Add.
- Configure the unique symbol for the original layer using a field to display in varying colors.
- In the Styles pane, click the Types (unique symbols) style and click Style options.
- In the Style options pane, click the colored symbol next to each category in the list to customize the category individually.
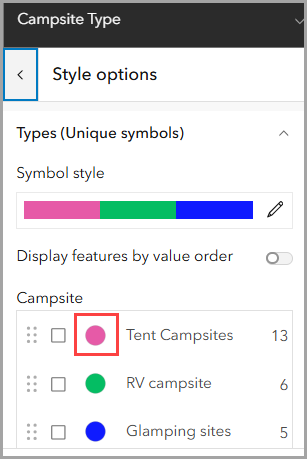
-
- In the Symbol style pane, for Size, adjust the slider handles or specify a new value in the text box.
- For Fill color, select a color from the color picker or specify a custom color using RGB or hexadecimal values.
- Close the pane.
- Repeat Steps 6(b) through 6(e) to change the color of the remaining categories.
- Click Done.
- Configure the unique symbol for the duplicated layer using another field.
- In the Layers pane, click the duplicated feature layer.
- On the Settings (light) toolbar, click Styles.
- In the Styles pane, in the Choose attributes section, click Field.
- In the Select Fields pane, select a field to symbolize and click Add.
- Configure the style for the duplicated layer to display in varying shapes.
- In the Pick a style section, click Style options.
- In the Style options pane, click the colored symbol next to each category in the list to customize the category individually.
- Click the symbol under Current symbol, select a shape symbol, and click Done.
- For Size, adjust the slider handles or specify a value smaller than the symbol size of the original layer in the text box.
- In the Symbol style pane, for Fill color, select black from the color picker or specify 000000 in the hexadecimal text box.
- Close the pane.
- Repeat Steps 8(a) through 8(f) to symbolize the other attribute categories using different shapes.
- Click Done to close the Style options pane.
- In the Styles pane, click Done to finish styling the layers.
- Group the layers. Refer to ArcGIS Online: Create and manage group layers for instructions. In the group layer, ensure the layer with the shape symbols is at the top of the drawing order.
- Apply blend mode to the duplicated layer in the group. Refer to ArcGIS Online: Apply blend modes for instructions. For Step 7 in the documentation, select Destination In.
- Save the web map.
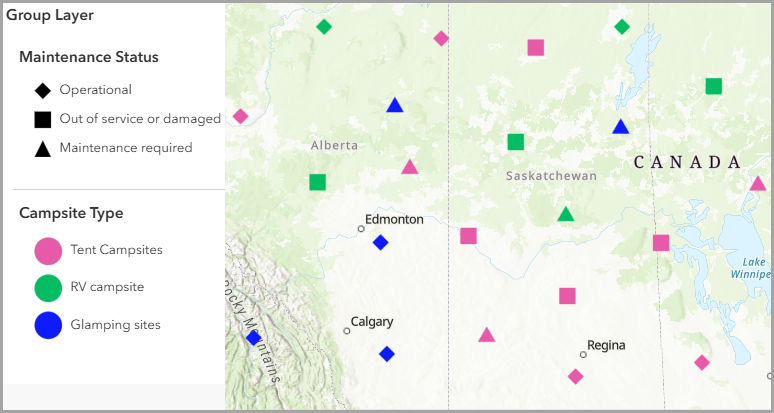
The map below shows the point feature layers styled by colors and shapes using two fields.
Article ID: 000034236
- ArcGIS Online
Get support with AI
Resolve your issue quickly with the Esri Support AI Chatbot.


Related Information
Discover more on this topic
Search for related information
Find training related to this topic
Explore ideas and give feedback
Get help from ArcGIS experts
Start chatting now