HOW TO
Smooth contour lines in ArcGIS Pro
Summary
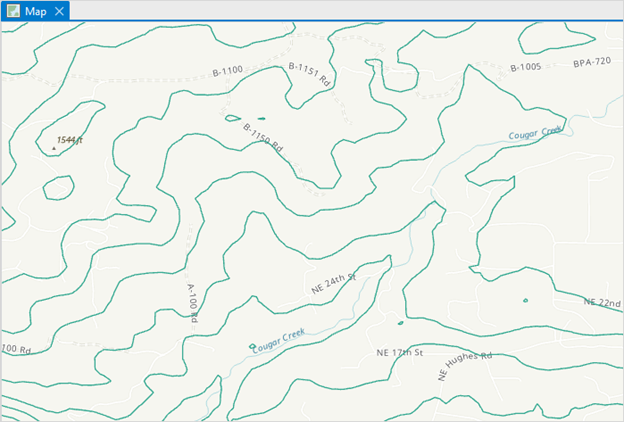
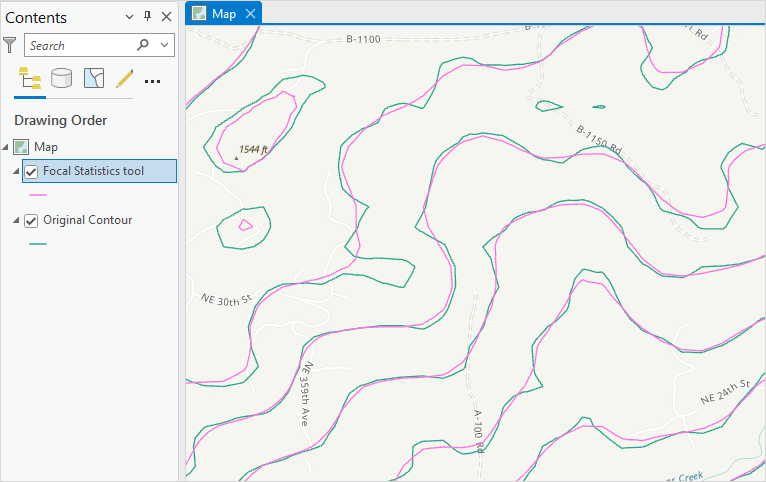
Contour lines are important in a map to help visualize surface topology and are a good way to display terrain surface. Sometimes, when creating a contour feature layer from raster data in ArcGIS Pro, the contour lines created are jagged and less smooth as shown in the image below.
This article describes three workflows involving the Contour function, the Smooth Line tool, and the Focal Statistics tool to smooth contour lines in ArcGIS Pro.
Procedure
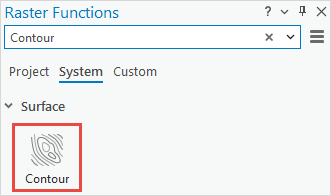
Use the Contour function
In ArcGIS Pro, processing some large raster datasets is time-consuming. This workflow is useful for very large datasets such as the World Elevation. In this workflow, the Contour function creates a raster contour output. The output generated is instantaneous and can be exported as a feature line layer or can be visualized as an overlay in a map. This is suitable for visualization purposes as the elevation value of the contour can be displayed based on the source elevation layer using Identify. The Adaptive Smoothing parameter in this function controls the amount of smoothing applied to the contour lines. Refer to ArcGIS Pro: Contour function for more information.
- Open the ArcGIS Pro project.
- On the Analysis tab, in the Raster group, click Raster Functions.
- In the Raster Functions pane, on the System tab, search for and click Contour in the Find Raster Functions search box.
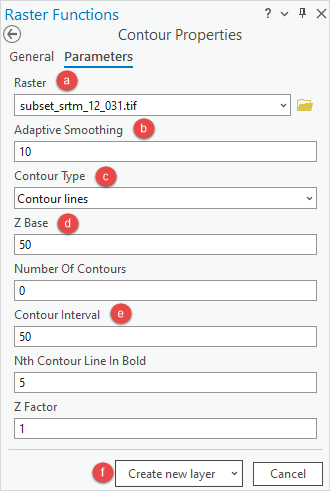
- In the Contour Properties pane, configure the Parameters tab.
- Select the raster layer of the contour from the Raster drop-down list.
- Specify the value for Adaptive Smoothing. The default value is 2.5. A higher value produces smoother contour lines and appears less jagged. Refer to ArcGIS Pro: Parameters for more information.
- For Contour Type, ensure the default Contour lines option is selected.
- For Z Base, specify the base contour value. In this example, the value is set to 50 meters.
- Specify either the Number Of Contours or Contour Interval field to determine the space between two contour lines. In this example, Contour Interval is specified as 50.
Note:
Define the space between the two contour lines using either the static (by specifying the Contour Interval field) or dynamic (by specifying the Number Of Contours field) value.
- Click Create new layer.
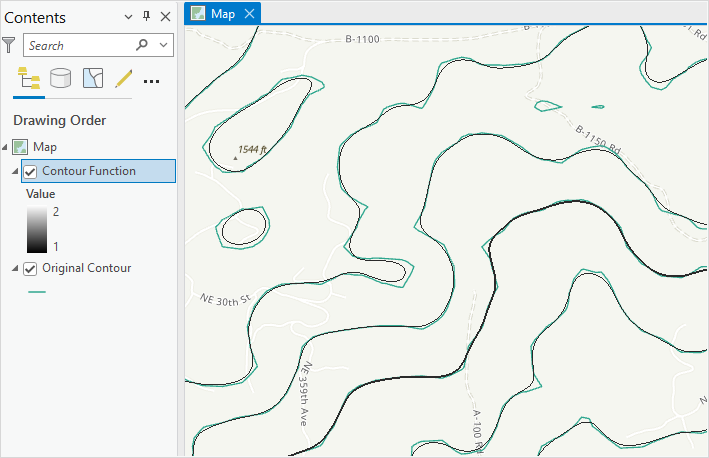
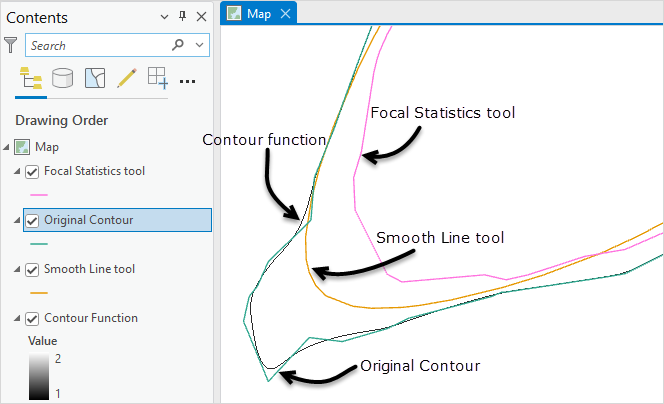
The contour lines created using the Contour function appear smoother than the original contour lines.
Use the Smooth Line tool
Note:
The Smooth Line tool requires an ArcGIS Desktop Standard or Advanced license.
- Open the ArcGIS Pro project.
- In the Geoprocessing pane, search for and click the Smooth Line tool. Refer to ArcGIS Pro: Run a tool in the Geoprocessing pane for instructions.
- In the Smooth Line pane, configure the Parameters tab.
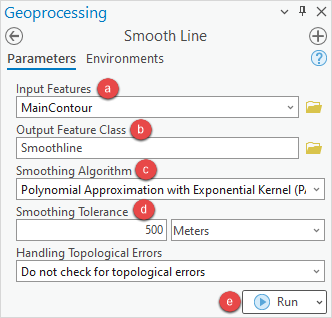
- Select the contour feature layer from the Input Features drop-down list.
- Provide a name for Output Feature Class, and click Browse
 to specify the location for the output feature class.
 - Select the smoothing algorithm method for the contour lines from the Smoothing Algorithm drop-down list. Refer to ArcGIS Pro: Usage for more information. In this example, Polynomial Approximation with Exponential Kernel (PAEK) is selected.
Note:
Skip Step (d) if 'Bezier interpolation' is selected as the smoothing algorithm method.
- Specify the preferred value and unit for Smoothing Tolerance. Refer to ArcGIS Pro: Parameters for more information. In this example, the tolerance value is set to 500 meters.
- Click Run.
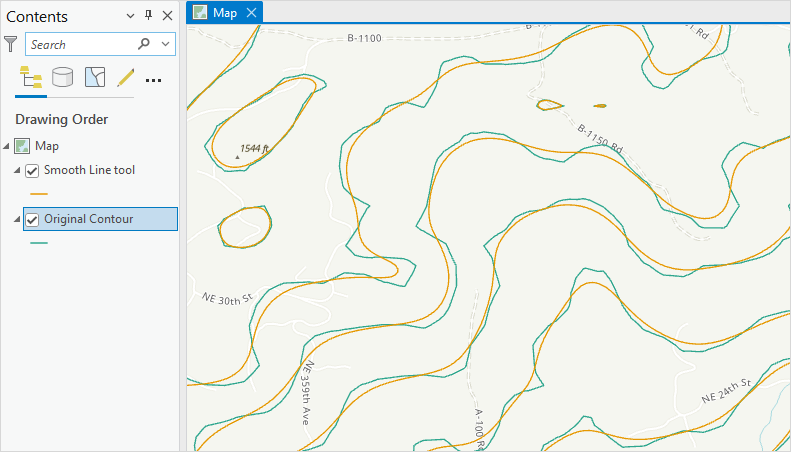
The contour lines created using the Smooth Line tool appear smoother than the original contour lines.
Use the Focal Statistics tool
Note:
The Focal Statistics tool requires a Spatial Analyst or Image Analyst license, and the Contour tool requires the Spatial Analyst or 3D Analyst license.
- Open the ArcGIS Pro project.
- Smooth the raster layer by averaging the cell values using the Focal Statistics tool.
- In the Geoprocessing pane, search for and click the Focal Statistics tool. Refer to ArcGIS Pro: Run a tool in the Geoprocessing pane for instructions.
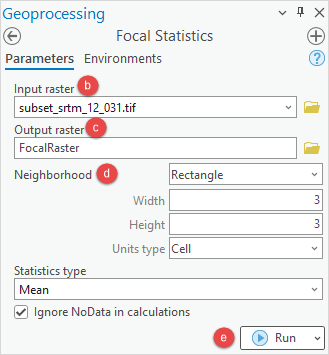
- In the Focal Statistics pane, on the Parameters tab, select the raster layer of the contour from the Input raster drop-down list.
- Provide a name for Output raster, and click Browse
 to specify the location for the output file.
 - Use the default details for Neighborhood and Statistics type. Refer to ArcGIS Pro: Parameters for more information.
- Click Run.
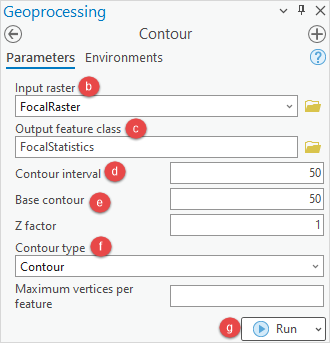
- Create a contour feature layer using the Contour tool.
- In the Geoprocessing pane, search for and click the Contour tool. Refer to ArcGIS Pro: Run a tool in the Geoprocessing pane for instructions.
- In the Contour pane, on the Parameters tab, select the raster layer from the Input raster drop-down list.
- Provide a name for Output feature class, and click Browse
 to specify the location for the contour feature layer.
 - For Contour interval, specify the space between two contour lines. In this example, the value is set to 50 meters.
- For Base contour, specify the base contour value. In this example, the value is set to 50 meters.
- For Contour type, ensure the default Contour option is selected.
- Click Run.
The contour lines created using the Focal Statistics tool appear smoother than the original contour lines.
The image below shows the contour lines created using different tools in ArcGIS Pro.
Article ID: 000027916
- ArcGIS Pro 3 0
- ArcGIS Pro 2 8 x
- ArcGIS Pro 2 7 x
- ArcGIS Pro 2 x
Get support with AI
Resolve your issue quickly with the Esri Support AI Chatbot.


Related Information
Discover more on this topic
Search for related information
Find training related to this topic
Explore ideas and give feedback
Get help from ArcGIS experts
Start chatting now