HOW TO
Set up logging for ArcGIS Workflow Manager in ArcGIS Pro
Summary
ArcGIS Workflow Manager can be configured to support many types of workflows, depending on an organization's needs. Setting up logging for Workflow Manager in ArcGIS Pro enables information to be stored in logs that allow organizations to review events, troubleshoot errors, and identify problems. For example, preconfigured steps can be set in the logs to guide users through a workaround when a problem is identified and addressed. This article provides the workflow to set up the ArcGIS Workflow Manager log when working in ArcGIS Pro.
Procedure
Warning:
Setting up logging for Workflow Manager in ArcGIS Pro requires changes to the Windows Registry. Esri cannot be held liable for issues that may arise as a result of these edits and recommends performing a backup of the registry before proceeding. Exercise caution. Consult a qualified computer systems professional if necessary. Refer to Microsoft: How to back up and restore the registry in Windows for more information.
Note:
This workflow requires an ArcGIS Workflow Manager license and does not involve any editing or deleting of current registry items, only the addition of one new item.
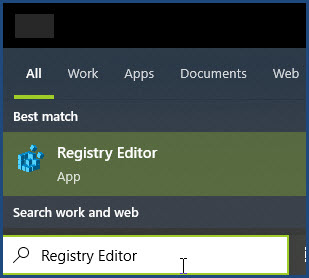
- On the Start menu, search for 'Registry Editor' in the search box, and click Registry Editor app to open the Windows Registry Editor window.
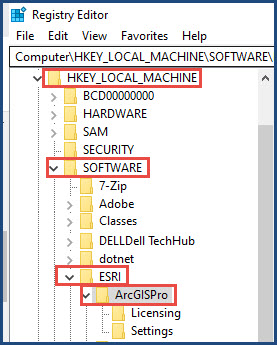
- In the Registry Editor window, navigate to HKEY_LOCAL_MACHINE > SOFTWARE > ESRI > ArcGISPro.
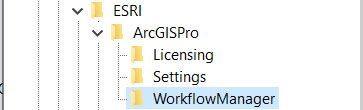
- Select the WorkflowManager key. If the key is absent, create the key.
- Right-click the ArcGISPro folder.
- Select New > Key
- Rename the key to WorkflowManager.
- Add the first entry in the Registry Editor window.
- Right-click an empty space in the window and select New > DWORD (32-bit) Value.
- Right-click the newly created value and select Rename. Change the name of the new value created to LogLevel.
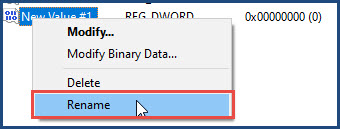
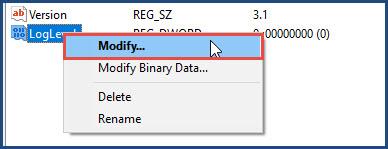
- Right-click the new entry and select Modify.
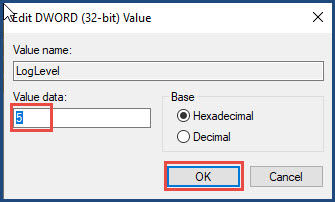
- Under Value data, type a value of 5 and click OK.
- Create a new entry with a string value at the preferred file path location where the log must be created.
- Right-click an empty space in the window and select New > String Value.
- Right-click the newly created entry and Rename to LogsPath.
- Right-click the entry and click Modify.
- In the Edit String dialog box, under Value data, paste the file path address and click OK.
- Close or minimize the Registry Editor window and open ArcGIS Pro.
- In ArcGIS Pro, create a workflow connection. Refer to ArcGIS Pro: Connect to a workflow connection for instructions. Once connected, check the log location specified in Step 4(d) to ensure a log is created.
Article ID: 000020983
- ArcGIS Pro 3 1
- ArcGIS Pro 3 0
- ArcGIS Pro 2 9x
Get support with AI
Resolve your issue quickly with the Esri Support AI Chatbot.


Related Information
Discover more on this topic
Search for related information
Find training related to this topic
Explore ideas and give feedback
Get help from ArcGIS experts
Start chatting now