HOW TO
Retain marker symbol layer within rotated attribute-driven symbology in ArcGIS Pro
Summary
In ArcGIS Pro, attribute-driven symbology is used to dynamically adjust symbol properties, such as rotation, size, and color, based on values stored in attribute fields. When attribute-driven rotation is applied to a customized symbol that is saved to a style and composed of multilayer point symbols, the symbol rotates as a single unit, and the individual layers cannot be rotated independently. This article describes the workflow to retain a marker symbol layer within the rotated attribute-driven symbology in ArcGIS Pro.
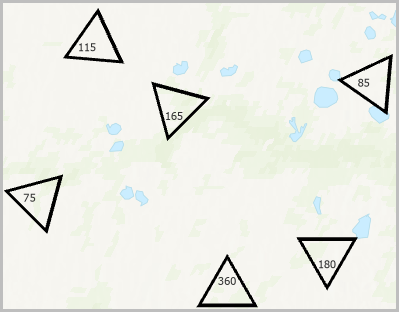
The image below shows the rotated point symbology, customized with the text and triangle-shape marker layers.

Cause
Symbols are composed of one or more component symbol layers. Symbol layers are graphical element that include marker, stroke, fill, or procedural types.
Procedure
Add a new symbol layer in the Symbology pane
- Open the ArcGIS Pro project.
- Add a new symbol layer in the Symbology pane.
- In the Contents pane, click the symbol of the point feature layer.
- In the Symbology pane, click the Properties tab and click the Structure tab
 .
. - Under Layers, click Add symbol layer and select Import layers from a symbol.
- In the Import layers from symbol dialog box, under Favorites, select the customized symbol and click Import.
- Click Delete layer
 to remove the existing symbol layer.
Note: Ensure the attribute-driven symbology is enabled before connecting symbol properties to the feature layer attributes. Refer to ArcGIS Pro: Enable attribute-driven symbology for more information.
- Apply rotation to the desired symbol marker layer based on the attribute value. Refer to ArcGIS Pro: Connect symbol properties to attributes for instructions. In Step 5, click the No attribute mapping defined button next to the Angle property under Rotation.
Create a new feature class for attribute-driven symbology
- Open the ArcGIS Pro project.
- Copy the existing feature layer to a new feature layer using the Copy Features tool.
- Change the new feature layer symbol to the customized symbol.
- In the Contents pane, right-click the new feature layer and click Symbology.
- In the Symbology pane, under Primary symbology, select Unique Values from the drop-down list.
- In the Field 1 menu, select the desired field for rotation from the drop-down list.
- On the Classes tab, click the symbol.
- In the Format symbol mode of the Symbology pane, under Favorites, select the customized symbol.
- Enable the attribute-driven symbology.
- In the Format Symbol mode of the Symbology pane, click the menu button
 .
. - Select the Allow symbol property connections option.
- In the Format Symbol mode of the Symbology pane, click the menu button
- Apply rotation to the desired symbol marker layer based on the attribute value. Refer to ArcGIS Pro: Connect symbol properties to attributes for instructions. In Step 5, click the No attribute mapping defined button next to the Angle property under Rotation.
The image below shows the texts retained within the rotated symbology.
Article ID: 000035882
- ArcGIS Pro
Get support with AI
Resolve your issue quickly with the Esri Support AI Chatbot.


Related Information
Discover more on this topic
Search for related information
Find training related to this topic
Explore ideas and give feedback
Get help from ArcGIS experts
Start chatting now