HOW TO
Publish a feature layer from Databricks to ArcGIS Online or the ArcGIS Enterprise portal
Summary
In Databricks, feature layers can be published to ArcGIS Online or ArcGIS Enterprise as hosted layers using the ArcGIS API for Python or ArcGIS GeoAnalytics Engine. The API approach requires a Spatially Enabled DataFrame (SEDF), which can be published through the .to_featurelayer() method, while GeoAnalytics Engine enables writing Spark DataFrames directly to feature services. Refer to ArcGIS API for Python: Introduction to the Spatially Enabled DataFrame for more information.
This article outlines workflows for publishing feature layers to ArcGIS Online or ArcGIS Enterprise as hosted layers using Databricks Notebooks. These workflows are suitable for large-scale ETL operations on cloud data lake formats such as Parquet and CSV. Databricks Notebooks provide scalable, Spark-based processing to efficiently transform datasets before publishing. Refer to ArcGIS Architecture Center: Databricks and ArcGIS integrations for more information.
Note:
If the workflow requires ArcPy or GIS-centric analysis, ArcGIS Notebooks is recommended as it provides a web-based environment with both ArcPy and the ArcGIS API for Python.
Procedure
Prerequisites to successfully publish a feature layer to ArcGIS Online or ArcGIS Enterprise:
• Create a Databricks account.
• Create an ArcGIS Online or ArcGIS Enterprise account with privileges to publish a hosted feature layer.
• Create and store the Parquet and CSV files in the Unity Catalog Volume in Databricks. Refer to Databricks: What are Unity Catalog volumes? for more information.
Publish a Parquet file or CSV file from Databricks to ArcGIS Online or ArcGIS Enterprise
- Install the required library packages in Python.
# Recommended for geometry backend
%pip install shapely
%pip install --upgrade pyshp==2.3.1
#Install this for ArcGIS API Python and geometry backend
%pip install -- quiet arcgis shapely - Restart Python after installing the library packages for Python.
dbutils.library.restartPython()
-
Select the file format stored in Databricks.
Note:
• Use a Parquet file for better performance when working with large datasets.
• Use a CSV file for simplicity when working with small datasets.
• Read the Parquet file from Databricks and convert it into a Pandas DataFrame.
# Path to your Parquet file in Databricks
parquet_path = "/Volumes/workspace/default/myvolume/sample_points.parquet"

# Read with Spark
df_spark = spark.read.parquet(parquet_path)

# Optional quick checks
df_spark.printSchema()
display(df_spark.limit(5))

# Convert to Pandas for ArcGIS API
df = df_spark.toPandas()
• Read the CSV file from Databricks and convert it into a Pandas DataFrame.
# Path to your CSV file in Databricks
csv_path = "/Volumes/workspace/default/myvolume/sample_points.csv"

# Read with Spark
df_spark = spark.read.csv(csv_path, header=True, inferSchema=True)

# Optional quick checks
df_spark.printSchema()
display(df_spark.limit(5))

# Convert to Pandas for ArcGIS API
df = df_spark.toPandas()
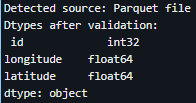
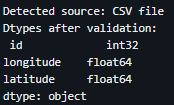
- Validate the coordinates in the file to display the output of the Parquet file or CSV file in Databricks.
import pandas as pd

# Auto-detect source based on which path variable exists
if 'parquet_path' in globals():
    source = 'Parquet file'
elif 'csv_path' in globals():
    source = 'CSV file'
else:
    source = 'unknown'  # fallback

# Coordinate columns
X_COL = "longitude"
Y_COL = "latitude"

# Convert to numeric; invalid values become NaN
df[X_COL] = pd.to_numeric(df[X_COL], errors="coerce")
df[Y_COL] = pd.to_numeric(df[Y_COL], errors="coerce")

# Drop rows with missing coordinates
df = df.dropna(subset=[X_COL, Y_COL])

# Keep valid WGS84 ranges
df = df[
    (df[X_COL] >= -180) & (df[X_COL] <= 180) &
    (df[Y_COL] >= -90) & (df[Y_COL] <= 90)
]

print(f"Detected source: {source}")
print("Dtypes after validation:\n", df.dtypes)
The image below shows the output display of the Parquet file.
The image below shows the output display of the CSV file.
- Authenticate to ArcGIS Online or ArcGIS Enterprise.
• Authenticate to ArcGIS Online. In this example, an ArcGIS Online public account is used.
# Authenticate to ArcGIS Online
from arcgis.gis import GIS
from arcgis.features import GeoAccessor, GeoSeriesAccessor
# Replace the username and password with your own
gis = GIS("https://www.arcgis.com", "YOUR_USERNAME", "YOUR_PASSWORD")
• Authenticate to ArcGIS Enterprise.
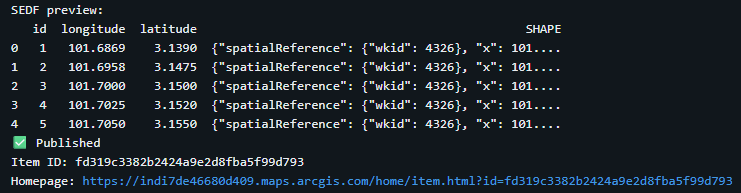
# Authenticate to ArcGIS Enterprise (Portal for ArcGIS) from arcgis.gis import GIS from arcgis.features import GeoAccessor, GeoSeriesAccessor # Replace with your Portal URL, username, and password gis = GIS(url="https://your-enterprise-host.domain.com/portal", username="YOUR_USERNAME", password="YOUR_PASSWORD") print("Signed in as:", gis.users.me.username if gis.users.me else "Anonymous") - Create a Spatially Enabled DataFrame (SEDF) and publish the hosted feature layer to ArcGIS Online or ArcGIS Enterprise.
Note:
The publishing is performed using the sdf.spatial.to_featurelayer() method, which uses the Spatially Enabled DataFrame (SEDF) as input and creates a hosted feature layer in ArcGIS Online or ArcGIS Enterprise portal. If the folder parameter is used, ensure the folder exists beforehand or omit it to avoid returning the error, "TypeError: can only concatenate str (not 'NoneType') to str".
from arcgis.features import GeoAccessor, GeoSeriesAccessor
import pandas as pd

# Must match the coordinates names in Step 4
X_COL = "longitude"
Y_COL = "latitude"

# Create SEDF from the cleaned DataFrame
sdf = pd.DataFrame.spatial.from_xy(df=df, x_column=X_COL, y_column=Y_COL, sr=4326)

print("SEDF preview:")
print(sdf.head())

# Publish as a hosted feature layer
feature_layer_item = sdf.spatial.to_featurelayer(
    title="Sample Points from Databricks",
    gis=gis,
    tags="databricks, arcgis, hosted feature layer",
    snippet="Hosted feature layer published from Databricks",
    description="Point features published from Databricks using a Spatially Enabled DataFrame."
)

print("✅ Published")
print("Item ID:", feature_layer_item.id)
print("Homepage:", feature_layer_item.homepage)
The image below shows the output display of the Python script.
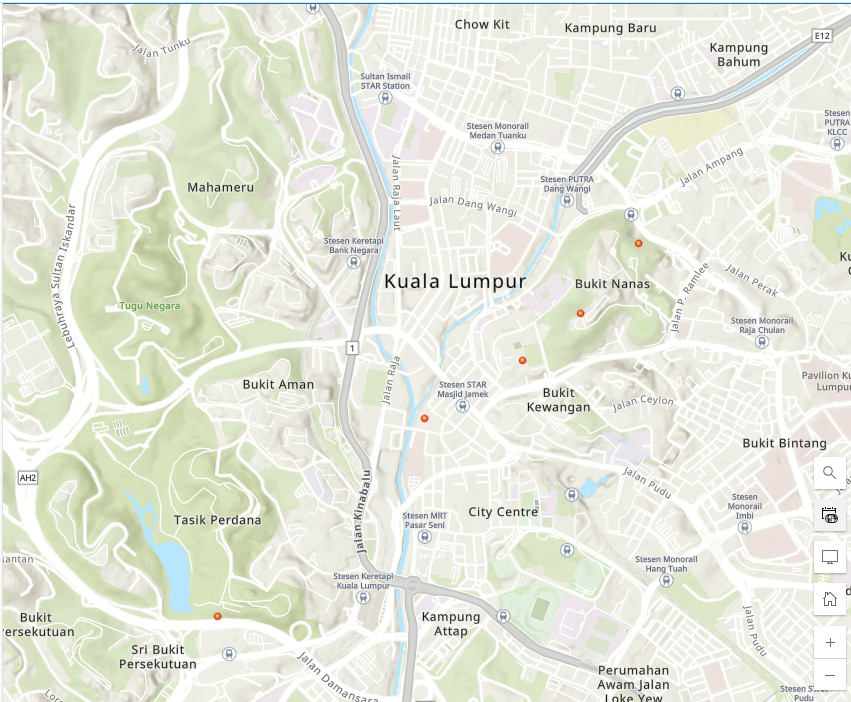
- Verify and view the hosted feature layer in ArcGIS Online or ArcGIS Enterprise.
- Log in to ArcGIS Online or ArcGIS Enterprise.
- Click Content and select the hosted feature layer.
- Click Open in Map Viewer to view the map of the hosted feature layer, as shown in the example below.
Publish the feature layer after converting the CSV file to a Parquet file using PyArrow
- Install the required library packages for Python.
# Install PyArrow (for CSV -> Parquet conversion)
%pip install --quiet pyarrow

# Recommended for geometry backend
%pip install shapely
%pip install --upgrade pyshp==2.3.1

# Install the ArcGIS API for Python and geometry backend
%pip install --quiet arcgis shapely
- Refer to Step 2 in the first workflow.
- Read the CSV file into Arrow Table using PyArrow.
import pyarrow.csv as py import pyarrow.parquet as pq import os csv_path = "/Volumes/workspace/default/myvolume/sample_points.csv" parquet_file_path = "/Volumes/workspace/default/myvolume/sample_points_pyarrow.parquet" # Safety check: avoid writing single-file parquet to a directory path if os.path.isdir(parquet_file_path): raise IsADirectoryError( f"'{parquet_file_path}' is a directory. Choose a unique .parquet filename." ) # Read CSV → Arrow Table table = py.read_csv(csv_path) - Convert the Arrow Table into a Parquet file.
# Conversion: Arrow Table → Parquet file
pq.write_table(table, parquet_file_path)
- Load the Parquet file into Pandas DataFrame.
import pandas as pd # Read Parquet → pandas DataFrame pq_df = pd.read_parquet(parquet_file_path, engine="pyarrow") df = pq_df print("Preview:") print(df.head()) - Refer to Steps 5 through 7 in the first workflow to authenticate and publish the hosted feature layer to ArcGIS Online or ArcGIS Enterprise.
Article ID: 000028973
- ArcGIS Online
- Portal for ArcGIS
- Third Party Product
- ArcGIS Enterprise
Get support with AI
Resolve your issue quickly with the Esri Support AI Chatbot.


Related Information
Discover more on this topic
Search for related information
Find training related to this topic
Explore ideas and give feedback
Get help from ArcGIS experts
Start chatting now