HOW TO
Publish Cached Services to ArcGIS Enterprise
Summary
The best practice workflow when publishing cached raster tiles into ArcGIS Enterprise is to create a map in ArcGIS Pro, then publish the map and choose the option to create the cache manually. This creates an empty service, and the Manage Map Server Cache geoprocessing tool can then be used to create the cache. This option uses the ArcGIS Online tiling scheme, which uses WGS84 and has pre-defined levels of detail.
If you need a non-WGS84 Web Mercator projection and a custom level of details, use the Generate Map Server Tiling Scheme geoprocessing tool first to create a custom tiling schema. Once the scheme file is generated, use it in the next steps to publish your data.
Note:
It is best to try the process on a small area first as a prototype (for example. only a small local government area or few suburbs ). Once we are happy with the workflow and verified the process is working, we can then scale it up to the whole area of interest.
Procedure
Publishing Cached Map Image layer (Map Service)
- Navigate to the Share tab/ribbon, and click Web Layer > Publish Web layer.
- In the Sharing Map As a Web Layer window select Map Image under Reference registered data if publishing referenced data or use the Copy all data option, if needed.
- Click on the Configuration tab, under the Layers section click the Map Image Properties. Under Map Image Properties, expand Layer Drawing and select using tiles from a new cache.
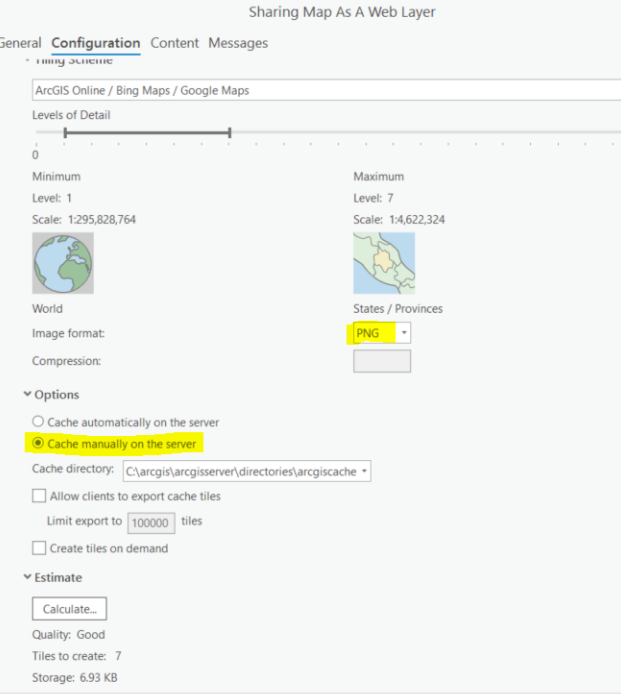
- Expand Tiling scheme and select your tiling scheme file, if you are happy to use WGS84 projection and don't want to use a specific projection and tiling scheme you can use the ArcGIS Online/BingMaps/Google Maps scheme.
- Expand Options and select Cache manually on the server, as shown in the next image. Here you can define the cache directory, whether it's the default arcgiscache directory or a cloud store directory (for example, an S3 bucket).
- Analyze and Publish the service. This creates the cache directory, but it is still empty.
Create the tiles
Use the Manage Map Server Cache Tiles geoprocessing tool to create the tiles. Select the service you just published as the input service, this reads all the scales defined in the previous steps when selecting the tile scheme. You can select them all, leave the update mode, and select Recreate All Tiles. This takes a while until all the tiles are created. Use an area of interest, so the tiles are not generated for unneeded areas. Check the box to wait for the job to finish. This makes it asynchronous and you don’t have to wait for the caching to finish. This generates the cache on the server site and frees the client application (for example, ArcGIS Pro).
Publishing Cached Imagery Layer (Image Service)
When publishing raster data (for example, mosaic datasets) initiate the publishing from the Catalog pane by right-clicking the mosaic dataset or the raster file and then clicking Share as web layer. This ensures the service is published as an Imagery Service. Set the rest of the parameters similar to publishing a Map Image Layer. This creates an Imagery Layer on your Portal. Once the service is published, run the Manage Map Server Cache Tiles geoprocessing tool and this generates the tile cache under the ArcGIS Server cache directory (the default cache directory is C:\arcgis\arcgisserver\directories\arcgiscache) as shown in the image below. The _alllayers folder contains the actual bundle files for each level of details.

Article ID: 000031272
- ArcMap
- ArcGIS Pro
Get support with AI
Resolve your issue quickly with the Esri Support AI Chatbot.


Related Information
Discover more on this topic
Search for related information
Find training related to this topic
Explore ideas and give feedback
Get help from ArcGIS experts
Start chatting now