HOW TO
Install a new kernel in Jupyter Notebook using a specific Python environment
Summary
Instead of running a separate instance of Jupyter Notebook for different Python environments, it is possible to install a kernel with a specific Python environment in Jupyter Notebook. The environment is then configured when creating a new notebook.
Procedure
To install a kernel with a specific Python environment in Jupyter Notebook, follow the steps described below:
- Run the Python Command Prompt as an administrator.
Note:
The Python Command Prompt window opens with the active default Python environment.
- In the Python Command Prompt window, insert the following command:
python -m ipykernel install --user --name <python environment> --display-name "Python (<python environment>)"
- Press Enter on the keyboard, and the following response is returned:
Installed kernelspec <python environment> in C:\Users\<user>\AppData\Roaming\jupyter\kernels\<python environment>
The image below shows the command and response in the Python Command Prompt window. The name of the Python environment used in this example is arcgispro-py3-clone1.

- Run Jupyter Notebook from the default Python environment.
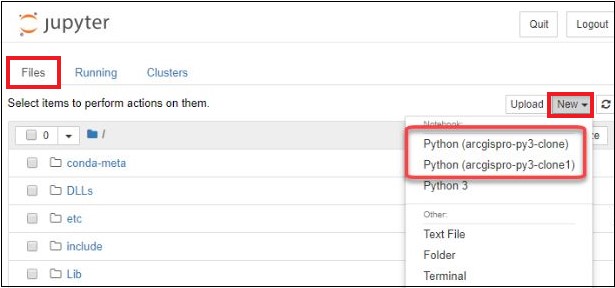
- In the Files tab, click New.
Alternatively, manually create a new kernel with a specific Python environment in the kernels folder.
- Navigate to the following location:
C:\Users\<Username>\AppData\Roaming\jupyter\kernels
- Create a kernel JSON file.
- Using Notepad++, insert the following JSON code:
{
"argv": [
"C:\Users\<user>\AppData\Local\ESRI\conda\envs\<python environment>\python.exe",
"-m",
"ipykernel_launcher",
"-f",
"{connection_file}"
],
"display_name": "Python (<python environment>)",
"language": "python"
}
- In the Notepad++ window, click File > Save As... .
- In the box next to File name, insert kernel.json.
- Click the box next to Save as type, and select All Files.
- Click Save.

Article ID: 000019210
- ArcGIS Pro
- ArcGIS API for Python
Get support with AI
Resolve your issue quickly with the Esri Support AI Chatbot.


Related Information
Discover more on this topic
Search for related information
Find training related to this topic
Explore ideas and give feedback
Get help from ArcGIS experts
Start chatting now