HOW TO
Extract lines from a scanned map to a feature class in ArcGIS Pro
Summary
Converting lines from a scanned map into a feature class automates the time-consuming task of manual line tracing. This approach is useful for datasets without vector features, for example, scanned maps of utility networks, parcel boundaries, or hand-drawn coastal and river outlines. By automating the extraction, data are properly prepared for analysis and visualization in ArcGIS Pro.
This article describes the workflow to extract the lines from a scanned map by detecting and converting them into vector features. In this example, the Isle of Kerrera boundary is extracted from the scanned map and converted into a line feature class.
Procedure
Note:
The workflow is most effective when the scanned map has minimal noise and clear contrast between the features. This ensures the line features are distinguishable for accurate extraction.
- Add and georeference the scanned map to the known coordinate system in ArcGIS Pro.
- Add the scanned map to the map. Refer to ArcGIS Pro: Browse to data to add to a map or scene for instructions.
- Georeference the scanned map to align it with the correct geographic location. Refer to ArcGIS Pro: Georeference a raster to a referenced layer for instructions.
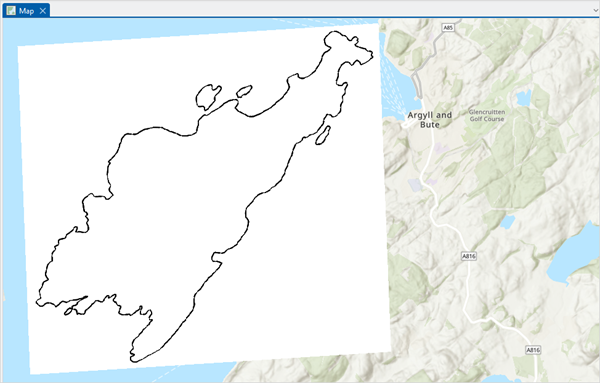
The image below shows the georeferenced scanned map aligned on the map.
- Reclassify the cell values in the scanned map using the Reclassify tool and isolate the line features from the other areas.
Note:
The Reclassify tool requires a Spatial Analyst or 3D Analyst license.
- On the Analysis tab, in the Geoprocessing group, click Tools.
- In the Geoprocessing pane, search for and click Reclassify (Spatial Analyst Tools).
- In the Reclassify pane, on the Parameters tab, for Input raster, select the scanned map layer from the drop-down list.
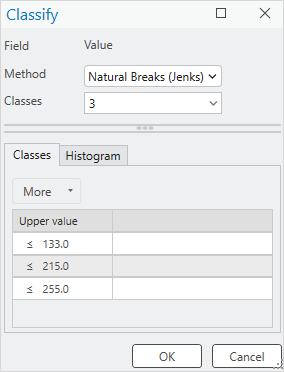
- Under Reclassification, click Classify.
- In the Classify dialog box, for Method, select Natural Breaks (Jenks) from the drop-down list.
- For Classes, select the preferred number of classes from the drop-down list. In this example, the number is 3.
- Click OK.
- For Output raster, specify a name and location to export the reclassified raster. Click Run.

- Extract the raster values of the lines and convert the reclassified raster dataset to a polyline using the Raster to Polyline tool.
- In the Contents pane, right-click the reclassified raster layer and select Attribute Table.
- In the attribute table, identify the raster value in the Value field and select the row representing the line features. In this example, the row with value 1 is selected.

- In the Geoprocessing pane, click Back
 .
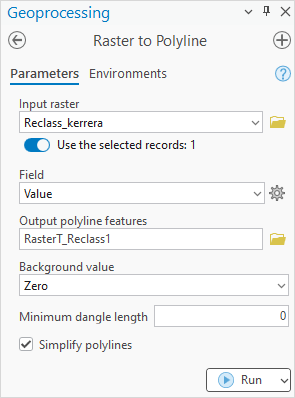
. - Search for and click Raster to Polyline (Conversion Tools).
- In the Raster to Polyline pane, for Input raster, select the reclassified raster layer from the drop-down list. Toggle Use the selected records on.
- For Output polyline features, specify a name and location to export the feature class.
- Click Run.
- Use the following tools to refine the extracted line features, and simplify or smooth the geometry.
Note:
The Snap, Simplify Line, and Smooth Line tools require an ArcGIS Pro Standard or Advanced license.
- Use the Snap tool to connect the line vertices by a specified distance.
- Use the Simplify Line tool to reduce the number of vertices and simplify the shape of the line feature.
- Use the Smooth Line tool to refine jagged edges and create a smoother polyline.
Note:
If the lines are not sufficiently distinct for automated extraction, manually digitize or modify the lines over the georeferenced scanned map. Refer to ArcGIS Pro: Create features and ArcGIS Pro: Modify features for instructions. Additionally, apply topology rules to validate the connectivity of the lines. Refer to ArcGIS Pro: Create a topology and ArcGIS Pro: Validate and fix geodatabase topology to create topology rules and correct topology errors for the line features.
- Use one of the following tools to merge the refined line features into one feature.
- Use the Merge tool to combine the line features into a single feature.
- Run the Dissolve tool without specifying the Dissolve Fields parameter.
Note:
The attribute table can also be populated with the relevant information. Refer to ArcGIS Pro: Create and manage fields to create fields and add attributes to the line features.
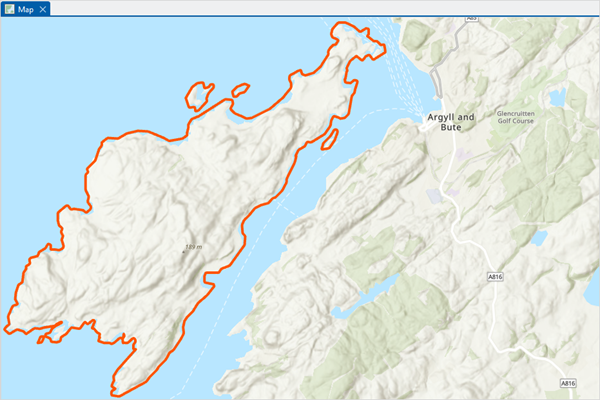
The map below shows the line features extracted from the scanned map and merged into a single feature class.
Article ID: 000034497
- ArcGIS Pro 3 3
- ArcGIS Pro 3 2
- ArcGIS Pro 3 4
Get support with AI
Resolve your issue quickly with the Esri Support AI Chatbot.


Related Information
Discover more on this topic
Search for related information
Find training related to this topic
Explore ideas and give feedback
Get help from ArcGIS experts
Start chatting now