HOW TO
Export KML ground overlays to ArcGIS Online
Summary
KML ground overlays are georeferenced images anchored to specific ground coordinates within geographic data files. These overlays provide visual context by mapping images directly onto terrain. However, when importing the files into ArcGIS Online, users often encounter display issues where the layer displays a red cross instead of the intended image. This article demonstrates the workflow to properly prepare and export KML ground overlay layers to ensure accurate and complete visualization.
The image below shows the ground overlay layer incorrectly displayed in ArcGIS Online.
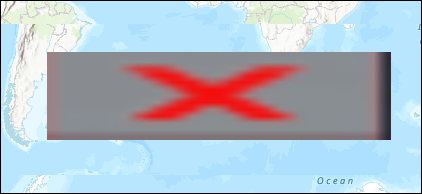
This is because there is an image attached to the KMZ file known as a 'ground overlay' and cannot properly view this data on ArcGID Online, as KMZ and KML files are generally meant to represent point data.
Cause
This is because there is an image attached to the KMZ file known as a ground overlay and cannot properly view this data on arcgis online as KMZ and KML files are generally meant to represent point data.
Procedure
- Open ArcGIS Pro.
- Add and convert the KML file to a feature layer using the KML To Layer tool.
- On the Analysis tab, in the Geoprocessing group, click Tools.
- In the Geoprocessing pane, search for and click KML To Layer (Conversion Tools).
- In the KML To Layer pane, for Input File (KML or KMZ), click Browse and select the KMZ file.
- For Target Folder, specify its location.
- For Output Name, specify a name.
- Check the Include ground overlay check box.
- Click Run.
- Export the ground overlay layer to a PNG file and ensure the correct projection is used.
- In the Contents pane, expand the output feature layer if necessary.
- Right-click the ground overlay layer and click Data > Export Raster.
- In the Export Raster pane, on the General tab, for Output Format, select PNG from the drop-down list.
- For Coordinate System, change the projection similar to the projection used in ArcGIS Online.
- Click the Spatial Reference icon to open the Spatial Reference dialog box.
- In the Spatial Reference dialog box, expand Projected Coordinate System and select WGS 1984 Web Mercator (auxiliary sphere).
- Click OK to close the dialog box.
- Click Export.
- Share the output in Step 3 as a web tile layer to ArcGIS Online. Refer to ArcGIS Pro: Share a web tile layer using the default configuration for instructions.
- Open the hosted tile layer shared in Step 4 as a web map.
- Sign in to ArcGIS Online. Refer to ArcGIS Online: Sign in for instructions.
- Click Content > My Content and navigate to the hosted tile layer.
- Click More Options
 and select Open in Map Viewer.
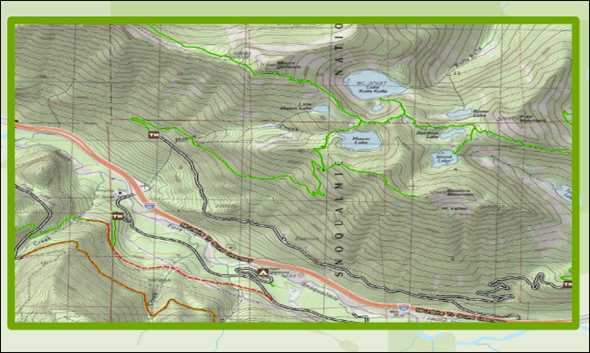
The following image illustrates the ground overlay layer correctly displayed in ArcGIS Online after being properly exported and configured in ArcGIS Pro.
Article ID: 000035151
- ArcGIS Pro
- ArcGIS Online
Get support with AI
Resolve your issue quickly with the Esri Support AI Chatbot.


Related Information
Discover more on this topic
Search for related information
Find training related to this topic
Explore ideas and give feedback
Get help from ArcGIS experts
Start chatting now