HOW TO
Edit the field properties of a CSV file in ArcGIS Pro
Summary
In ArcGIS Pro, when running certain geoprocessing tools involving two or more datasets, it is necessary to ensure the fields in the datasets have similar properties. For example, when using the Append tool to append data from a CSV file to a feature class, the data type and name of the output and source fields of the field map parameter must match. Ensuring the fields match circumvents errors.
This article provides steps to manually change the field properties of a CSV file in ArcGIS Pro while maintaining the field value by editing the schema.ini file.
Procedure
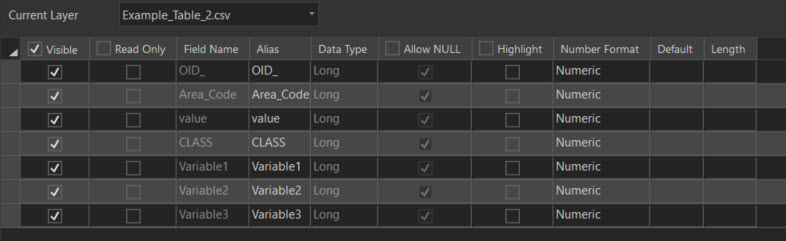
- In ArcGIS Pro, add the CSV file to a project.
- Create a copy of the CSV file using Export Table. Refer to ArcGIS Pro: Export tables for more information.
- The new table is automatically added to Contents. To verify the data in the table fields are accurately captured, right-click the table, and click Open.
- In Contents, right-click the new table, and click Remove.
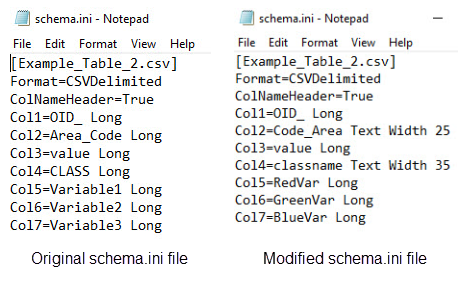
- Navigate to the output file location. A schema.ini file is created with the CSV file.

- Edit the schema.ini file to change the field properties. Right-click the schema.ini file, and click Edit. Manually edit the preferred field properties (for example, data type and name), and save the changes. Refer to ArcGIS Pro: Add an ASCII or text file table for more information.
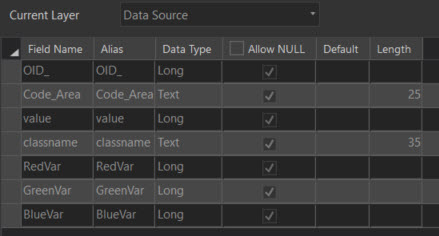
- In ArcGIS Pro, add the CSV file created in Step 2, and verify the field information. The edits to the field properties in the schema.ini file are displayed in ArcGIS Pro.
The image below shows the results of the edits made to the schema.ini file.
Article ID: 000024378
- ArcGIS Pro 2 7 x
- ArcGIS Pro 2 x
Get support with AI
Resolve your issue quickly with the Esri Support AI Chatbot.


Related Information
Discover more on this topic
Search for related information
Find training related to this topic
Explore ideas and give feedback
Get help from ArcGIS experts
Start chatting now