HOW TO
Dissolve coincident point features in ArcGIS Online Map Viewer
Summary
In ArcGIS Online Map Viewer, coincident point features can be dissolved using multiple analysis tools to create a new layer with the dissolved records. As an example, when calculating driving times between locations with identical coordinates, duplicate records are generated. Therefore, dissolving coincident points before calculating driving time is essential to reduce data redundancy and optimize data management.
This article outlines the workflow to dissolve coincident point features using the Create Buffers, Dissolve Boundaries, and Find Centroids analysis tools in ArcGIS Online Map Viewer.
Procedure
Note:
This workflow consumes credits depending on the number of records to be analyzed and the generated output layer. Refer to ArcGIS Online: Understand credits for more information. Alternatively, use the Delete Identical or Dissolve tools in ArcGIS Pro to remove coincident points.
- In ArcGIS Online, open the web map with the hosted feature layer containing the coincident point features in Map Viewer.
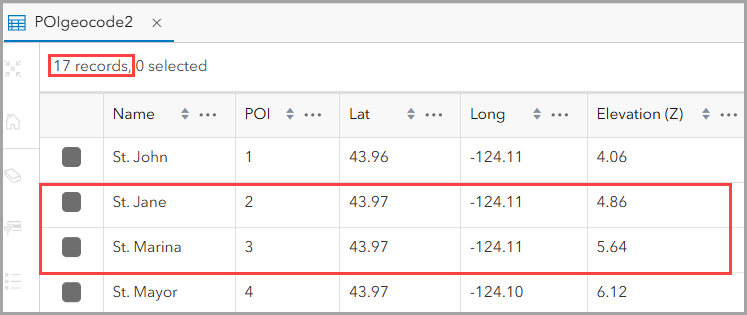
The table below shows 2 records with similar attribute values (coordinates), indicating the coincident point features.
- Use the Create Buffers analysis tool to create a polygon feature layer from the point feature layer.
- On the Settings (light) toolbar, click Analysis.
- In the Analysis pane, click the Tools icon.
- In the search bar, search for and select Create Buffers.
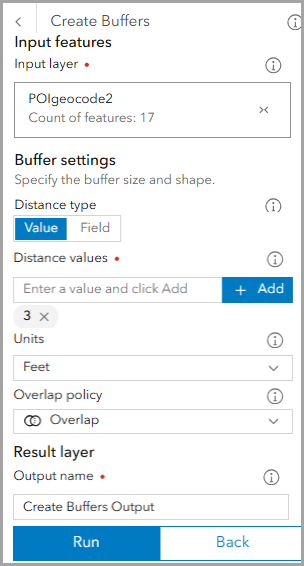
- In the Create Buffers pane, under Input features, click Layer for Input layer.
- In the Select layer pane, click the layer with the coincident point features. In this example, the layer selected is 'POIgeocode2'.
- Under Buffer settings, for Distance type, ensure Value is selected.
- For Distance values, input a value and click Add. In this example, the distance value is 3. Edit Units, if required.
- Under Result layer, for Output name, specify a name for the output layer. In this example, the name is 'Create Buffers Output'.
- Click Run.
- Use the Dissolve Boundaries analysis tool to dissolve polygon features created in Step 2.
- In the Create Buffers pane, click the Back icon.
- In the search bar, search for and select Dissolve Boundaries.
- In the Dissolve Boundaries pane, under Input features, click Layer for Input features.
- In the Select layer pane, select the output layer from Step 2. In this example, the layer selected is 'Create Buffers Output'.
- Under Dissolve settings, toggle Dissolve features with matching field values on.
- For Fields to match, click + Fields, check the fields containing the same attributes to dissolve coincident features in the Select Fields pane, and click Done.
- Under Result layer, for Output name, input a name. In this example, the output layer name is 'Dissolve Boundaries Output'.
- Click Run.

- Use the Find Centroids analysis tool to generate a point feature layer with dissolved coincident records.
- In the Dissolve Boundaries pane, click the Back icon.
- In the search bar, search for and select Find Centroids.
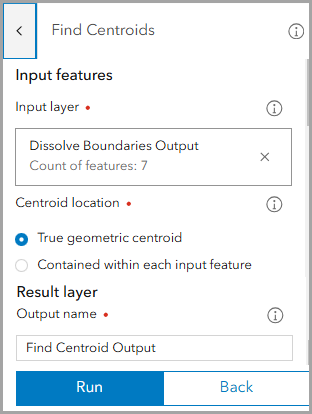
- In the Find Centroids pane, under Input features, click Layer for Input layer.
- In the Select layer pane, select the generated output layer from Step 3. In this example, the layer selected is 'Dissolve Boundaries Output'.
- For Centroid location, ensure True geometric centroid is selected.
- Under Result layer, for Output name, specify a name for the output layer. In this example, the name is 'Find Centroid Output'.
- Click Run.
Note:
The generated layers in Steps 2 and 3 can be deleted after completing the workflow to reduce the credit consumption in ArcGIS Online.
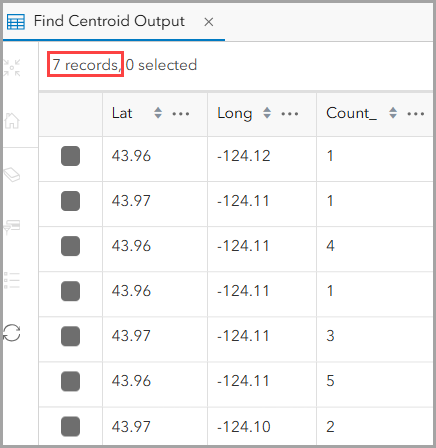
The table below shows the point feature records after dissolving coincident features with similar coordinates.
Article ID: 000034312
- ArcGIS Online
Get support with AI
Resolve your issue quickly with the Esri Support AI Chatbot.


Related Information
Discover more on this topic
Search for related information
Find training related to this topic
Explore ideas and give feedback
Get help from ArcGIS experts
Start chatting now