HOW TO
Display multiple views of a web scene with different symbology in ArcGIS Experience Builder
Summary
Multiple views of a web scene enable the comparison of different scenarios by varying data classifications, levels of detail, and spatial extents. In Scene Viewer, web scene slides capture distinct views with selected basemaps, layer visibility, and extents, allowing quick navigation to specific areas. The Bookmark widget in ArcGIS Experience Builder converts these slides into interactive buttons that switch between predefined views within the experience. Clicking a bookmark updates the scene to its corresponding view, replicating the slide functionality in Scene Viewer.
This article describes the workflow to display multiple views of a web scene with different symbology in ArcGIS Experience Builder using the Bookmark widget.
Procedure
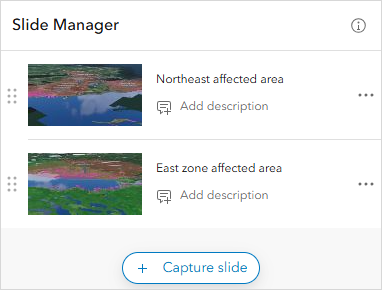
- In Scene Viewer, use Slide Manager to create multiple bookmarks representing different views of the web scene. Refer to ArcGIS Online: Capture a slide for instructions.
- Open the ArcGIS Experience Builder web experience and add the web scene.
- In ArcGIS Experience Builder, click Create new, select the preferred template, and click Create.
- In the Insert widget panel, drag and drop the Map widget to the canvas.
- In the Map pane, add the web scene. Refer to ArcGIS Experience Builder: Add data to an app for instructions.
- Add and configure the Bookmark widget to display a list of bookmarks showing different views of the web scene.
- In the Insert widget panel, drag and drop the Bookmark widget to the canvas.
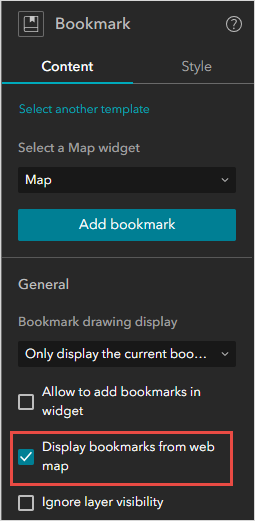
- In the Bookmark pane, select a template and click Start. In this example, the List template is selected.
- On the Content tab, under General, ensure the Display bookmarks from web map check box is checked.
- In the Insert widget panel, drag and drop the Legend widget to the canvas to display the symbology for each view.
- Save, preview, and publish the experience.
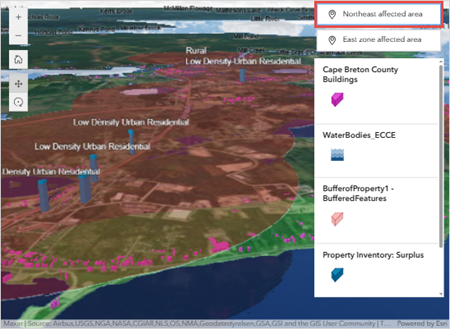
Clicking a bookmark navigates to the corresponding web scene view and displays the symbology in the legend. The image below shows the 'Northeast affected area' bookmark with its symbology.
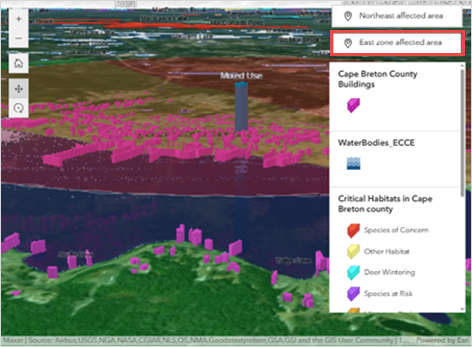
The image below shows the 'East zone affected area' bookmark with its symbology.
Article ID: 000035447
- ArcGIS Online
- ArcGIS Experience Builder
Get support with AI
Resolve your issue quickly with the Esri Support AI Chatbot.


Related Information
Discover more on this topic
Search for related information
Find training related to this topic
Explore ideas and give feedback
Get help from ArcGIS experts
Start chatting now