HOW TO
Create traverse paths within polygon areas in ArcGIS Pro
Summary
In ArcGIS Pro, paths can be generated to traverse a specified area, allowing for detailed spatial analysis and planning. These paths can be created through various processes, including tracing the area to define directional flow or movement, and are essential for applications such as route planning, accessibility analysis, and network mapping. This article describes the workflow to create traverse paths within polygon areas in ArcGIS Pro.
Procedure
- Open the ArcGIS Pro project.
Note:
For instructions to find and use the geoprocessing tool, refer to ArcGIS Pro: Find a geoprocessing tool.
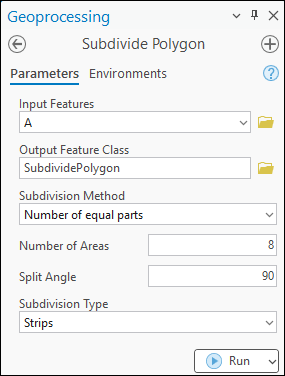
- Create equal areas by subdividing the polygon area using the Subdivide Polygon tool.
- In the Subdivide Polygon pane, for Input Features, select the polygon feature layer in the drop-down list.
- For Output Feature Class, specify a name and its location.
- For Number of Areas, specify the total areas of the polygon to be divided. In this example, the polygon area is divided into 8 areas.
- For Split Angle, specify a strip angle as required. In this example, the angle is specified at 90 degrees.
- Click Run.
- Create a line feature class. Refer to ArcGIS Pro: Create a feature class for instructions.
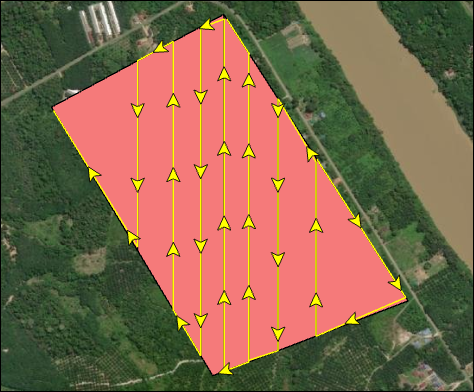
- Illustrate direction and generate the desired paths using the Trace tool. Begin tracing from the preferred area and continue through the subdivided strips until the endpoint. Refer to ArcGIS Pro: Trace for instructions.
- Configure the symbol to display the path directions.
- In the Contents pane, right-click the output in Step 4 and select Symbology.
- In the Symbology pane, on the Primary symbology tab, click the symbol.
- On the Gallery tab, search for and click Arrow Line 2 (Along) in the Search box.
- On the Properties tab, under Appearance, customize and modify the symbol's appearance as required. Refer to ArcGIS Pro: Modify basic symbol properties for more information and instructions.
The map below displays the traverse path within the polygon area in ArcGIS Pro.
Article ID: 000035825
- ArcGIS Pro
Get support with AI
Resolve your issue quickly with the Esri Support AI Chatbot.


Related Information
Discover more on this topic
Search for related information
Find training related to this topic
Explore ideas and give feedback
Get help from ArcGIS experts
Start chatting now