HOW TO
Create multiple tables with subheaders in pop-ups using HTML in ArcGIS Online Map Viewer
Summary
In Map Viewer in the ArcGIS Enterprise portal and ArcGIS Online, multiple tables with subheaders in pop-ups help maintain the original subheader distribution, ensuring correct display and readability. This approach improves consistency by preventing shifts in table width between groups and enhances structure by stacking groups within a single table without extra elements.
Complete the workflow provided to create multiple tables with subheaders in pop-ups using HTML in the ArcGIS Enterprise portal and ArcGIS Online Map Viewer.
Procedure
- Log in to the ArcGIS Enterprise portal or ArcGIS Online and open the web map in Map Viewer.
- In Map Viewer, on the Settings toolbar, click Pop-ups
 .
. - In the Pop-ups pane, click Add content, and select Text.
- In the text editor, click Source
 .
. - Configure the HTML codes using <table> tags for each table.
The code block below shows the full working script for two tables in ArcGIS Online Map Viewer.
<figure class="table">
<table style="border-collapse:collapse;" width="99%">
<thead>
<tr>
<th style="background-color:#333;border-bottom:2px solid #555;color:white;padding:8px;text-align:left;" colspan="2">
<strong>Group 1 </strong>
</th>
</tr>
</thead>
<tbody>
<tr style="background-color:#f2f2f2;">
<td style="border-bottom:1.4px solid #ddd;border-right:1.4px solid #ddd;font-weight:550;padding:8px;text-align:left;">
field 1
</td>
<td style="border-bottom:1.4px solid #ddd;padding:8px;text-align:left;">
abc
</td>
</tr>
<tr>
<td style="border-bottom:1.4px solid #ddd;border-right:1.4px solid #ddd;font-weight:550;padding:8px;text-align:left;">
field 2
</td>
<td style="border-bottom:1.4px solid #ddd;padding:8px;text-align:left;">
abc
</td>
</tr>
<tr style="background-color:#f2f2f2;">
<td style="border-bottom:1.4px solid #ddd;border-right:1.4px solid #ddd;font-weight:550;padding:8px;text-align:left;">
field 3
</td>
<td style="border-bottom:1.4px solid #ddd;padding:8px;text-align:left;">
abc
</td>
</tr>
</tbody>
</table>
</figure>
<figure class="table">
<table style="border-collapse:collapse;" width="99%">
<thead>
<tr>
<th style="background-color:#333;border-bottom:2px solid #555;color:white;padding:8px;text-align:left;" colspan="2">
<strong>Group 2 </strong>
</th>
</tr>
</thead>
<tbody>
<tr style="background-color:#f2f2f2;">
<td style="border-bottom:1.4px solid #ddd;border-right:1.4px solid #ddd;font-weight:550;padding:8px;text-align:left;">
field 1
</td>
<td style="border-bottom:1.4px solid #ddd;padding:8px;text-align:left;">
abc
</td>
</tr>
<tr>
<td style="border-bottom:1.4px solid #ddd;border-right:1.4px solid #ddd;font-weight:550;padding:8px;text-align:left;">
field 2
</td>
<td style="border-bottom:1.4px solid #ddd;padding:8px;text-align:left;">
abc
</td>
</tr>
<tr style="background-color:#f2f2f2;">
<td style="border-bottom:1.4px solid #ddd;border-right:1.4px solid #ddd;font-weight:550;padding:8px;text-align:left;">
field 3
</td>
<td style="border-bottom:1.4px solid #ddd;padding:8px;text-align:left;">
abc
</td>
</tr>
</tbody>
</table>
</figure>
- Click Source. The table is displayed in the text editor.
- Click OK to close the text editor.
- On the Contents toolbar, click Save and open > Save to save the modifications.
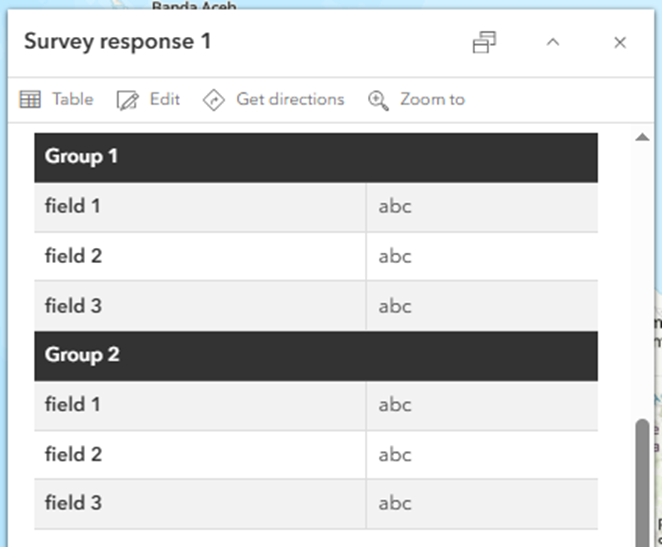
The image below shows two tables, each with a subheader, in a pop-up created using HTML in the ArcGIS Enterprise portal and ArcGIS Online Map Viewer.
Article ID: 000035224
- ArcGIS Online
- Portal for ArcGIS
- ArcGIS Enterprise
Get support with AI
Resolve your issue quickly with the Esri Support AI Chatbot.


Related Information
Discover more on this topic
Search for related information
Find training related to this topic
Explore ideas and give feedback
Get help from ArcGIS experts
Start chatting now