HOW TO
Create individual routes from multiple origins and destinations within a feature class in ArcGIS Pro
Summary
In ArcGIS Pro, a route can be created by connecting a pair of points representing the origin, and destination. In some cases, when there are many pairs of points in an attribute table, it is efficient to simultaneously generate routes for each pair using a network analysis method. For more information, refer to ArcGIS Pro: Network Analyst solvers.
This article describes the workflow to create individual routes from multiple origins and destinations within a feature class in ArcGIS Pro.
Procedure
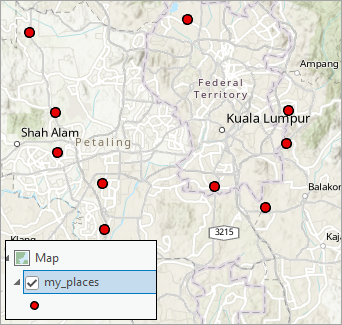
The image below displays a map with five pairs of points in the my_places feature class used to create five routes connecting the origins to the destinations.
- Open the ArcGIS Pro project.
- Add a new unique ID field to the point features attribute table.
- In the Contents pane, right-click the point feature layer and click Attribute Table.
- In the Attribute Table, click Add
 to add a new field.
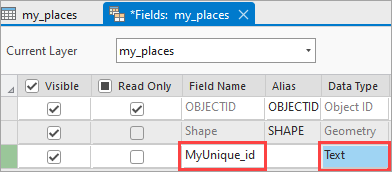
 - In the Fields view, specify the Field Name, and Data Type columns for the new field. In this example, the new field is named MyUnique_id with a Text data type.
- Click Save in the Changes group to save the changes.
- Assign unique IDs, representing the specific routes, to each pair of point features representing the origins and destinations.
Note:
This workflow is also applicable when creating routes from the origins to destinations passing through midpoints, or stops. To do so, assign a unique ID of the route to the point features that represents the origin, destination, and all the stops.
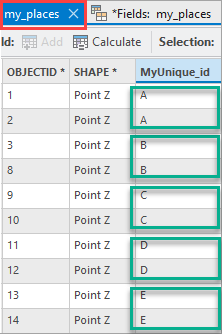
- Open the point feature class attribute table and assign unique values to the new field created in Step 2. In this example, five unique IDs are assigned to each pair of point features in the MyUnique_ID column in the my_places feature class.
- On the Edit tab, click Save to save the changes.
- Create a route layer. On the Analysis tab, in the Workflows group, click Network Analysis > Route.
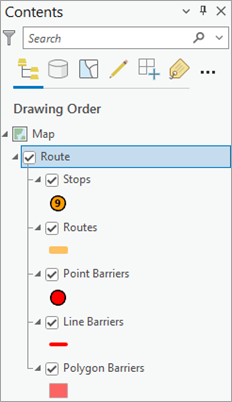
The Route layer with the Stops, Routes, Point Barriers, Line Barriers, and Polygon Barriers sublayers is added to the Contents pane.
- Add the point feature locations to the Stops sublayer of the route layer.
- Highlight the new route layer in the Contents pane, and click the Route Layer tab.
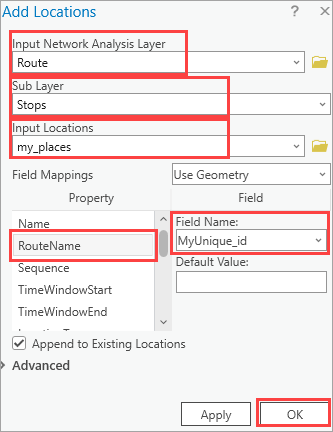
- In the Input Data group, click Import Stops to open the Add Locations window.

- Configure the parameters in the Add Locations window.
- For Input Network Analysis Layer, select the route layer created in Step 4. In this example, Route is selected.
- For Sub Layer, select Stops from the drop-down list to add locations to the Stops sublayer.
- For Input Locations, specify the feature class containing the locations to be added to the Stops sublayer. In this example, the my_places feature class is selected.
- For Property, select RouteName.
- For Field, under Field Name, select the field name created in Step 2. In this example, MyUnique_id is selected.
- Click OK.
- On the Route Layer tab, in the Analysis group, click Run to add routes to the stops created.
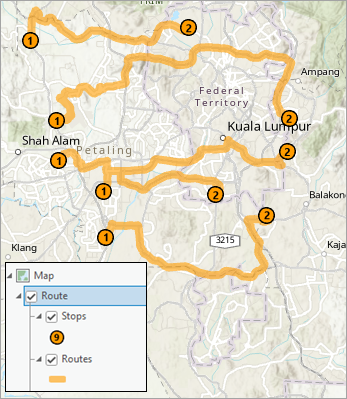
The image below shows five individual routes created connecting multiple origins and destinations within a feature class in ArcGIS Pro.
Article ID: 000030650
- ArcGIS Pro 3 1
- ArcGIS Pro 3 0
- ArcGIS Pro 2 9x
Get support with AI
Resolve your issue quickly with the Esri Support AI Chatbot.


Related Information
Discover more on this topic
Search for related information
Find training related to this topic
Explore ideas and give feedback
Get help from ArcGIS experts
Start chatting now