HOW TO
Create a copy of a feature class without attachments in ArcGIS Pro
Summary
In ArcGIS Pro, attachments, such as images and files, can significantly increase data size and complexity. While attachments are useful, they are unnecessary when only geometry and attribute information are required. Excluding attachments simplifies data management and sharing, while also improving storage efficiency and performance.
To manage attachments, ArcGIS Pro provides the Remove Attachments and Disable Attachments tools. The Remove Attachments tool requires an existing attachment table linked to the feature layer. In contrast, the Disable Attachments tool permanently deletes all attachments stored in the geodatabase. However, if attachments are re-enabled after being disabled, previously associated attachments cannot be recovered.
In scenarios where the tools are not suitable, this article outlines the workflows to create a copy of a feature class without attachments in ArcGIS Pro to efficiently manage data without relying on the Remove Attachments or Disable Attachments tool.
Procedure
Disable the Maintain Attachments environment setting
Use the Copy Features or Export Features tool and uncheck the Maintain Attachments check box to remove the attachment relationship class and attachment table from the feature class.
- Open the ArcGIS Pro project.
- On the Analysis tab, in the Geoprocessing group, click Tools.
- In the Geoprocessing pane, search for and click Copy Features or Export Features.
- In the Copy Features (Data Management Tools) or Export Features (Conversion Tools) pane, on the Parameters tab, for Input Features, click Browse
 and select the feature class.
 - Specify a name for Output Feature Class, click Browse
 and select a location for the feature class.
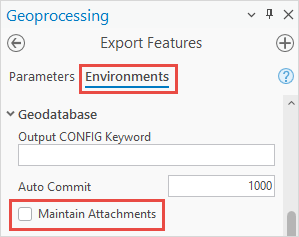
 - On the Environments tab, expand Geodatabase and uncheck the Maintain Attachments check box.
- Click Run.
Convert the geodatabase feature class to a shapefile feature class
Shapefiles provide a simple format for storing spatial data, including location, shape, and feature attributes. They do not support attachments and are ideal for sharing data across different software applications and for creating simple features and attributes. Use the Feature Class To Shapefile tool to convert the geodatabase feature class to a shapefile feature class.
- Open the ArcGIS Pro project.
- On the Analysis tab, in the Geoprocessing group, click Tools.
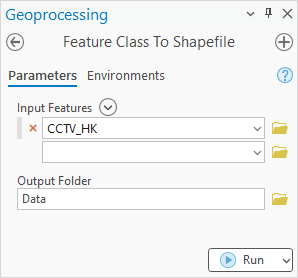
- In the Geoprocessing pane, search for and click Feature Class To Shapefile (Conversion Tools).
- In the Feature Class To Shapefile pane, on the Parameters tab, for Input Features, click Browse
 and select the feature class.
 - For Output Folder, click Browse
 and select a folder to save the output shapefile.
 - Click Run.
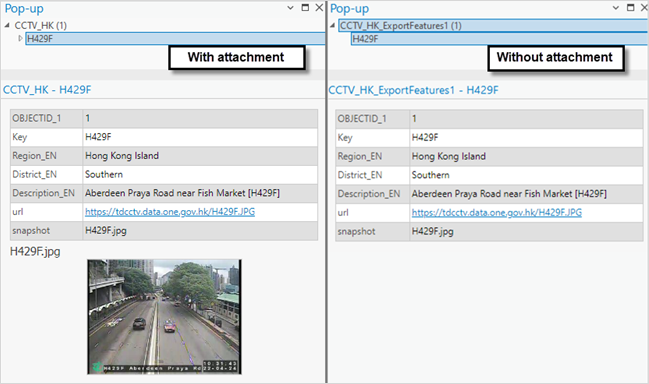
The pop-ups below show the attachment removed from the point feature class.
Article ID: 000034219
- ArcGIS Pro 3 3
- ArcGIS Pro 3 2
- ArcGIS Pro 3 4
Get support with AI
Resolve your issue quickly with the Esri Support AI Chatbot.


Related Information
Discover more on this topic
Search for related information
Find training related to this topic
Explore ideas and give feedback
Get help from ArcGIS experts
Start chatting now