HOW TO
Convert labels to annotations and store them in separate annotation feature classes in ArcGIS Pro
Summary
In ArcGIS Pro, when there are multiple labels, some labels cannot be placed on the map due to congestion and are known as unplaced labels. This article provides the workflow to convert labels to geodatabase annotations to convert placed and unplaced labels into two separate annotation feature classes. This is useful for better label management and analysis. For example, the placed and unplaced annotations can each be used in two separate maps for side-by-side viewing.
Note:
To view the unplaced labels, on the top ribbon, navigate to the Labeling group on the Map tab or the Map group on the Labeling tab, and click View Unplaced.
Procedure
Note:
This workflow requires using a Standard Label Engine. To change the label engine, navigate to the top ribbon, click the Labeling tab, in the Map group. Click More and uncheck the Use Maplex Label Engine check box.
- Open the ArcGIS Pro project.
- In the Contents pane, right-click the feature layer, and click Label to turn on labeling.
- In the Contents pane, right-click the feature layer, hover the cursor over Convert Labels, and click Convert Labels to Annotation from the drop-down menu.
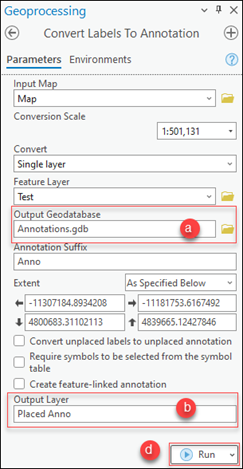
- Configure the parameters of the tool to create an annotation for placed labels.
- For Output Geodatabase, click the Browse button and select the file geodatabase to store the annotation. In this example, the file geodatabase selected is named Annotations.
- For Output Layer, specify the name of the annotation specific to the placed labels. In this example, the output layer is named Placed Anno.
- Leave all the other parameters as default.
- Click Run.
- In the Contents pane, uncheck the check box of the placed annotation layer.
- Turn on the labels again for the original feature layer. Refer to Step 2 above to do so.
- Select the layer name, navigate to the Labeling tab on the top ribbon, and in the Label Placement group, click Label Placement Properties
 .
. - On the Label Class pane, under Position, click the Conflict resolution button and check the Place overlapping labels check box.
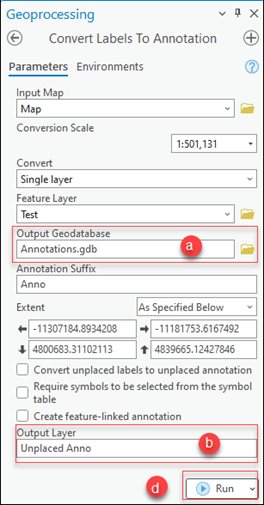
- In the Contents pane, right-click the feature layer, hover the cursor over Convert Labels and click Convert Labels to Annotation from the drop-down menu.
- Configure the parameters of the tool to create an annotation for unplaced labels.
- For Output Geodatabase, click the Browse button and select the file geodatabase to store the annotation. In this example, the file geodatabase selected is named Annotations.
- For Output Layer, specify the name of the annotation specific to the unplaced labels. In this example, the output layer is named Unplaced Anno.
- Leave all the other parameters as default.
- Click Run.
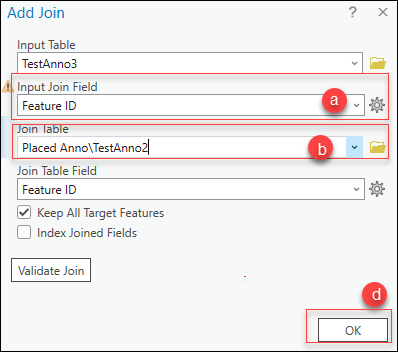
- In the Contents pane, right-click the unplaced annotation layer, hover the cursor over Joins and Relates, and click Add Join from the drop-down menu.
- Configure the parameters of the tool to remove the placed annotation from the unplaced annotation layer, leaving only the unplaced annotation.
- For Input Join Field, select Feature ID from the drop-down menu.
- For Join Table, select the placed annotations layer from the drop-down menu.
- Leave all the other parameters as default.
- Click OK.
- Remove the placed annotations from the unplaced annotation layer.
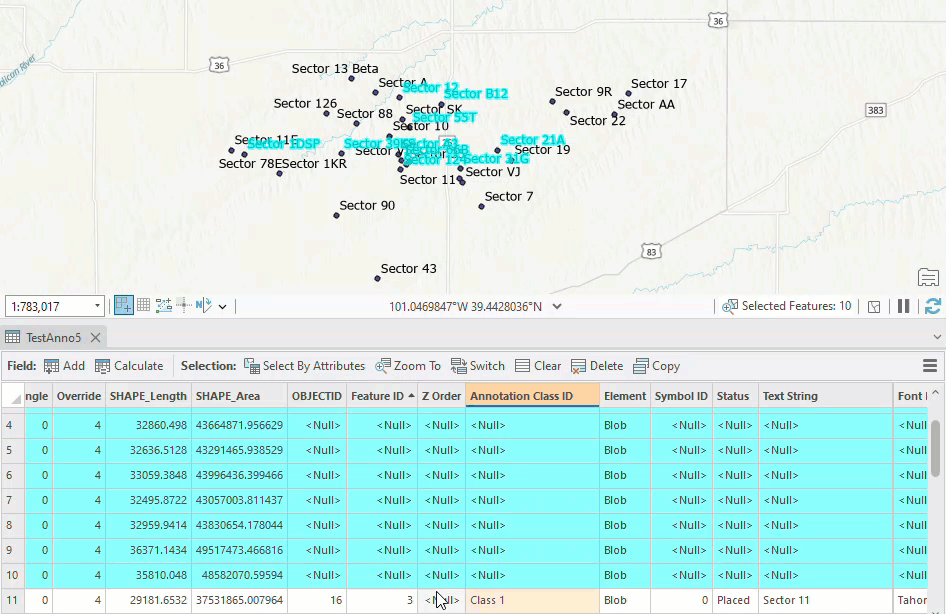
- Right-click on the unplaced annotation layer and click Attribute Table.
- In the attribute table, navigate to the second Feature ID field in the table, right-click the field header name, and select Sort Ascending.
- Press the Shift key and use the mouse to select the rows of Feature ID with <Null> values.
- In the attribute table, click the Switch button. Close the attribute table window.
- Navigate to the Edit tab on the top ribbon, in the Features group, click Delete. Click Yes for the message window that is displayed.
- In the Edit tab on the top ribbon, in the Manage Edits group, click Save to save the changes.
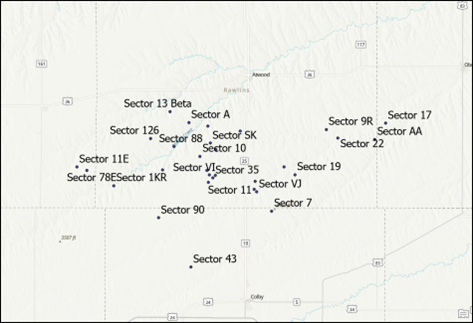
The image below displays only the unplaced annotation layer on the map.

The image below displays only the placed annotation layer on the map.
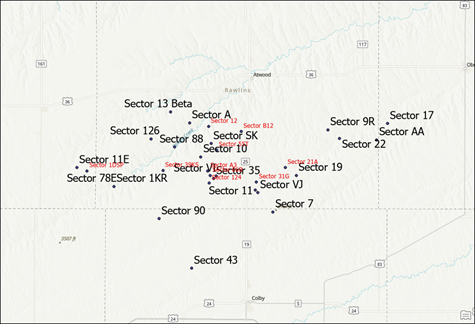
The image displays both the placed and unplaced annotation layers on the map.
Article ID: 000030906
- ArcGIS Pro
Get support with AI
Resolve your issue quickly with the Esri Support AI Chatbot.


Related Information
Discover more on this topic
Search for related information
Find training related to this topic
Explore ideas and give feedback
Get help from ArcGIS experts
Start chatting now