HOW TO
Convert graphics to KML in ArcGIS Pro
Summary
Graphics cannot be directly converted to Keyhole Markup Language (KML) files because KML files require geographical data. So, the graphics must be converted into features and the resulting feature layer is converted to a KML file. This article provides a workaround to convert graphics to KML files in ArcGIS Pro.
Procedure
- Launch the ArcGIS Pro project.
- On the Analysis tab, click Tools to open the Geoprocessing pane.
- In the Geoprocessing pane, search for and click the Graphics To Features tool.
Note:
To convert specific graphics, enable the graphics layer and select the graphics to be converted into features. Refer to ArcGIS Pro: Select graphic elements for instructions.
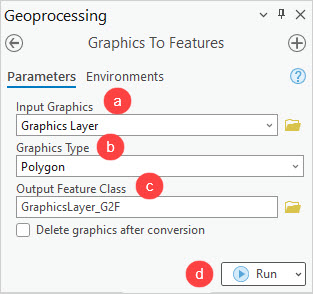
- In the Graphics To Features pane, configure the Parameters tab.
- For Input Graphics, click the drop-down menu and select the graphics layer.
- For Graphics Type, click the drop-down menu and select the type of graphics to be converted.
- Edit the Output Feature Class name if required and click Browse
 to specify a location for the output layer. Optionally, uncheck the Delete graphics after conversion checkbox if necessary.
 - Click Run. A new feature layer is added to the Contents pane.
- In the Geoprocessing pane, search for and click the Layer To KML tool.
- In the Layer To KML pane, configure the Parameters tab.
- For Input Layer, click the drop-down menu and select the feature layer created in Step 4.
- Edit the Output File (.kmz or .kml) name if required and click Browse
 to specify a location for the output KML or KMZ file.
 - Click Run.

Article ID: 000030477
Software:
- ArcGIS Pro
Get support with AI
Resolve your issue quickly with the Esri Support AI Chatbot.


Related Information
Discover more on this topic
Search for related information
Find training related to this topic
Explore ideas and give feedback
Get help from ArcGIS experts
Start chatting now