HOW TO
Convert flow accumulation lines from a DEM to polylines in ArcGIS Pro
Summary
A digital elevation model (DEM) represents the Earth's surface as a grid of elevation values, enabling the analysis and modeling of water flow. The line features extracted from the DEM are used to measure the stream lengths and support various hydrological assessments, including stream order classification and floodplain mapping.
This article describes the workflows to convert flow accumulation lines from a DEM to polylines in ArcGIS Pro.
Procedure
Use the Derive Stream As Line tool
The Derive Stream As Line tool automatically generates stream line features from a DEM by applying a flow accumulation threshold to define the stream network structure without prior sink filling.
Note:
The Derive Stream As Line tool requires the Spatial Analyst license.
- Open the ArcGIS Pro project with the DEM data.
- On the Analysis tab, in the Geoprocessing group, click Tools.
- In the Geoprocessing pane, search for and click Derive Stream As Line (Spatial Analyst Tools).
- In the Derive Stream As Line pane, configure the tool parameters.
- For Input surface raster, select the DEM layer from the drop-down list.
- For Output polyline features, specify a name and location for the output polyline features.
- Optionally, for Accumulation threshold, specify the threshold to determine the extent of the stream network.
- Click Run.
Generate the flow accumulation raster and convert the raster streams to polyline features
This workflow customizes the stream network by defining the thresholds and adjusting the parameters at each stage of the process before generating the final stream lines. It also generates intermediate outputs, such as the flow direction and accumulation rasters, which support further analysis and hydrological modeling.
Note:
This workflow requires the Spatial Analyst license.
- Open the ArcGIS Pro project with the DEM data.
- Generate the flow accumulation raster from the DEM data. Refer to Steps 1 through 3 in How To: Create a watershed model using Hydrology in ArcGIS Pro for instructions.
- Classify the flow accumulation lines.
- In the Contents pane, right-click the flow accumulation raster and select Symbology.
- In the Symbology pane, under Primary symbology, select Classify from the drop-down list.
- Optionally, for Classes, specify the number of classes to determine the stream structure.
- On the Classes tab, in the Color column, click the symbols and select the desired color to change the default color of the flow accumulation lines.
- Repeat Step 3d for each label class symbol to match the color of the flow accumulation lines.
Note:
The lowest value in the label classes represents the lowest value of the flow accumulation lines. In this example, the value is 31,919.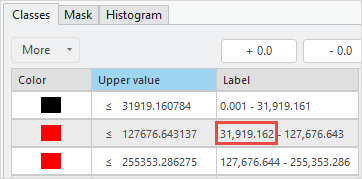
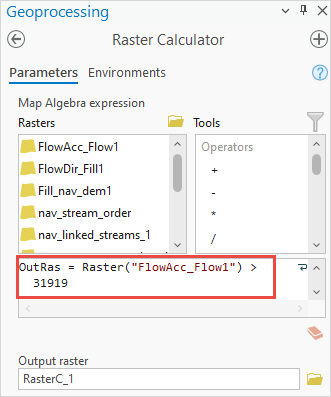
- Run the Raster Calculator tool to return the cells representing the line features.
- In the Geoprocessing pane, search for and click Raster Calculator (Spatial Analyst Tools).
- In the Raster Calculator pane, specify the following expression in the Map Algebra expression box. Replace <flow_accumulation_raster> with the name of the flow accumulation raster layer created in Step 2 and <min_value> with the lowest cell value of the flow accumulation lines.
OutRas = Raster("<flow_accumulation_raster>") > <min_value>
The following is the sample expression.
OutRas = Raster("FlowAcc_Flow1") > 31919
- For Output raster, specify a name and location for the output raster. Click Run.
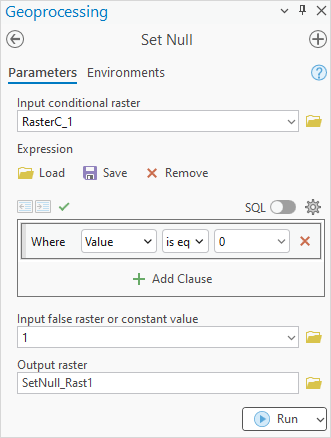
- Use the Set Null tool to return only the value corresponding to the line features.
- In the Geoprocessing pane, search for and click Set Null (Spatial Analyst Tools).
- In the Set Null pane, on the Parameters tab, for Input conditional raster, select the output raster layer created in Step 4.
- For Expression, specify the Where clause as follows:
Where VALUE is equal to 0
- For Input false raster or constant value, type 1.
- For Output raster, specify a name and location for the output raster. Click Run.
- Use the Stream to Feature tool to convert the flow accumulation lines from the output raster layer created in Step 5 into line features. Alternatively, use the Raster to Polyline tool.
The map below shows the flow accumulation lines from the DEM extracted as polylines in ArcGIS Pro.

Article ID: 000034632
- ArcGIS Pro 3 3
- ArcGIS Pro 3 2
- ArcGIS Pro 3 4
Get support with AI
Resolve your issue quickly with the Esri Support AI Chatbot.


Related Information
Discover more on this topic
Search for related information
Find training related to this topic
Explore ideas and give feedback
Get help from ArcGIS experts
Start chatting now