HOW TO
Configure time limits for surveys in ArcGIS Survey123
Summary
ArcGIS Survey123 supports time-based constraints to ensure timely and consistent data collection. There are two methods to implement this functionality.
In the ArcGIS Survey123 web app, survey access can be limited by scheduling open and close times. This method is useful for managing data collection during defined periods, but does not apply timers to individual responses.
Alternatively, in the ArcGIS Survey123 field app, time tracking can be configured in Survey123 Connect by calculating the survey duration and displaying a warning when the time limit is exceeded. This method simulates a timer but does not enforce hard limits or provide real-time countdowns.
This article describes the workflows for both methods to support time-aware survey designs.
Procedure
Configure survey availability in the ArcGIS Survey123 web app
- In a web browser, open ArcGIS Survey123 and sign in with the organization credentials.
- In the My Surveys window, click Design
 on the survey.
 - Click the Collaborate tab. On the Share survey tab, under Survey status, select Schedule the open/close date and time and configure the following parameters:
- For Open, click the calendar and clock icons, and specify the date and time for the survey to be available.
- For Close, click the calendar and clock icons, and specify the date and time for the survey to be closed.
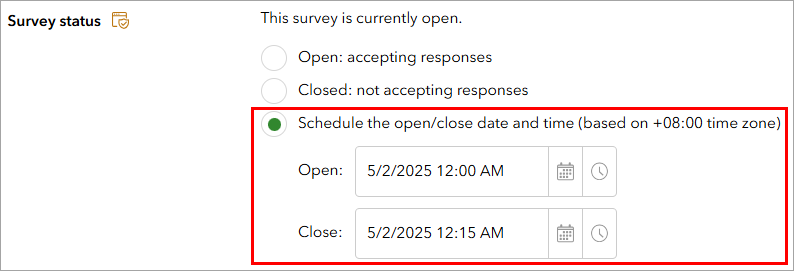
Note:
The minimum duration for survey availability is 15 minutes.
- Click Save.
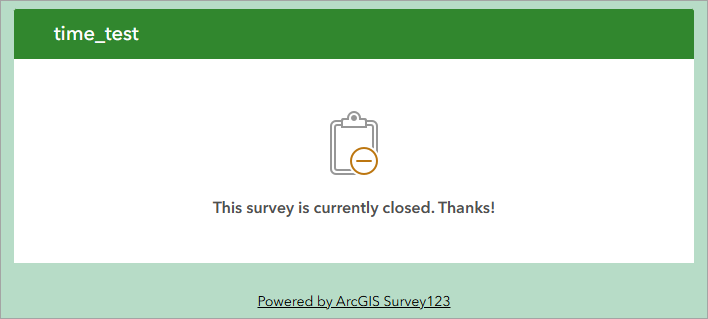
The survey is closed and displays the message when accessed outside the allowed response time, as shown below.
Calculate the survey duration using ArcGIS Survey123 Connect
This method displays a message indicating that the time limit has been exceeded to inform respondents to complete the survey within the intended time frame, but the survey remains open.
Note:
This workflow is only applicable in the ArcGIS Survey123 field app.
- In ArcGIS Survey123 Connect, in the My Survey Designs window, open the survey.
- In the survey’s window, click XLSForm.
- In the XLSForm, create an expression to calculate the duration of the survey response.
- In the survey worksheet, in the type column, select time from the drop-down list.
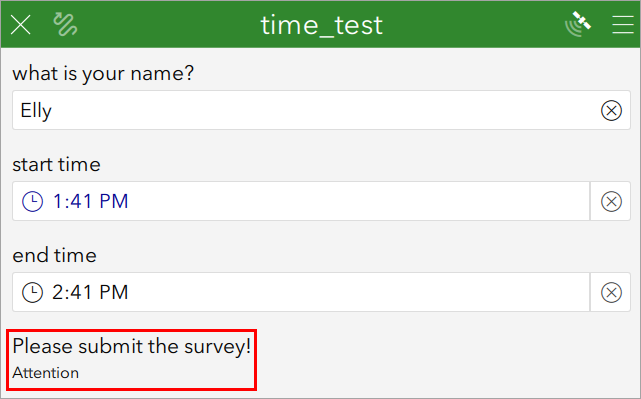
- Specify the values in the name and label columns. In this example, the first question is named 'start_time' and labeled 'start time'.
- In the calculation column, specify the following expression.
once(now())
- On a new row, in the type column, select time from the drop-down list.
- Specify the values in the name and label columns. In this example, the second question is named 'current_time' and labeled 'end time'. This value must be entered manually by the respondent, and is used to simulate the end time of the response.
- On a new row, in the type column, select calculate from the drop-down list.
- Specify the values in the name column. In this example, the third question is named 'duration_minutes'.
- In the calculation column, specify the following expression. Replace <endtime> with the name of the second question, and <starttime> with the name of the first question.
round((decimal-date-time(${<endtime>}) - decimal-date-time(${<starttime>})) * 1440, 0)
The following is an example of the expression.
round((decimal-date-time(${current_time}) - decimal-date-time(${start_time})) * 1440, 0)
- Create a note to inform respondents when the time exceeds the allowed time frame.
- In the survey worksheet, in the type column, select note from the drop-down list.
- Specify the values in the name, label and hint columns. In this example, the note is named 'note', labeled 'Please submit the survey!', and given the hint 'Attention'.
- In the relevant column, specify the following expression. Replace <relevanttest> with the name of the note, and <timelimit> with the maximum time allowed before the note is displayed.
${<relevanttest>} >= <timelimit>
The following is an example of the expression.
${duration_minutes} >= 15
- Click Save
 .
. - In the ArcGIS Survey123 Connect window, click Publish > Publish survey.
The survey below displays the note when the response time exceeds the allowed time frame.
Article ID: 000035981
- ArcGIS Survey123 Field App iOS
- ArcGIS Survey123 Field App Android
- ArcGIS Survey123 Connect
Get support with AI
Resolve your issue quickly with the Esri Support AI Chatbot.


Related Information
Discover more on this topic
Search for related information
Find training related to this topic
Explore ideas and give feedback
Get help from ArcGIS experts
Start chatting now