HOW TO
Configure different transparencies for polygon fills and outlines in ArcGIS Pro
Summary
In ArcGIS Pro, polygon fills and outlines can be configured with varying transparencies to enhance map visualization. For example, using a semi-transparent fill for land use zones allows underlying features such as roads, parks, or water bodies to be visible, providing context to the area being analyzed. This article describes the workflows to configure different transparencies for polygon fills and outlines in ArcGIS Pro.
Procedure
Configure the symbol and outline transparency
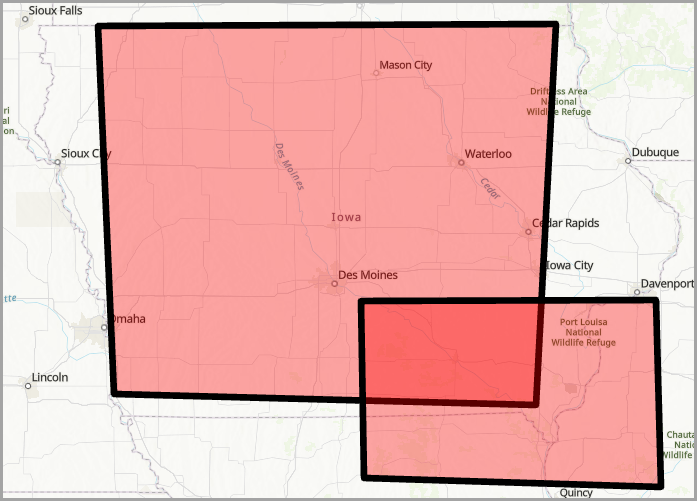
This workflow displays an additive opacity effect for overlapping polygon areas, as the transparency effect is reduced by the number of overlapping polygons. This is useful when identifying potential conflicts in land use or analyzing spatial relationships between different zoning categories, thereby aiding in more informed decision-making and effective urban planning.
- Open the ArcGIS Pro project.
- In the Contents pane, right-click the polygon feature layer and click Symbology to open the Symbology pane.
- In the Symbology pane, on the Primary symbology
 tab, click the symbol's patch to access the Format Polygon Symbol mode.
 - Configure the polygon fill transparency.
- In the Format Polygon Symbol mode, click the Properties tab.
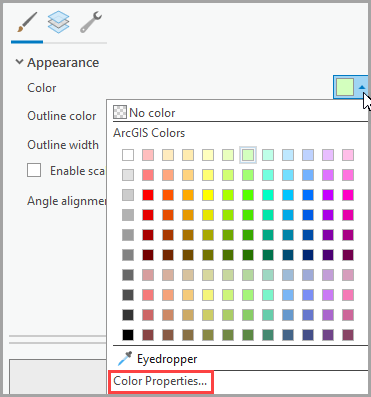
- On the Symbol
 tab, under Appearance, for Color, click the drop-down arrow and select Color Properties.
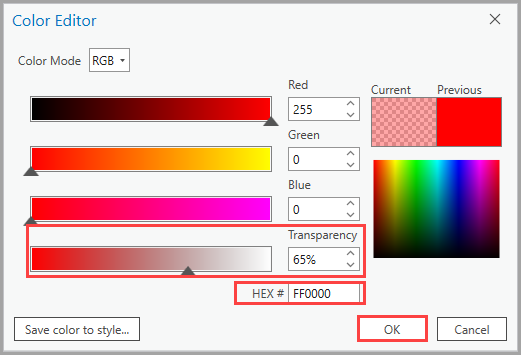
- In the Color Editor dialog box, for Transparency, drag the slider to the right to increase the transparency or specify the transparency percentage. In this example, the transparency is set to 65%.
- For HEX #, specify the hexadecimal value. In this example, FF0000 is specified. Refer to ArcGIS Pro: Color for more information on color choices.
- Click OK.
- Repeat Step 4 to configure the polygon outline transparency. For Step 4(b), on the Symbol tab, under Appearance, for Outline Color, click the drop-down arrow and select Color Properties to open the Color Editor dialog box for the outline. Specify a Transparency value that is different from the fill transparency.
- In the Format Polygon Symbol mode, under Appearance, for Outline width, specify a non-zero value to display the outline.
- Click Apply.
The map shows the different polygon fill and outline transparency with the additive opacity effect for overlapping areas.
Configure the layer transparency
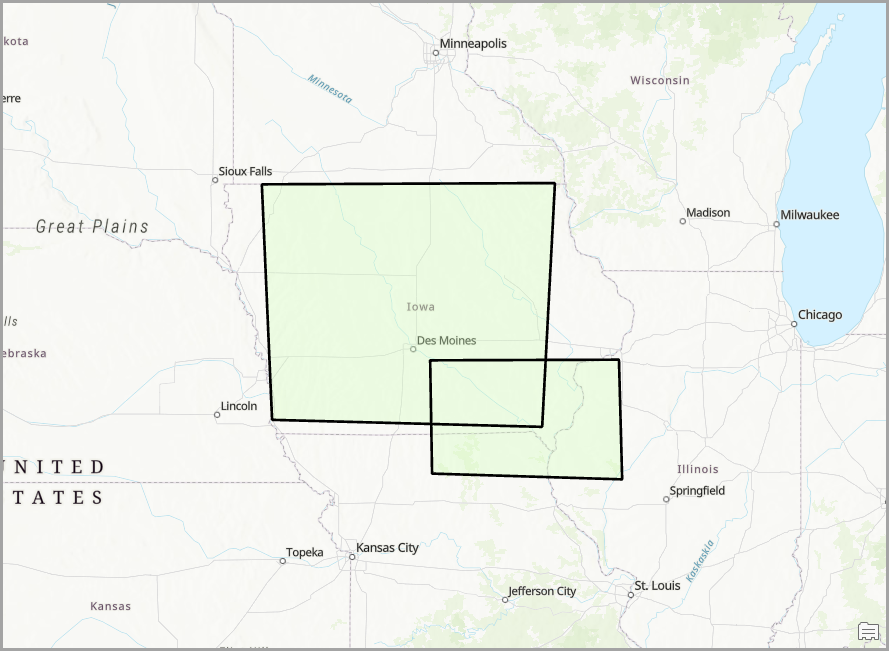
This workflow does not produce an additive opacity effect for overlapping polygon areas, ensuring the visualization of the underlying labels or layers, such as road layers, is unimpeded.
Note:
This workflow increases the project's data file size. Refer to FAQ: What are some best practices to reduce data file size before publishing from ArcGIS Pro? to circumvent the issue.
- Open the ArcGIS Pro project.
- Export the polygon feature layer.
- In the Contents pane, right-click the polygon feature layer, and click Data > Export Features.
- In the Export Features dialog box, on the Parameters tab, for Input Features, click the drop-down arrow and select the polygon feature layer.
- For Output Feature Class, specify the name of the polygon feature class to be exported.
- Click OK.
- Increase the original layer transparency.
- In the Contents pane, click the original polygon feature layer.
- On the Feature Layer ribbon tab, in the Effects group, for Transparency, specify the percentage value.
- Change the exported layer symbol style.
- In the Contents pane, right-click the exported polygon feature layer and click Symbology.
- In the Symbology pane, on the Primary symbology
 tab, click the symbol's patch to access the Format Polygon Symbol mode.
 - On the Gallery tab, under ArcGIS 2D, select a polygon style without fill. In this example, Black Outline (2 pts) is selected.
The map shows the different polygon fill and outline transparency without the additive opacity effect for overlapping areas.
Article ID: 000033961
- ArcGIS Pro 3 1
- ArcGIS Pro 3 3
- ArcGIS Pro 3 2
Get support with AI
Resolve your issue quickly with the Esri Support AI Chatbot.


Related Information
Discover more on this topic
Search for related information
Find training related to this topic
Explore ideas and give feedback
Get help from ArcGIS experts
Start chatting now