HOW TO
Calculate the volume of a region from elevation points in ArcGIS Pro
Summary
Elevation points represent the height of a land surface, and each point contains the x, y and z-value measurements of the Earth’s surface. In ArcGIS Pro, the volume of a region can be calculated from elevation points by interpolating a raster surface and running the Surface Volume tool to calculate the volume of the region above or below a specific elevation (reference plane). This method can be used to calculate the amount of soil collected from excavating a certain area of land to a specific depth.
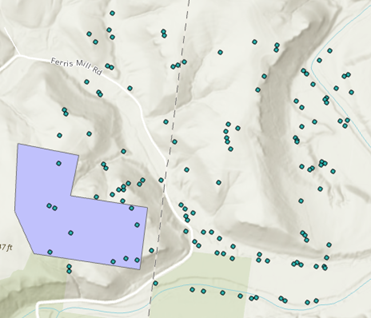
In this article, the volume of a region is calculated based on a polygon boundary feature class and the elevation points, as shown in the image below.
Procedure
Note:
This workflow requires the 3D Analyst license. Refer to ArcGIS Pro: Enable ArcGIS 3D Analyst extension for more information.
- Open the ArcGIS Pro project.
- Interpolate a raster surface from the elevation points using the Natural Neighbor tool.
- On the ribbon, click Analysis > Tools.
- In the Geoprocessing pane, search for and select Natural Neighbor (3D Analyst Tools).
- Select the elevation points for Input point features.
- Select the elevation value field for Z value field.
- Specify the output for Output raster and click Run.

A new raster surface layer is created from the elevation points.

- Cut the raster surface from Step 2 with the boundary as the output extent using the Clip Raster tool.
Note:
In this scenario, the polygon boundary feature class represents the area of interest.
- In the Geoprocessing pane, search for and select Clip Raster (Data Management Tools).
- Select the output from Step 2 for Input Raster.
- Select the boundary feature class for Output Extent.
- Specify the output for Output Raster Dataset.
- Check the Use Input Features for Clipping Geometry check box and click Run.

A new clipped raster is created representing the area of focus.

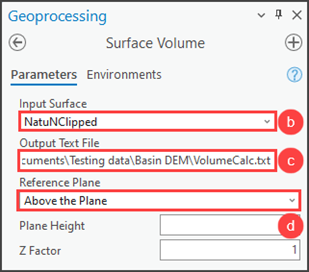
- Calculate the volume of the area using the Surface Volume tool.
- In the Geoprocessing pane, search for and select Surface Volume (3D Analyst Tools).
- Select the output from Step 3 for Input Surface.
- Specify the output for Output Text File.
- Click the Reference Plane drop-down arrow and select Above the Plane or Below the Plane, depending on whether the volume to be calculated is above or below the reference plane.
- Click Run.
- Navigate to and open the output text file on the machine. Refer to the output path in Step 4(c), if necessary.
The text file stores the path to the surface, the parameters used to generate the results, and the calculated area and volume measurements. The volume is displayed at the end of the text file. In this example, the volume is 4,389,169.5 cubic meters (m³).

Article ID: 000030262
- ArcGIS Pro 3 1
- ArcGIS Pro 3 0
- ArcGIS Pro 2 x
Get support with AI
Resolve your issue quickly with the Esri Support AI Chatbot.


Related Information
Discover more on this topic
Search for related information
Find training related to this topic
Explore ideas and give feedback
Get help from ArcGIS experts
Start chatting now