HOW TO
Calculate and display area values for tessellation grids in ArcGIS Pro
Summary
Tessellation grids divide space into equal-sized analysis zones, providing a structured framework for spatial analysis. The grids are useful in comparing data uniformly across areas, conducting statistical assessments, and visualizing patterns with clarity. Displaying area sizes within these grids further enhances the interpretability of the map, supports transparent decision-making, and helps validate the accuracy of spatial units. This article describes the workflow to calculate and display the area values for the tessellation grids in ArcGIS Pro.
Procedure
- Open the ArcGIS Pro project containing the polygon feature.
- Create a tessellation grid over the polygon feature using the Generate Tessellation tool.
- On the Analysis tab, in the Geoprocessing group, click Tools.
- In the Geoprocessing pane, search for and click Generate Tessellation.
- In the Generate Tessellation pane, for Output Feature Class, specify a name.
- For Extent, click Extent of a Layer
 and select the polygon feature layer from the drop-down list.
 - For Shape Type, select the preferred shape from the drop-down list.
- For Size, specify the preferred size and unit.
- Click Run.
- Clip the tessellation grid layer with the polygon feature layer using the Pairwise Clip tool.
- In the Generate Tessellation pane, click the Back icon to return to the search field.
- In the Geoprocessing pane, search for and click Pairwise Clip.
- In the Pairwise Clip pane, for Input Features, select the output feature layer in Step 2 from the drop-down list.
- For Clip Features, select the polygon feature layer from the drop-down list.
- For Output Feature Class, specify a name.
- Click Run.
- Add a new field to the clipped tessellation grid layer.
- In the Contents pane, right-click the output feature layer created in Step 3 and select Attribute Table.
- In the attribute table, click Add Field to open the Fields view.
- Configure the new field with a double data type. Refer to ArcGIS Pro: Create a field and apply a domain and default value for instructions and more information.
- On the Fields tab, in the Manage Edits group, click Save. Close the Fields view.
- Calculate and populate area values in the new field. Refer to How To: Calculate geometry in ArcGIS Pro for instructions. For Property, select Area or Area (geodesic) and specify Area Unit with the preferred unit.
- Enable labeling for the clipped tessellation grid layer based on the attribute field values. Refer to ArcGIS Pro: Turn on labels for instructions. In the Label Class group, click the Field drop-down list and select the newly created field.
Note:
Adjust the label position to improve map readability, if necessary. Refer to ArcGIS Pro: Specify a point label position for more information.
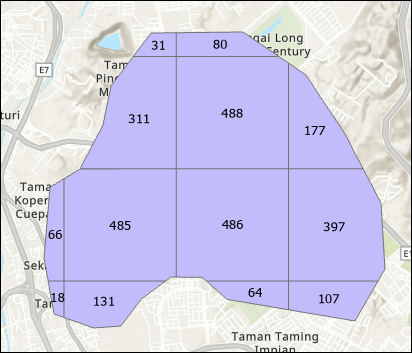
The image below displays the area values for each polygon grid in US Survey Acres.
Article ID: 000036904
- ArcGIS Pro
Get support with AI
Resolve your issue quickly with the Esri Support AI Chatbot.


Related Information
Discover more on this topic
Search for related information
Find training related to this topic
Explore ideas and give feedback
Get help from ArcGIS experts
Start chatting now