HOW TO
Batch import fleet management data in Site Scan Manager
Summary
Overview
In Site Scan Manager for ArcGIS, Fleet Management is a repository of drone assets, personnel, and flight history. It is important for organizations to maintain a system of record of this data so drone program managers have an accurate understanding of flight activity, ensure pilot and aircraft regulatory compliance, and can provide records to auditors when requested.
All flights conducted in the Site Scan Flight for ArcGIS app are automatically captured and stored in fleet management. However, there are several reasons why flights may not be conducted in the Site Scan Flight app, and you may still want to include those flights in your organization’s fleet management system. For instance:
- Your organization recently purchased Site Scan and has existing fleet management records in another system.
- Your organization uses drones that are not supported by the Flight app.
Using batch import, you can import aircraft, battery, and flight records to Site Scan’s fleet management.
While the batch import workflow includes steps for uploading aircraft, batteries, and flights, you do not need to upload all three entities at one time. You can skip any upload step along the way; for example, if you just need to upload flights, you can skip the aircraft and battery steps.
Below are some important considerations prior to importing data:
- To avoid duplicates, don’t import aircraft that you plan to use in the Site Scan Flight app. Site Scan will automatically create a new aircraft and flight record upon the aircraft’s first flight in the Site Scan Flight app. If you need to import historical flight data for an aircraft that you plan to use in the Site Scan Flight app, fly it first in the Flight app to create the aircraft in fleet management, then use batch import to import historical flights and associate them with the aircraft.
- All batch import jobs are permanent. It is important to ensure you are importing accurate data to avoid unintended results, as these records will impact fleet management statistics for your entire organization.
- If you just need to add one or two aircraft, batteries, or flights, you can still use the Add option in fleet management to add these one by one.
Prerequisites: CSV structure guidelines
Refer to the CSV templates below for proper import data structure. An example row is included with each template. If you plan to copy your data to the template, remove the example row before saving and importing your CSV.
Preparing your CSV files is an important step for a smooth import process. Data that is not in the expected format or schema can cause errors during import. This section describes how to prepare your CSV files.
Each CSV template reflects the schema and an acceptable value option. Refer to the sections below for all value format options. You can either copy your data into the CSV templates, or refer to the CSV templates to modify your existing data to match the schema.
Aircraft CSV
| Field name | Required | Description | Format/example |
| internalSerial | Yes (if no name field) | Typically the flight controller serial number that is created automatically by the drone flight software. It is not the serial number printed on the drone (see extSerial field). If your aircraft do not have flight controller serial numbers, you can omit this field. Must be unique. | |
| name | Yes (if no internalSerial field) | Aircraft name. Must be unique. | |
| extSerial | No | Printed serial number on the drone. Must be unique. | |
| extModel | No | Drone manufacturer and model. | See note below the table. |
| status | No | Identifies the drone as active or retired. Status field is not currently shown in fleet management but will be added in the future. Blank values will default to Active. |
|
| purchaseDate | No | Date the drone was purchased or acquired by your organization. |
|
| flightTimeAdj | No | Total flight time in minutes. Only use this field for drones whose flights will not be imported. If importing prior flights with associated drones, the flight hours will automatically be added to the drone without the need to add the time adjustment here. Blank values will default to zero. |
|
| notes | No | Short description or additional information about the aircraft. | |
| customId | No | Any unique string identifier that can be utilized as a matching key during the flight matching step. For example, some other fleet management systems have a drone ID string on their export of both the drone file and the flight file, which references a drone via the drone ID string. In such cases, add the ID string in this field to make the association. |
Note on extModel: It is strongly recommended that drones supported by Site Scan Flight are flown with the app and not imported to fleet management manually. Flying with the app will automatically create an aircraft profile for flights to be associated with. If you have a drone but do not plan to fly it in the flight app (for example, if the drone is retired), enter a corresponding aircraft make and model code from the list below rather than typing the aircraft make and model:
- astro
- inspire2
- mavicPro
- mavic2Pro
- mavic2Zoom
- m200
- m210
- m210rtk
- m200V2
- m210V2
- m210rtkV2
- m300RTK
- phantom4pro
- phantom4proV2
- phantom4advanced
- phantom4RTK
Batteries CSV
| Field name | Required | Description | Format/example |
| internalSerial | Yes (if no name field) | Typically the battery's flight controller serial number that is created automatically by the drone flight software. It is not the serial number printed on the battery (see extSerial field). If your batteries do not have flight controller serial numbers, you can omit this field. Must be unique. | |
| name | Yes (if no internalSerial field) | Battery name. Must be unique. | |
| extSerial | No | Printed serial number on the battery. Must be unique. | |
| status | No | Identifies the battery as active or retired. Status field is not currently shown in fleet management but will be added in the future. Blank values will default to Active. |
|
| purchaseDate | No | Date the battery was purchased or acquired by your organization. |
|
| flightTimeAdj | No | Total flight time in minutes. Only use this field for batteries whose flights will not be imported. If importing prior flights with associated batteries, the flight hours will automatically be added to the battery without the need to add the time adjustment here. Blank values will default to zero. |
|
| notes | No | Short description or additional information about the battery. | |
| customId | No | Any unique string identifier that can be utilized as a matching key during the flight matching step. For example, some other fleet management systems have a battery ID string on their export of both the battery file and the flight file, which references a battery via the ID string. In such cases, add the ID string in this field to make the association. |
Flights CSV
| Field name | Required | Description | Format/example |
| takeoffTime | Yes | Day and time the drone took off. |
|
| landingTime | Yes (if no duration) | Day and time the drone landed. | see takeoffTime |
| duration | Yes (if no landingTime) | Flight duration. If landingTime exists, leave blank. |
|
| pilot | Yes | Pilot name. Refer to section titled How matching works for pilots for more information on how this field is used. | |
| aircraft | Yes | Unique identifier for the aircraft. Should match with internalSerial, extSerial, or customId. Refer to section titled How matching works for aircraft and batteries for more information on how this field is used. | |
| timezone | No | IANA zone identifier. Use the TZ database name field. Defaults to browser timezone if left blank. |
|
| takeoffLat | No (required if you want weather data to be applied to the flight) | Takeoff latitude as a decimal. Must import with takeoffLong to create a coordinate pair. |
|
| takeoffLong | No (required if you want weather data to be applied to the flight) | Takeoff longitude as a decimal. Must import with takeoffLat to create a coordinate pair. |
|
| landingLat | No | Landing latitude as a decimal. Must import with landingLong to create a coordinate pair. | See takeoffLat |
| landingLong | No | Landing longitude as a decimal. Must import with landingLat to create a coordinate pair. | See takeoffLong |
| firmware | No | Drone firmware version used during the flight. |
|
| battery | No | Unique identifier for the battery. Should match with internalSerial, extSerial, or customId. Refer to section titled How matching works for aircraft and batteries for more information on how this field is used. Currently a flight can only reference one battery. | |
| notes | No | Short description or additional information about the flight. |
Notes about uploading CSVs
You can upload one CSV for aircraft, battery, and flight steps. You do not need to upload a CSV for all three; for example, if you only need to import flights, skip to step 4 of the workflow and upload a flight CSV.
Upon upload, the CSV contents are displayed in a formatted table. Errors or warnings may appear above the table to inform you if values that are formatted incorrectly, or duplicates are detected. If you encounter errors, refer to the prior sections of this documentation to correct value and header formats.
Site Scan only will import fields listed in the CSV templates. Any additional fields, or fields that do not match the template field headers, are discarded upon upload.
Procedure
Procedure
To import data to fleet management, follow the steps below. You must be a Fleet Manager to import fleet data. Fleet Managers can view the Dashboard panel of fleet management. Contact your Site Scan administrator with questions about your fleet permission.
- Sign into Site Scan Manager.
- In the left sidebar, click Fleet Management.
- In the upper left, click + Add new > Batch Import.

- Read the instructions page and download the relevant CSV templates for your import.
- Use the templates and documentation above to configure your CSVs to meet the schema and value requirements.
- Click Next to proceed to Aircraft upload. You can skip any upload step to get to the upload section that you need.
- To upload a CSV, either drag and drop the file into the window or browse for the file by clicking Select File.
- If needed, address any upload errors by referring to the above sections and modifying the CSV.
- If needed, click Upload new csv to replace the current file with a new one.
- Review the uploaded data and click Next.
- If you upload flights, read the matching guidance below and follow the steps under the Match assets section.
- After matching, click Next to review your batch import summary.
- Click Submit to import data.
Flight upload: matching
All flights require a matched aircraft. If your flights CSV includes the optional battery field, you can match batteries to your flights but the matching step is optional. Matches can be made with aircraft and batteries that are currently being uploaded in the batch import workflow, or from existing aircraft and batteries in Site Scan. Pilot matches must come from existing pilots in Site Scan. Flights with unmatched pilots can still be imported.
How matching works for aircraft and batteries
Every flight must reference a specific aircraft and optionally, specific batteries. Site Scan matches these assets by comparing the value in the flight CSV’s aircraft and battery fields with a the following fields for aircraft or batteries being imported or that already exist in Site Scan:
- customId (only for aircraft or batteries being imported)
- internalSerial
- extSerial
Keep in mind the following points while preparing your data:
- Assets cannot be matched by
name. customIdcan only be used for matching flights with aircraft or batteries that are being imported at the same time as flights.extSerialis referred to as Physical Serial Number on an aircraft or battery profile page in Site Scan.
Site Scan attempts to automatically match aircraft and batteries that are referenced for every flight based on these fields. It will look at all existing aircraft and batteries in your fleet management, as well as aircraft and batteries that were uploaded in steps 2 and 3 of the batch import workflow.
If no match is identified, you will have the option to manually match the aircraft or battery.
How matching works for pilots
Site Scan will look for matches between the pilot column in the flights CSV and pilot names in Site Scan. If your flights reference active pilots who don’t yet exist in Site Scan, add them on the Team Members page with the appropriate role prior to import.
If no match is found, it might be due to different spellings, or perhaps the flights CSV contains a pilot’s email address in the pilot field instead of a pilot name. In these cases, you can manually pick an existing pilot in Site Scan to complete the match.
Alternatively, the pilot may not be a Site Scan member. In these cases, you can choose the option, Not a Site Scan Pilot. In this case, any flights being imported for this pilot will not reference a pilot profile, but the name from the CSV will be displayed on the flight profile.
Match assets
Use the following steps to match flights with assets:
- Match aircraft
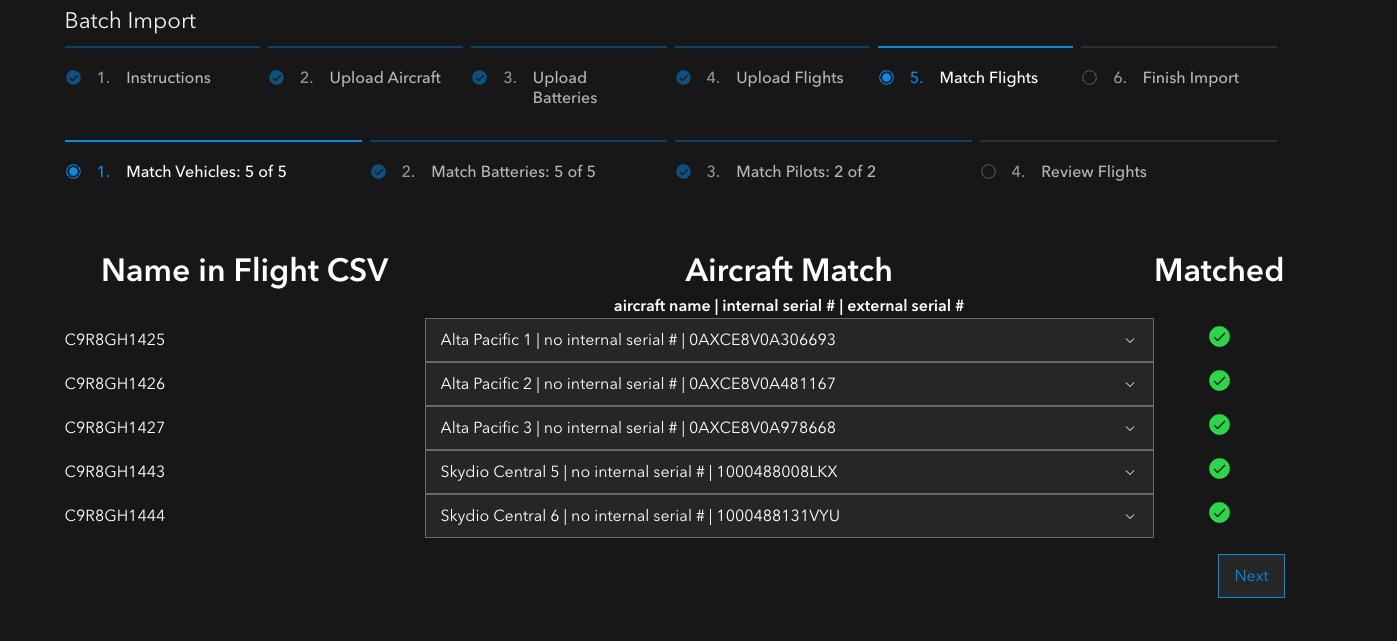
- Look through the aircraft values listed in the Aircraft Match column. Ensure each aircraft referenced in the flight CSV matches the expected corresponding aircraft from the aircraft CSV, or an existing aircraft in Site Scan.
- If you notice an incorrect match, click the dropdown and choose a different aircraft.
- If an aircraft from the flight CSV was not matched with any aircraft, click the dropdown and choose an aircraft. (See the Note about aircraft matches below)
- Once all aircraft have matches, click Next.
- Match batteries

- if applicable, repeat step 1 with batteries.
- Once desired batteries have matches, click Next.
- Match pilots

- Look through the pilot values listed in the Pilot Match column. Ensure each pilot referenced in the flight CSV matches the corresponding Site Scan pilot.
- If pilots from the flight CSV were not matched with any pilot, use one of the two following options:
- If the pilot referenced in the flight CSV is not a Site Scan member nor an active drone pilot in your organization, click the dropdown and choose Not a Site Scan pilot. This option will allow you to upload the pilot’s flights, but the flights will not reference a pilot profile.
- If the pilot referenced in the flight CSV is not a Site Scan member, but is an active drone pilot in your organization, add the pilot to Site Scan in the same method of adding a new team member. Exit the batch import, go to the Team Members page and click New Team Member. Pilots who don’t need access to Site Scan projects, but still need to be included in your fleet management system, can be added at no cost as Read-Only members with Fleet User permission. After adding these pilots, repeat the batch import process; the pilot should now match with their flights.
- Once all pilots have matches, or have been designated as Not a Site Scan user, click Next.
- Review flights after matching and click Next.

- Review your input summary and click Submit.

- View the imported data in fleet management to verify the import was successful.
Note about aircraft matches
If no corresponding aircraft exists yet in Site Scan, you can exit the batch import and add the aircraft to fleet management. Click Add new > Aircraft. Return to batch import, and select the newly created aircraft. If many aircraft referenced in the flight CSV do not have corresponding aircraft in Site Scan, consider doing a batch import of those aircraft for a more efficient import process. Ensure that any newly added aircraft contain the proper unique identifier (customId, internalSerial, or extSerial) so that Site Scan can match it with its flights.
If the aircraft you are adding are supported by the Site Scan Flight app, the best practice is to perform one flight with these aircraft using the Flight app. This will automatically create a new aircraft in fleet management that can be used for matching.
Errors and other CSV file structure tips
Batch import will only succeed if the CSV files contain exact names for required field names and proper syntax for field values. Errors can occur if the CSV data is not structured in the expected format. Errors can occur immediately upon upload, or during the final submission. In each instance, Site Scan attempts to provide a description of what field or value is causing the error so you can take corrective action and re-upload the file.
Review the required fields and allowable values for each field in the top sections of the documentation to address errors during upload and submission. Depending on the prior fleet management software from which your data originated, you may need to manipulate the CSV, including the cell format, so the values are in the expected syntax and the field names match the template.
A few other notes regarding possible CSV file errors:
- An aircraft cannot be referenced by multiple flights that occur at the same time. These are considered duplicate flights and will not be imported.
- If duplicate aircraft and batteries are detected, Site Scan will prompt a warning and none of the duplicates will be imported.
If you encounter errors that you cannot resolve, contact Esri Technical Support.
Article ID: 000029545
- Site Scan Manager for ArcGIS
Get support with AI
Resolve your issue quickly with the Esri Support AI Chatbot.


Discover more on this topic
Search for related information
Find training related to this topic
Explore ideas and give feedback
Get help from ArcGIS experts
Start chatting now