Frequently asked question
Is it possible to add a table to ArcGIS StoryMaps?
Yes, it is possible to insert a table to a story ArcGIS StoryMaps. In the August 2023 release of ArcGIS StoryMaps, a table block feature has been added to the story builder. Refer to ArcGIS Blog: Enhancing visual storytelling with the table block in ArcGIS StoryMaps for more information. While this feature is useful for enhance data visualisation and allows for direct edits to be made to the table, it is limited in a way where data must be input manually, and it might not be suitable for more complex tables. To insert a table in ArcGIS StoryMaps, perform the following workflow:
- In ArcGIS StoryMaps, browse to the story, click Quick actions
 > Edit.
 - In the story builder, click Add content block
 and click Table.
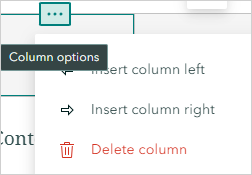
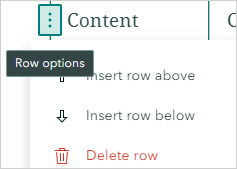
 - Optionally, to add or delete columns or rows, click Column options or Row options, as displayed in the images below.
- Manually insert the data in each cell.
Alternatively, an existing attribute table may be added through the Embed option in ArcGIS StoryMaps by embedding a hosted feature layer from a web application such as ArcGIS Experience Builder or ArcGIS Web AppBuilder.
In ArcGIS Experience Builder
- Open ArcGIS Experience Builder and create a blank project. Refer to ArcGIS Experience Builder: Templates for more information.
- Add the hosted table as the data. Refer to ArcGIS Experience Builder: Manage data for instructions.
- Add a Table widget to the web app.
- On the left side of the page, click the Insert tab.
- Expand the Data centric node and drag the Table widget to the center of the screen.
- On the Table pane, click Content and click New sheet.
- On the Sheet configuration pane, click Select data.
- On the Select data pane, select the hosted table to add to the Table widget.
- Click Save, and Publish.
- Open ArcGIS Story Maps and insert the URL of the web app created in Step 3. Refer to ArcGIS StoryMaps: Add embeds for instructions.
Using ArcGIS Web AppBuilder
- Log in to ArcGIS Online using an organizational account.
- Click Content > My Content.
- Click Create app, and click Web AppBuilder.
- On the ArcGIS Web AppBuilder editing page, add the Attribute Table widget.
- Click the Map tab.
- Click Choose map and select the web map with the hosted table.
- Click OK.
- Add the Attribute Table widget to the web app. Refer to ArcGIS Web AppBuilder: Configure the Attribute Table widget for instructions.
- Click Save.
- Open ArcGIS Story Maps and Insert the URL of the web app created in Step 3. Refer to ArcGIS StoryMaps: Add embeds for instructions.
Article ID: 000030213
- ArcGIS Web AppBuilder
- ArcGIS Experience Builder
- ArcGIS StoryMaps
Get support with AI
Resolve your issue quickly with the Esri Support AI Chatbot.


Related Information
Discover more on this topic
Search for related information
Find training related to this topic
Explore ideas and give feedback
Get help from ArcGIS experts
Start chatting now