ERROR
Your portal does not support this share type
Error Message
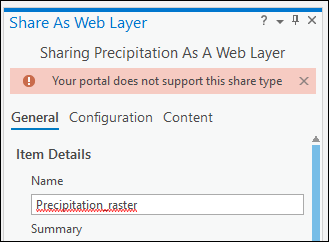
In ArcGIS Pro, when attempting to publish a raster dataset to ArcGIS Online, the following error message is returned.
Error:
Your portal does not support this share type
Cause
By default, when sharing a raster dataset as a web layer from the Catalog pane in ArcGIS Pro, it is shared as an imagery layer, and publishing image services to ArcGIS Online is not supported.
Solution or Workaround
Use one of the following options to publish a raster dataset as a web layer from ArcGIS Pro.
Publish the raster dataset as a web tile layer
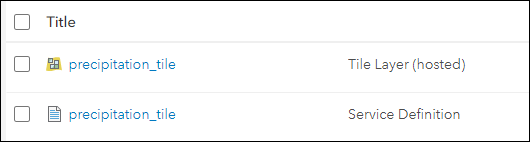
In ArcGIS Pro, add the raster dataset to the map, and share it as a web tile layer to ArcGIS Online. Refer to ArcGIS Pro: Share a web tile layer using the default configuration for more information.
The image below shows the hosted tile layer available on the Content page in ArcGIS Online.
Convert the raster layer into a KML file and add it to ArcGIS Online
In ArcGIS Pro, convert the raster layer into a KML file using the Layer To KML tool, and add the KML file to ArcGIS Online through the New item option on the Content page.
- Open the ArcGIS Pro project, and add the raster dataset to the map.
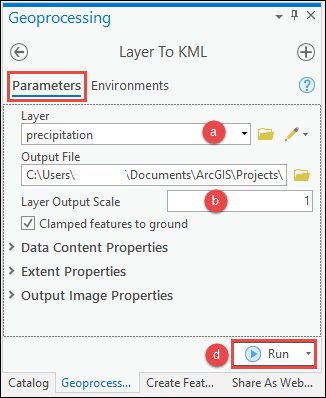
- In the Geoprocessing pane, search for and click the Layer To KML tool. The Layer To KML window opens.
- In the Layer To KML window, on the Parameters tab, fill in the required fields and parameters as follows:
- Layer: The raster layer. In this example, the raster layer is ‘precipitation’.
- Layer Output Scale: Type 1. This parameter is optional.
- Leave other parameters as default.
- Click Run to run the tool.
- Log in to ArcGIS Online, and add the KML file.
- In ArcGIS Online, click Content > My Content.
- On the My Content page, and click New item.
- In the New item window, drag and drop the KML file, and configure Title, Tags, and Summary. Click Save.
The image below shows the KML layer available on the Content page in ArcGIS Online.

Publish the raster dataset as an imagery layer to ArcGIS Enterprise
In ArcGIS Pro, share the raster dataset as a web imagery layer to ArcGIS Enterprise. Refer to ArcGIS Pro: Share a web imagery layer using the default configuration for more information.
The image below shows the imagery layer available on the Content page in Portal for ArcGIS.

Article ID: 000026381
- ArcGIS Online
- Portal for ArcGIS
- ArcGIS Pro 2 8 x
- ArcGIS Pro 2 7 x
- ArcGIS Pro 2 x
Get support with AI
Resolve your issue quickly with the Esri Support AI Chatbot.


Related Information
Discover more on this topic
Search for related information
Find training related to this topic
Explore ideas and give feedback
Get help from ArcGIS experts
Start chatting now