HOW TO
Allow custom text input in Map Viewer before printing
Summary
When creating a layout in ArcGIS Pro, organization members can specify custom text for selected elements in Map Viewer before printing.
Starting with Portal for ArcGIS 11.4, this is possible for templates in the organization's designated layout template group as well. Custom text elements in 11.3 have been observed to be buggy and only work with print services. Layout template groups are also not a feature in versions below 11.3.
Procedure
Preparing the text elements
Start by opening the desired layout in ArcGIS Pro. To insert text elements that can be edited, follow these steps:
- From the Insert tab of the ribbon, select the Text command in the Text and Graphics group.
- Click a location on the layout to position the new text element.
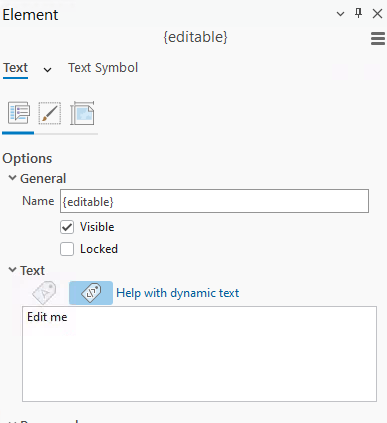
- Click the text element from the Contents pane to open the Element pane.
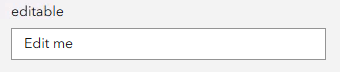
- Expand General if not already expanded, and choose a display Name. Space characters are supported. Surround the name with curly braces so the text element is seen by Map Viewer as editable. This name appears in Map Viewer similar to the example in the image below:
- Save the layout. In the Share tab, the Save As group, select Layout File and navigate to the designated folder for layouts.
Using the layout template in Portal for ArcGIS
The workflow depends on whether you want to create a custom print service or use the layout template group feature (see the Related Information section).
Use inside a custom print service
- From the Analysis tab, Tools group, search for the Export Web Map server tool and open it.
- For the Templates Folder field, choose the designated folder where the layouts were saved and click Run.
- Look for the Get Layout Templates Info server tool and open it.
- For the Layout Templates Folder, select the layouts folder again and click Run.
- From the Analysis tab, go to History and look for the most recent run of Export Web Map.
- Right-click it, hover over Share As and select Share Web Tool. The Share as Web Tool tab opens.
- On the Configuration tab, for Execution Mode select Synchronous. This is required to make this tool eligible to be the organization's default print service.
- On the Content tab, click Add Tool.
- Look for the most recent run of the Get Layout Templates Info tool and add it. This is required so Map Viewer can see the custom text elements of all templates we added and make input fields for each.
- Publish the tool and click Manage the web tool after it finishes.
- In the item details page that opens in the browser, scroll down to the URL section and click View. The Server REST Services page appears.
- Click the Export Web Map task and copy the URL from the browser.
- In the Portal home page, go to Organization > Settings > Utility services and under Printing, edit the URL of the default print service.
- Paste the URL copied earlier and save. Now all the templates in the designated folder appear.
Use with layout template group
In the Portal home page, create a new group. This will be used to store the templates.
- Have the Layout tab open in ArcGIS Pro.
- In the Share tab, in the Manage group, select Upload File.
- For Input File, select the .pagx layout file we saved in the designated folder.
- For Groups, select the group created earlier and Run.
- Repeat these steps for all the template files to be made available to the organization.
- In the Portal home page, go to Organization > Settings > Utility services > Printing and under Layout template group, select the group.
When opening Map Viewer and selecting the Print button from the Contents pane, the custom text inputs are now visible inside the Advanced options dropdown once we select the desired template. For custom print service templates, they show under Default templates. For the layout template group templates, they are under Organization templates.
Article ID: 000034881
- ArcGIS Pro
- Portal for ArcGIS
- ArcGIS Enterprise
Get support with AI
Resolve your issue quickly with the Esri Support AI Chatbot.


Related Information
Discover more on this topic
Search for related information
Find training related to this topic
Explore ideas and give feedback
Get help from ArcGIS experts
Start chatting now