HOW TO
Konfigurieren von ArcGIS Dashboards zum Anzeigen von ausgewählten Feature-Attributen Anlagen und Positionen auf der Karte
Zusammenfassung
Actions in ArcGIS Dashboards can be configured to provide an interactive experience and to give the dashboard a more focused context. This article describes how to use the Zoom and Filter actions to display the attributes, attachments (such as images), and location of features in target map elements (Details and Map elements) when selecting features from the source element (List element). Selecting a feature from the List element displays the corresponding attributes and attachments in the Details element, and its location in the Map element.
Vorgehensweise
- In ArcGIS Pro, publish the feature layer with attachments to ArcGIS Online or ArcGIS Enterprise. Refer to Share a web feature layer for more information. Skip this step if the hosted feature layer is available in ArcGIS Online or ArcGIS Enterprise.
- Sign in to ArcGIS Online or ArcGIS Enterprise version 10.9 and above, and create a dashboard.
- In ArcGIS Dashboards, click Add
 and select List
  . Click Browse all layers, select the preferred feature layer, and click Done.
 - Click Add and select Details
 . Select the same feature layer from Step 3, and click Done.
 - Click Add and select Map
 . Select a web map containing the same feature layer selected in Step 3, and click Done.
 - Configure the List element to add Filter and Zoom actions.
- In the List element, click Configure
 .
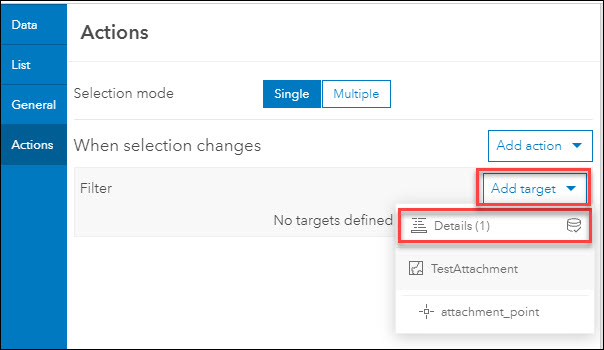
. - Click the Actions tab, click Add action, and select Filter
 .
. - Click Add target for the Filter action, and select the Details element configured in Step 4.
- In the List element, click Configure
- Click Add action, and select Zoom
 .
. - Click Add target for the Zoom action, and select the Map element configured in Step 5.
- Click Done.
- Configure the Map element to add the Filter action.
- In the Map element, click Configure
 .
. - Click the Map actions tab, click Add action, and select Filter.
- Click Add target, and select the List element configured in Step 3.
- Click Done.
- In the Map element, click Configure
The image below demonstrates the output when selecting a feature from the List element, with the corresponding attributes and attachments displayed in the Details element while the Map element zooms to the location of the selected feature.

Artikel-ID:000026591
Hilfe von ArcGIS-Expert*innen erhalten
Die Esri Support-App herunterladen
Zugehörige Informationen
Weitere Informationen zu diesem Thema erkunden
Search for related information
Find training related to this topic
Explore ideas and give feedback